I’ve been skeptical of presets for most of my career. Not because they don’t work, but because they work until they don’t. You build a beautiful sky treatment, save it as a preset, apply it to the next landscape, and then spend five minutes dragging gradients around to make it fit a completely different horizon line. At that point you’ve burned half the time you were trying to save. For high-volume work, that friction adds up fast. So when Lightroom 11.4 shipped with what Adobe is calling adaptive preset behavior, I paid attention.
In this Matt Kloskowski tutorial, Watch the full tutorial on YouTube, he walks through three specific changes to how Lightroom handles presets, and the combination of them is genuinely different from anything presets have done before. The core shift is that presets can now use AI-calculated masks rather than fixed geometric ones, which means the mask recalculates for each new image instead of stamping the same shape onto every photo. For anyone processing batches of landscape, portrait, or product images, that’s a workflow problem that just quietly got solved.
Step 1: Understand Why Fixed Gradients Limited Presets
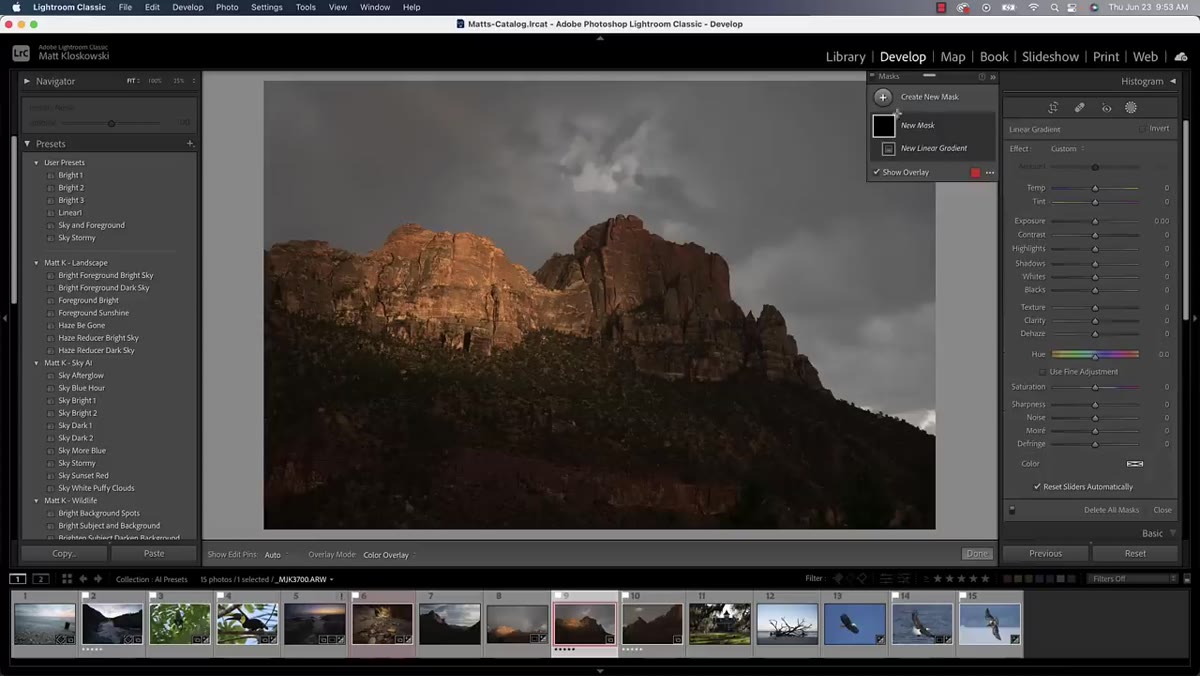 Linear gradient applied to sky on landscape photo
The old approach to a sky preset was straightforward: draw a linear gradient over the top portion of the image, push the exposure down, maybe lift the whites and clarity to add drama, then save the whole thing as a preset including the gradient. The problem showed up the moment you applied it to a different photo. Lightroom would drop that gradient in the exact same position, regardless of where the sky actually sat in the new image. A wide open prairie shot and a photo with a tree line at two-thirds height got the same fixed treatment.
Linear gradient applied to sky on landscape photo
The old approach to a sky preset was straightforward: draw a linear gradient over the top portion of the image, push the exposure down, maybe lift the whites and clarity to add drama, then save the whole thing as a preset including the gradient. The problem showed up the moment you applied it to a different photo. Lightroom would drop that gradient in the exact same position, regardless of where the sky actually sat in the new image. A wide open prairie shot and a photo with a tree line at two-thirds height got the same fixed treatment.
This wasn’t a dealbreaker for one-off edits where you planned to adjust everything manually anyway. But it killed the efficiency argument for presets entirely. If you have to reposition a gradient on every single image, you haven’t automated anything meaningful.
Step 2: Use AI Subject and Sky Selections as Your Mask Source
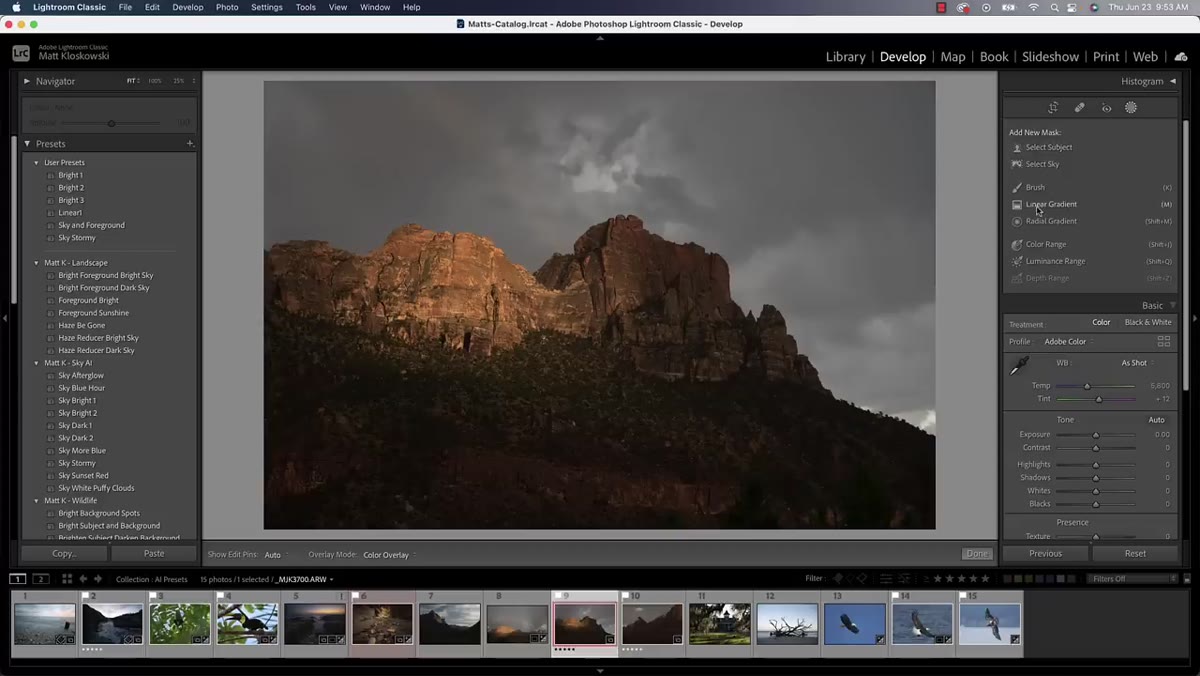 AI-powered sky selection active in Lightroom masking panel
The foundation of the new system is the AI-powered selection tools Adobe introduced in late 2021, specifically the Select Sky and Select Subject options inside the masking panel. Instead of drawing a gradient, you open masking, choose Select Sky, and Lightroom analyzes the actual pixel content of the image to build the mask. It handles irregular horizons, partial cloud cover, trees breaking into the frame. The mask fits the image it’s looking at rather than assuming a clean horizontal divide.
AI-powered sky selection active in Lightroom masking panel
The foundation of the new system is the AI-powered selection tools Adobe introduced in late 2021, specifically the Select Sky and Select Subject options inside the masking panel. Instead of drawing a gradient, you open masking, choose Select Sky, and Lightroom analyzes the actual pixel content of the image to build the mask. It handles irregular horizons, partial cloud cover, trees breaking into the frame. The mask fits the image it’s looking at rather than assuming a clean horizontal divide.
For the sky treatment Matt demonstrates, the workflow is: open the masking panel, select Sky, then make your tonal and color adjustments directly to that masked layer. Bring exposure down, push clarity up, adjust whites. The values you use here will become part of the preset, but the mask shape will not be permanently stored. That distinction is everything.
Step 3: Apply a Duplicate and Invert to Create a Foreground Mask
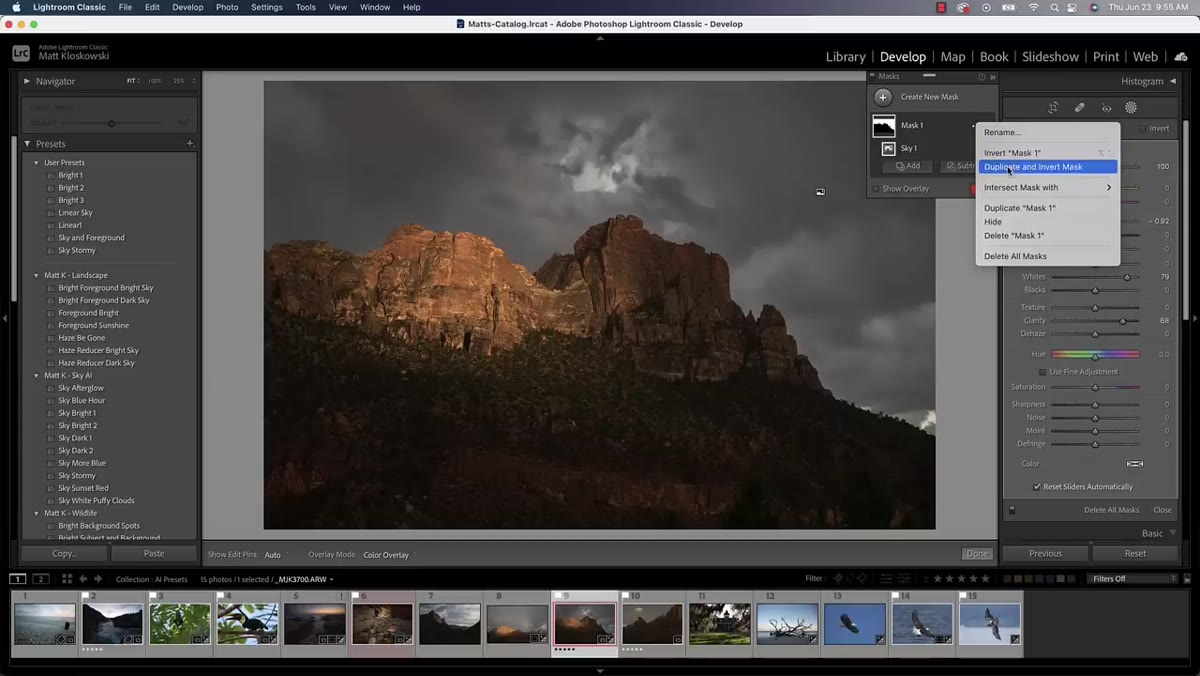 Duplicate and invert option shown in masking panel dropdown
This is the part that made me stop and rewatch. Once you have your sky mask active with adjustments applied, you can go into the mask options and choose “Duplicate and Invert.” What that does is create a second masked layer that covers everything the sky mask does not. Practically speaking, you now have a foreground mask ready for its own set of adjustments.
Duplicate and invert option shown in masking panel dropdown
This is the part that made me stop and rewatch. Once you have your sky mask active with adjustments applied, you can go into the mask options and choose “Duplicate and Invert.” What that does is create a second masked layer that covers everything the sky mask does not. Practically speaking, you now have a foreground mask ready for its own set of adjustments.
The critical detail here is how the duplication actually works. It isn’t simply flipping the sky mask shape and saving it. Lightroom is making a copy of the AI-powered mask instruction, so when this preset is applied to a new image, both masks get recalculated independently for that specific photo. The sky gets detected fresh, and the foreground is derived from that new detection. You end up with two masks, both adaptive, both accurate to the image you’re working on.
Step 4: Add Separate Adjustments to the Foreground Layer
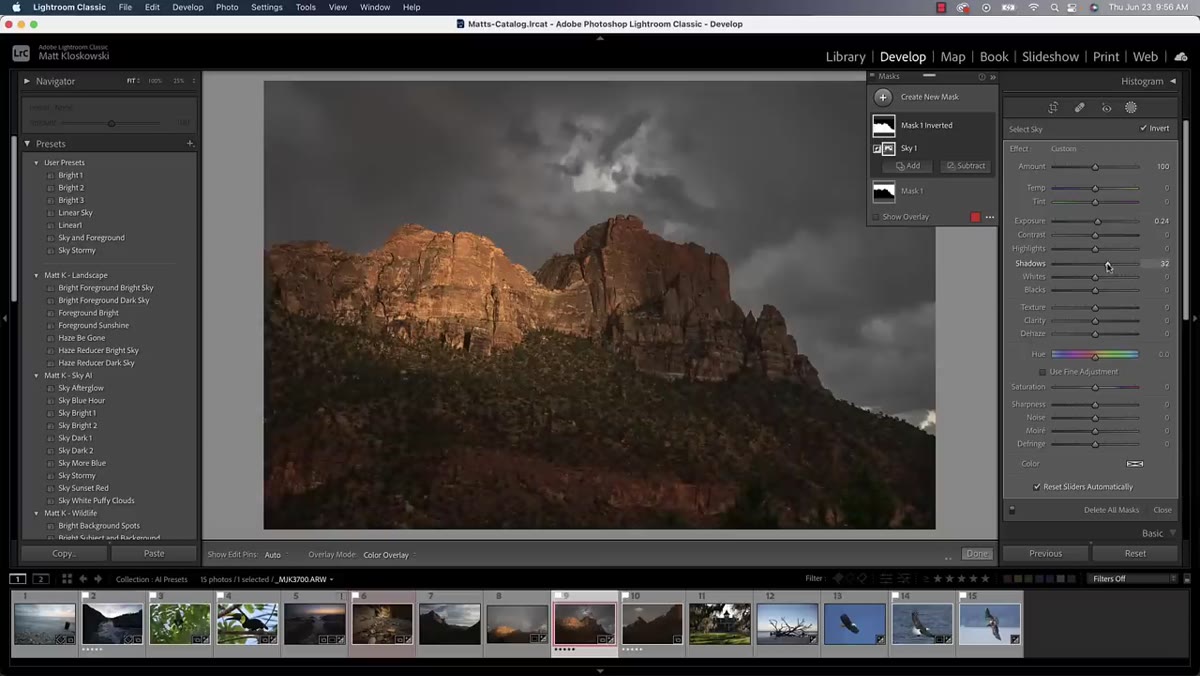 Foreground mask selected with exposure and shadow adjustments visible
With the foreground mask active, you can make a completely separate set of edits that apply only to the ground, water, grass, or whatever occupies the lower portion of the frame. Lift shadows to open up dark foregrounds, cool or warm the tones to contrast with the sky treatment, add a touch of dehaze if you want more separation. These adjustments live on their own layer and won’t bleed into the sky corrections you made in the previous step.
Foreground mask selected with exposure and shadow adjustments visible
With the foreground mask active, you can make a completely separate set of edits that apply only to the ground, water, grass, or whatever occupies the lower portion of the frame. Lift shadows to open up dark foregrounds, cool or warm the tones to contrast with the sky treatment, add a touch of dehaze if you want more separation. These adjustments live on their own layer and won’t bleed into the sky corrections you made in the previous step.
What you’re building at this point is a two-layer preset: one layer that intelligently finds and adjusts the sky, one layer that intelligently finds and adjusts everything else. The combined effect is a full-image treatment that actually accounts for the structure of the scene rather than painting the same look across the entire frame regardless of content.
Step 5: Save the Entire Mask Stack as a Single Preset
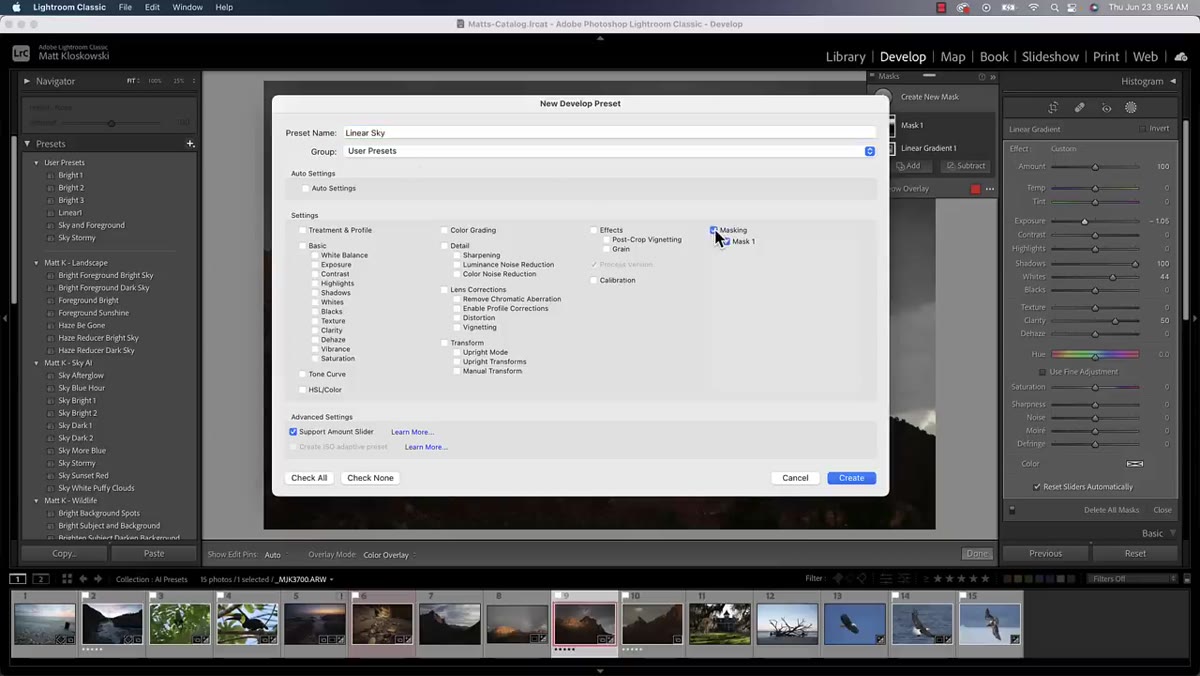 Preset save dialog showing masking options included
Once both layers are configured the way you want, saving this as a preset works the same way it always has. Name it, choose a group, and make sure the masking option is included in what gets saved. The preset will store the adjustment values, the mask types, and the relationship between the two layers. What it will not store is the specific mask shapes from the image you built it on.
Preset save dialog showing masking options included
Once both layers are configured the way you want, saving this as a preset works the same way it always has. Name it, choose a group, and make sure the masking option is included in what gets saved. The preset will store the adjustment values, the mask types, and the relationship between the two layers. What it will not store is the specific mask shapes from the image you built it on.
When you apply this preset to any other landscape photo, Lightroom runs the sky detection fresh on the new image, applies your sky adjustments to whatever it finds there, duplicates and inverts that detection to isolate the foreground, and drops your foreground adjustments onto that. The whole thing happens in the time it takes to click a preset thumbnail.
How I’d Extend This for Product and Commercial Work
The landscape use case is obvious, but the underlying mechanic applies anywhere Lightroom’s AI selection tools have reliable detection. For portrait work, you can build the same kind of stack using Subject selection for skin treatment and an inverted version for background control. The subject mask recalculates per image, so even if your subject moves position or changes framing between shots, the mask follows correctly.
For my own batch workflows, I’d be testing this heavily on e-commerce product sets where you consistently have a product against a clean background. The Subject selection would isolate the product for one set of adjustments and the invert would let you handle the background separately, all in a single preset click. That’s the kind of thing that turns a two-hour culling-and-editing session into something you can finish before lunch.
The single most important shift here isn’t any individual feature. It’s the move from presets as fixed templates to presets as adaptive instructions. A preset that understands what’s in the frame and responds accordingly is a fundamentally different tool from one that just reapplies stored settings. If you’ve written off presets because they never quite fit your images, this update is worth a serious second look.
Watch the full tutorial on YouTube to see Matt walk through the complete workflow, including the third feature area he covers that builds on everything described here.
Comments (2)
I've been looking for exactly this kind of tutorial. Perfect timing.
Really solid breakdown. This pairs perfectly with the compositing work I've been writing about.
Leave a Comment