
I built my first Photoshop action at 26, mostly out of desperation. I was three hours into manually applying the same sequence of adjustments to a batch of product shots and something clicked - not in Photoshop, but in my brain. There had to be a better way. Fifteen years and roughly 2,400 logged hours of saved time later, I can tell you that actions are the single most underused feature in Photoshop for working photographers and retouchers. The problem is that most people try them once, get a cryptic error message about a missing layer, and give up.
That’s exactly the problem Aaron Nace of PHLEARN tackles head-on in one of his clearest tutorials on the subject. Watch the full tutorial on YouTube before or after reading this breakdown - either way, you’ll get more out of it. Aaron’s approach is practical: he starts by showing you what bad actions look like (yes, including one of Photoshop’s own defaults), then walks you through building something clean and repeatable from the ground up.
The core lesson isn’t just how to press Record. It’s how to think about the steps you’re recording so they don’t break the moment the context changes. Here’s the full walkthrough.
Step 1: Open the Actions Panel
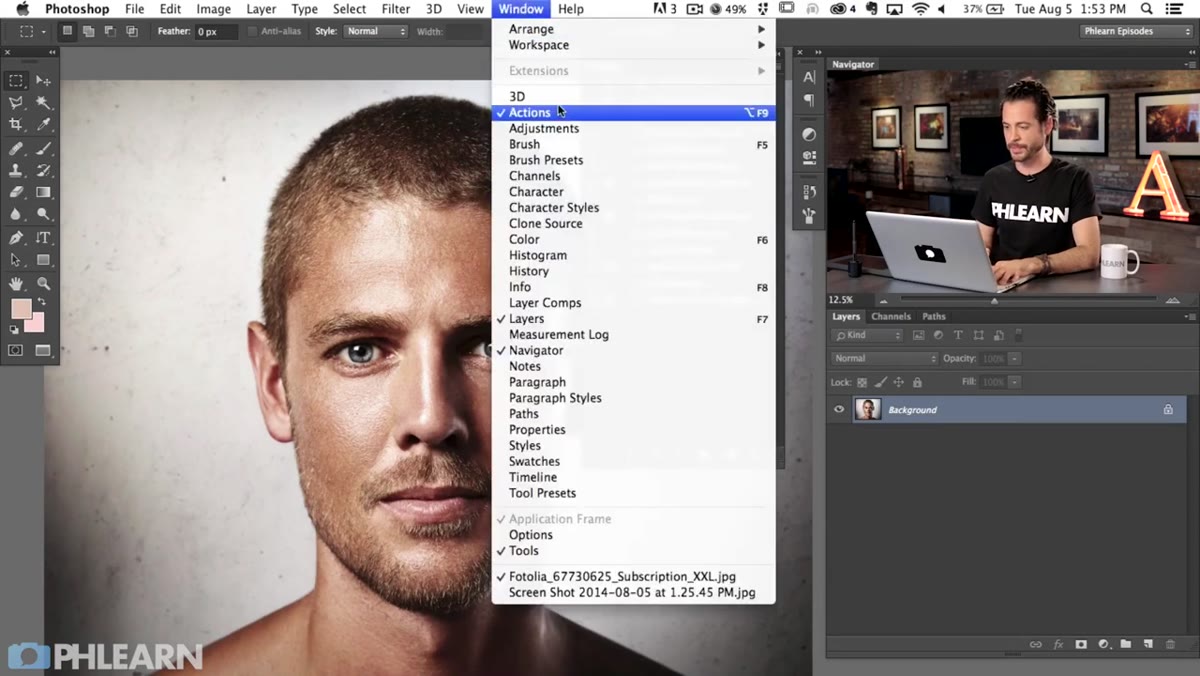 Window menu open with Actions panel option highlighted
Go to Window in the top menu bar and select Actions. If you’ve never opened this panel before, you’ll see Photoshop’s built-in default actions already sitting there in a folder. Leave those alone for now - they’re useful as a reference, but as Aaron demonstrates, some of them are poorly constructed and will throw errors when you run them on a fresh document. The panel has a small toolbar at the bottom with buttons for Stop, Record, Play, New Set (folder), and New Action.
Window menu open with Actions panel option highlighted
Go to Window in the top menu bar and select Actions. If you’ve never opened this panel before, you’ll see Photoshop’s built-in default actions already sitting there in a folder. Leave those alone for now - they’re useful as a reference, but as Aaron demonstrates, some of them are poorly constructed and will throw errors when you run them on a fresh document. The panel has a small toolbar at the bottom with buttons for Stop, Record, Play, New Set (folder), and New Action.
Step 2: Create a New Action Set (Folder)
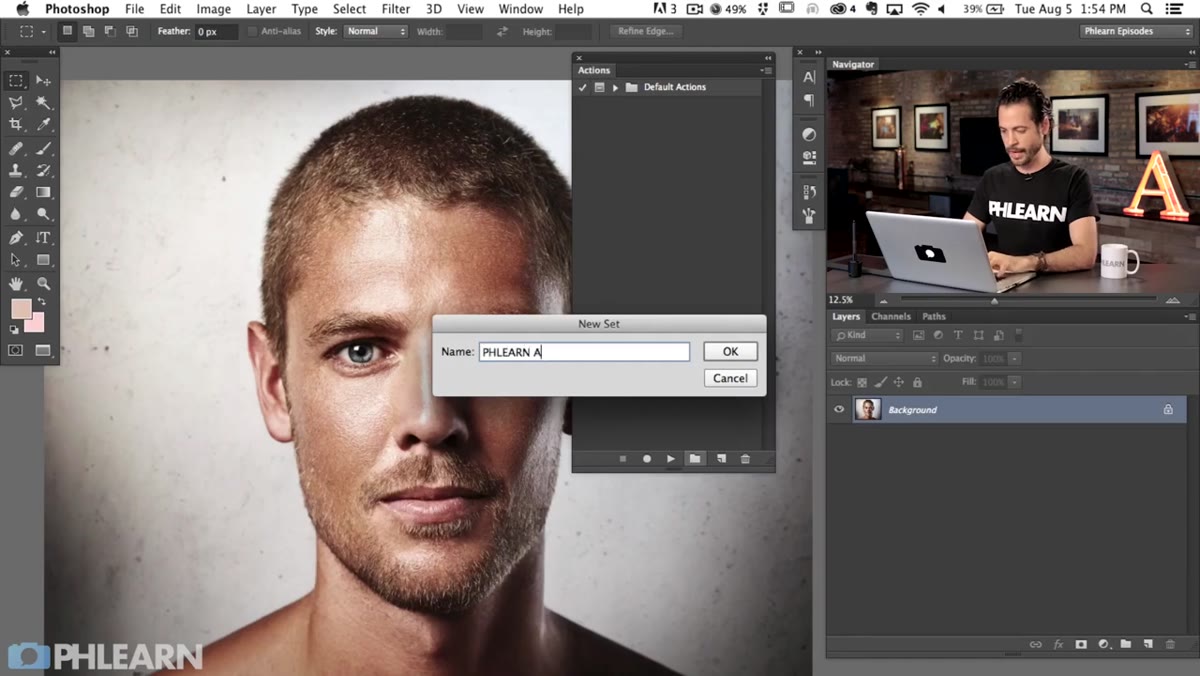 New Set dialog box with folder name being entered
Before recording anything, create an organizational folder to house your actions. Click the folder icon at the bottom of the Actions panel. Name it something descriptive - Aaron uses “PHLEARN Actions” as his example. This step matters more than it sounds. If you’re building actions for a specific client, project type, or workflow stage, keeping them in named sets means you can export, share, or import them later without losing your mind. I keep separate sets for product photography, portrait retouching, and export prep - color-coded in my notes, naturally.
New Set dialog box with folder name being entered
Before recording anything, create an organizational folder to house your actions. Click the folder icon at the bottom of the Actions panel. Name it something descriptive - Aaron uses “PHLEARN Actions” as his example. This step matters more than it sounds. If you’re building actions for a specific client, project type, or workflow stage, keeping them in named sets means you can export, share, or import them later without losing your mind. I keep separate sets for product photography, portrait retouching, and export prep - color-coded in my notes, naturally.
Step 3: Create and Name Your New Action, Then Hit Record
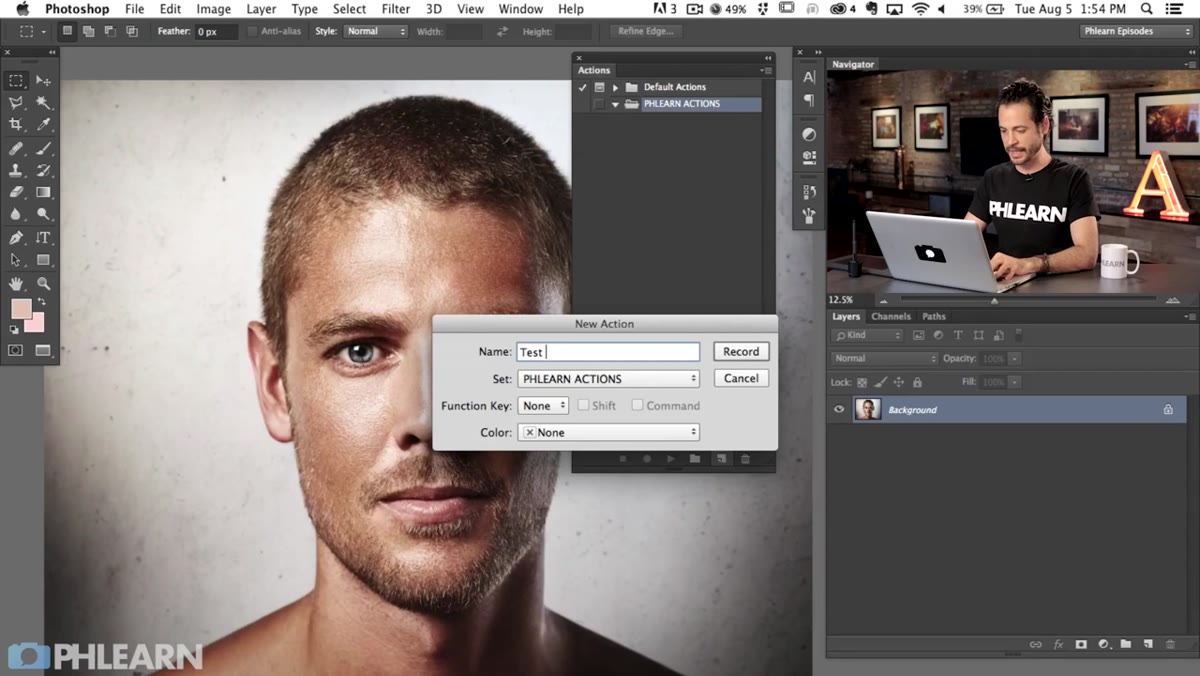 New Action dialog with name field and Record button visible
With your set selected, click the New Action icon (the page icon, next to the folder icon). Give it a specific name - not “action 1.” Something like “Duplicate and Rotate” describes what it does. You can also assign a function key shortcut and color label here, which becomes genuinely useful once you have a library of 20 or 30 actions. Hit Record. The red record button at the bottom of the panel will illuminate, and from this point forward, every step you take in Photoshop is being captured.
New Action dialog with name field and Record button visible
With your set selected, click the New Action icon (the page icon, next to the folder icon). Give it a specific name - not “action 1.” Something like “Duplicate and Rotate” describes what it does. You can also assign a function key shortcut and color label here, which becomes genuinely useful once you have a library of 20 or 30 actions. Hit Record. The red record button at the bottom of the panel will illuminate, and from this point forward, every step you take in Photoshop is being captured.
Step 4: Perform Your Steps - Photoshop Records Every Move
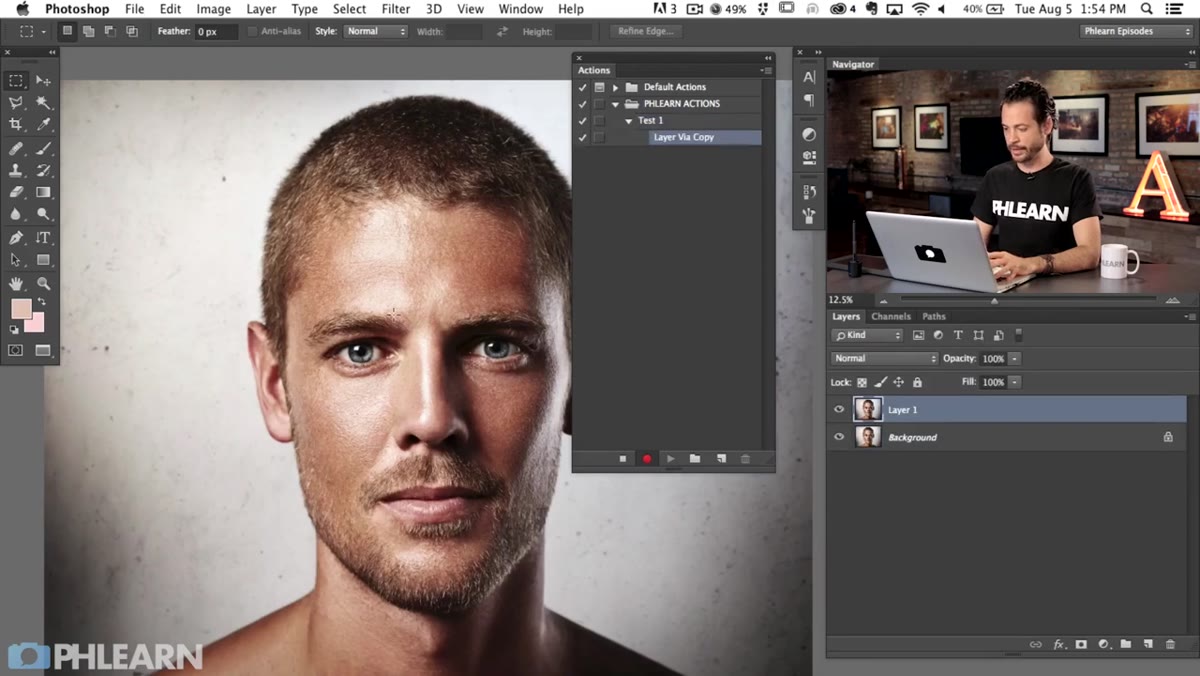 Actions panel showing recorded steps populating in real time
With recording active, work through the steps you want to automate. In Aaron’s example, he duplicates the active layer using Command+J (PC: Ctrl+J), which logs as “Layer Via Copy” in the panel. He then uses Command+T (Ctrl+T) to transform the layer and enters a specific rotation value. Every discrete action appears as a new line item in the action list as you work. Keep your steps deliberate here. Avoid clicking around aimlessly or selecting things you don’t intend to be part of the sequence - everything registers. If you make a mistake, you can delete individual steps from the action later by dragging them to the trash icon in the panel.
Actions panel showing recorded steps populating in real time
With recording active, work through the steps you want to automate. In Aaron’s example, he duplicates the active layer using Command+J (PC: Ctrl+J), which logs as “Layer Via Copy” in the panel. He then uses Command+T (Ctrl+T) to transform the layer and enters a specific rotation value. Every discrete action appears as a new line item in the action list as you work. Keep your steps deliberate here. Avoid clicking around aimlessly or selecting things you don’t intend to be part of the sequence - everything registers. If you make a mistake, you can delete individual steps from the action later by dragging them to the trash icon in the panel.
Step 5: Stop Recording and Test the Action
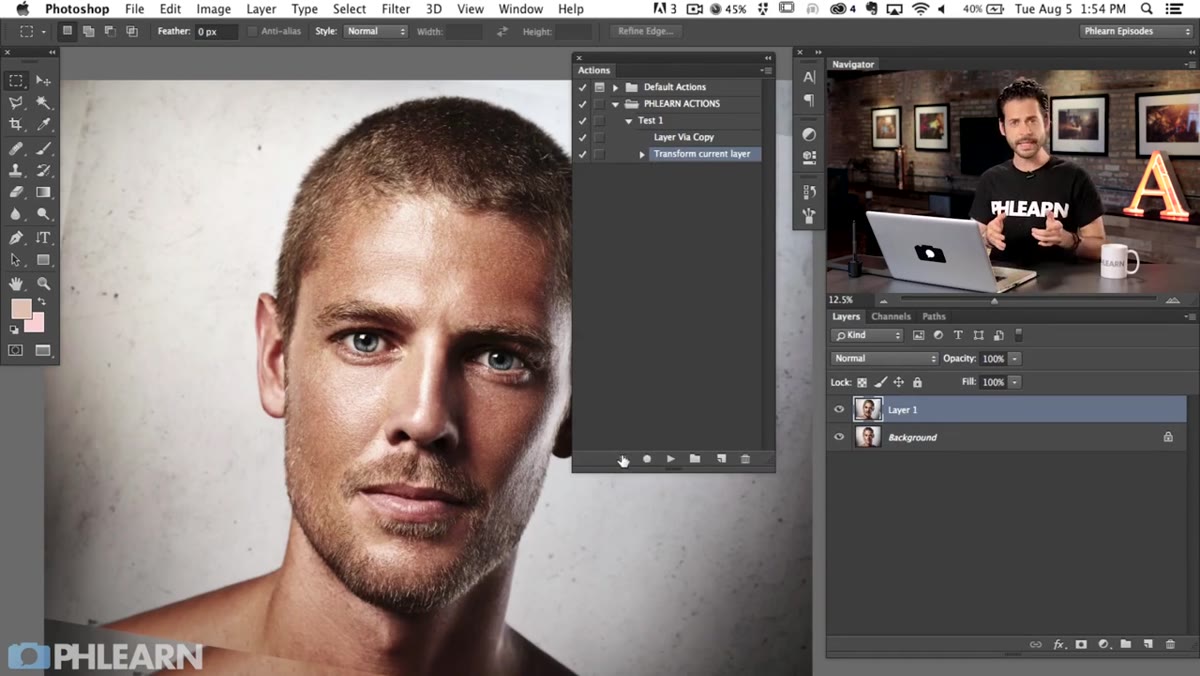 Stop button being clicked, completed action list showing two steps
Click the square Stop button when you’re done. Your action is now saved. To verify it works, select the action name in the panel and hit the Play button (the triangle). Photoshop will execute every recorded step in sequence. Aaron runs his test action multiple times in a row, stacking the results - each pass duplicates and rotates the layer again. Testing immediately after recording is a habit worth building. It’s far easier to troubleshoot a two-step action than a 15-step one you built and forgot about for a month.
Stop button being clicked, completed action list showing two steps
Click the square Stop button when you’re done. Your action is now saved. To verify it works, select the action name in the panel and hit the Play button (the triangle). Photoshop will execute every recorded step in sequence. Aaron runs his test action multiple times in a row, stacking the results - each pass duplicates and rotates the layer again. Testing immediately after recording is a habit worth building. It’s far easier to troubleshoot a two-step action than a 15-step one you built and forgot about for a month.
Step 6: Add More Steps by Resuming Recording
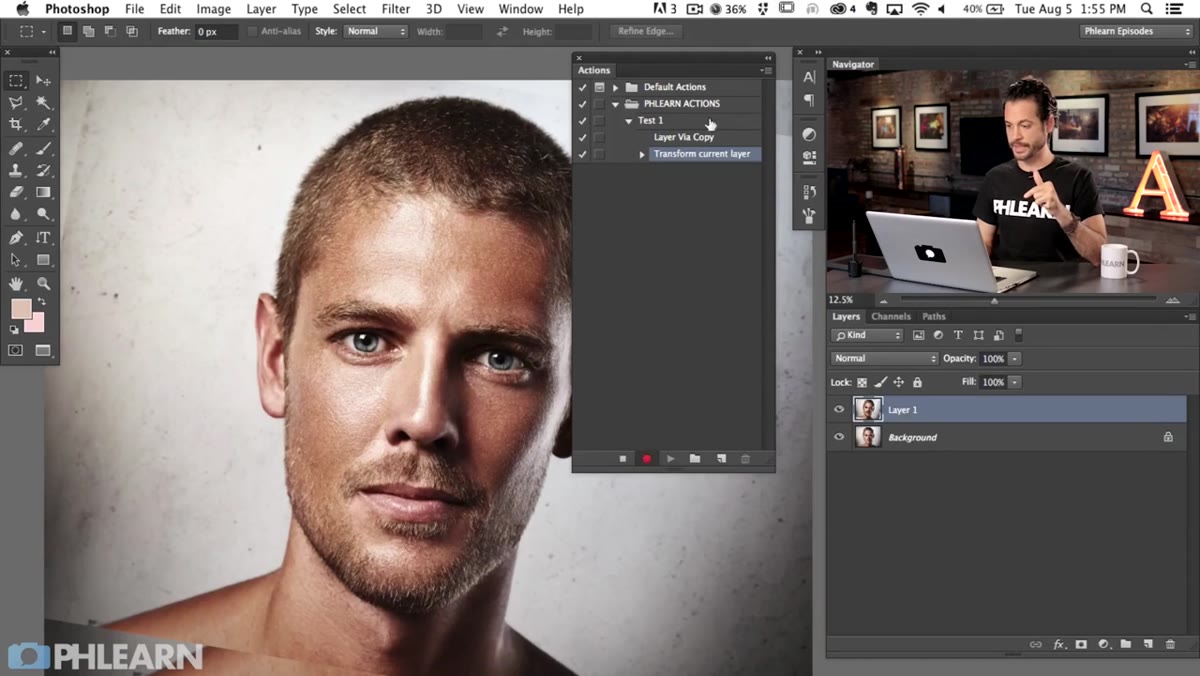 Record button re-engaged on existing action to append new steps
Here’s something that trips up beginners: you don’t have to capture everything in one sitting. Select your existing action in the panel, click the Record button again, and Photoshop will append new steps to the end of that action. Aaron demonstrates this by clicking on the background layer and using the Fill command to add a black fill to the canvas. This recorded as a separate step but belongs to the same action. This append-and-extend approach is how you build complex, multi-stage workflows incrementally without starting over every time.
Record button re-engaged on existing action to append new steps
Here’s something that trips up beginners: you don’t have to capture everything in one sitting. Select your existing action in the panel, click the Record button again, and Photoshop will append new steps to the end of that action. Aaron demonstrates this by clicking on the background layer and using the Fill command to add a black fill to the canvas. This recorded as a separate step but belongs to the same action. This append-and-extend approach is how you build complex, multi-stage workflows incrementally without starting over every time.
The Part the Tutorial Doesn’t Cover (But You’ll Hit Anyway)
The “layer doesn’t exist” error Aaron mentions at the start is the most common action failure, and the root cause is almost always that the action was recorded with a very specific document structure in mind - a certain number of layers, a specific layer named a specific thing - and then run on a document that looks different. The fix is to build actions around layer positions and states rather than layer names wherever possible. When you need to target a specific layer, merge or flatten to a known state before the critical steps. I also build in checkpoints for complex actions: short pauses where a dialog box appears and lets me confirm a setting before the next step fires. You enable this in Photoshop by clicking the toggle column next to any step in the action list - the small dialog icon. It slows things down slightly but saves hours of troubleshooting when an action behaves unexpectedly on an unusual file.
The biggest takeaway here is deceptively simple: record actions the same way you’d write instructions for someone who’s never opened your file. Assume nothing about what’s already selected, what’s named what, or how many layers exist. Build in that discipline from step one and your actions will run cleanly across hundreds of files without a single error popup.
Watch the full tutorial on YouTube - Aaron covers additional nuances around fills and layer targeting that are worth seeing in motion, even if you’ve been making actions for years.
Comments (2)
This is the kind of content that keeps me coming back.
Been doing this wrong for years apparently. Thanks for the wake-up call.
Leave a Comment