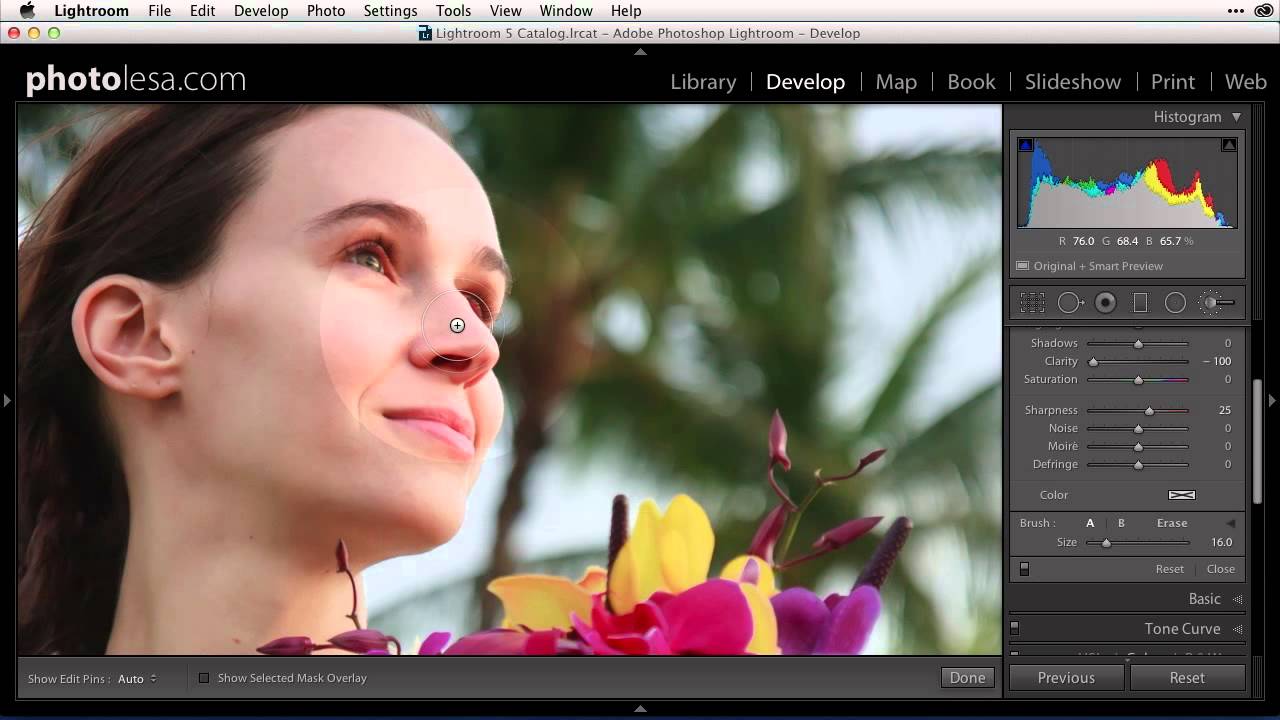
There’s a phase every retoucher goes through where they know what they want an image to look like but can’t quite connect that vision to specific slider values. I spent an embarrassing amount of time in that gap early in my career, guessing at Clarity adjustments and hoping for the best. What eventually pulled me out of it wasn’t a course or a book — it was slowing down and actually reading what existing presets were doing under the hood. In this CreativeLive tutorial, instructor Lisa Carney walks through exactly that approach inside Lightroom’s Adjustment Brush, and the insight she shares is deceptively simple: the presets Adobe ships with the software are a free masterclass in retouching logic, if you bother to look at the settings they use.
Watch the full tutorial on YouTube
The technique applies directly to portrait work, but the habit of reverse-engineering preset values transfers to everything — product retouching, beauty campaigns, e-commerce skin correction. Once you start reading presets instead of just applying them, you start building your own informed decisions instead of reaching for somebody else’s.
Step 1: Activate the Adjustment Brush and Open the Preset Menu
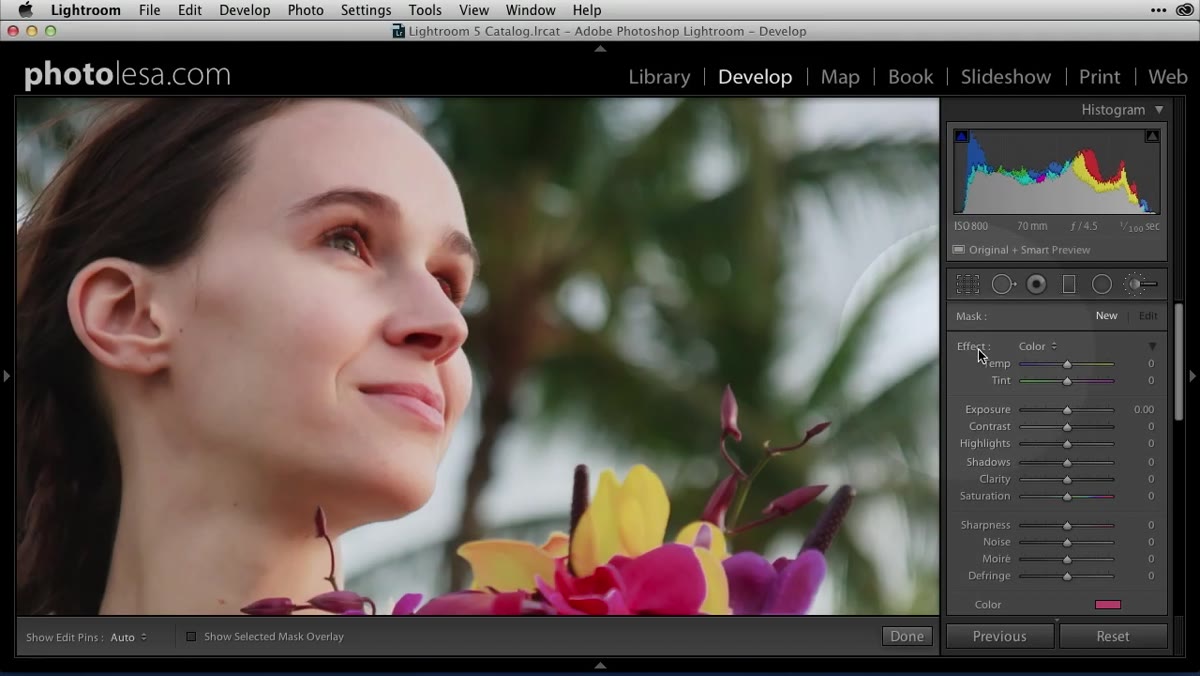 Adjustment brush active in Lightroom with Effect popup visible
With the Adjustment Brush active in Lightroom’s Develop module, look for the word “Effect” at the top of the brush panel on the right side. Next to it is a small popup menu arrow. Click that, and you’ll see a full list of built-in presets — things like Soften Skin, Teeth Whitening, Iris Enhance, and more. These aren’t third-party additions. Adobe ships these with Lightroom, and most people scroll past them to grab a slider. Don’t.
Adjustment brush active in Lightroom with Effect popup visible
With the Adjustment Brush active in Lightroom’s Develop module, look for the word “Effect” at the top of the brush panel on the right side. Next to it is a small popup menu arrow. Click that, and you’ll see a full list of built-in presets — things like Soften Skin, Teeth Whitening, Iris Enhance, and more. These aren’t third-party additions. Adobe ships these with Lightroom, and most people scroll past them to grab a slider. Don’t.
The list is longer than most people expect. The point here isn’t to use every preset — it’s to treat this menu as a reference library. You’re about to open them one at a time and read what they’re actually doing.
Step 2: Click a Preset and Read the Sliders
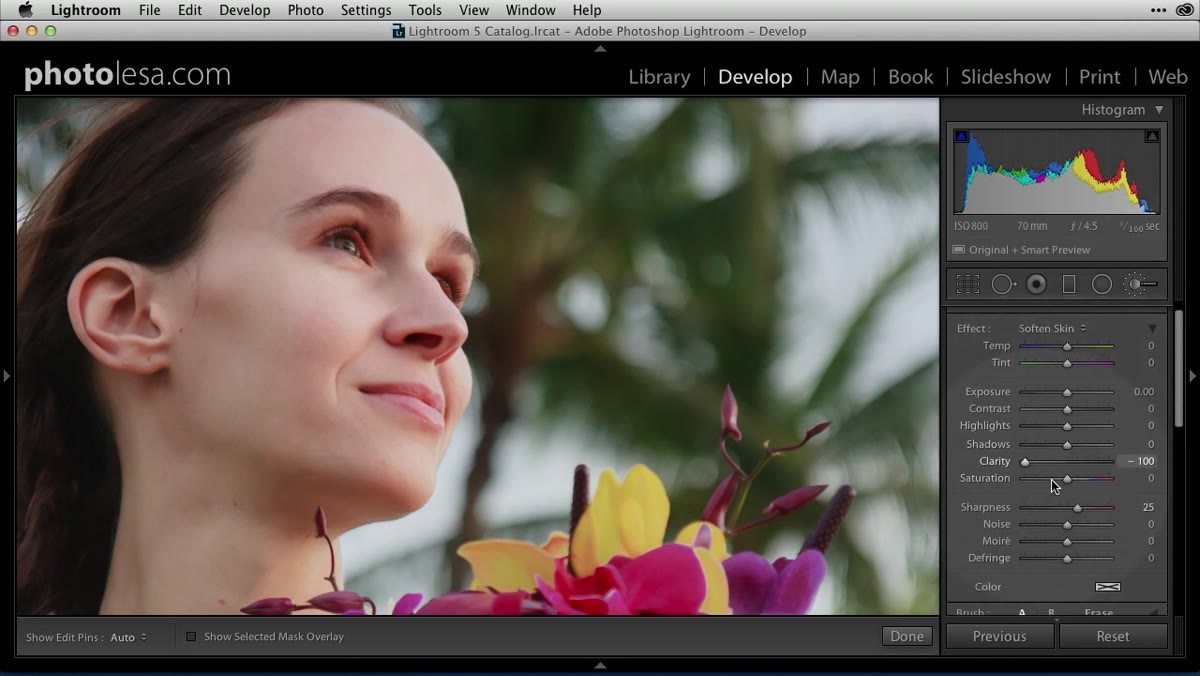 Soften Skin preset selected showing negative Clarity and slight Sharpness values
Click “Soften Skin” and then look up at the expanded slider panel at the top of the brush options. The preset will populate specific values across Clarity, Sharpness, and potentially other parameters. What you’ll find with Soften Skin is that it pulls Clarity into negative territory — which diffuses contrast at the edge level and creates that soft, painterly quality — while simultaneously adding a small positive Sharpness value to compensate. That combination keeps skin from going mushy.
Soften Skin preset selected showing negative Clarity and slight Sharpness values
Click “Soften Skin” and then look up at the expanded slider panel at the top of the brush options. The preset will populate specific values across Clarity, Sharpness, and potentially other parameters. What you’ll find with Soften Skin is that it pulls Clarity into negative territory — which diffuses contrast at the edge level and creates that soft, painterly quality — while simultaneously adding a small positive Sharpness value to compensate. That combination keeps skin from going mushy.
This is the learning moment. If someone had just told me “lower Clarity for soft skin,” I’d have overdone it. The preset shows you the counterbalance. Negative Clarity needs a Sharpness anchor, otherwise your retouching starts to look like it was done through a fog filter. Adobe’s engineers figured this out, and they left the answer right there in the preset values.
Step 3: Try Teeth Whitening and Notice the Unexpected Choice
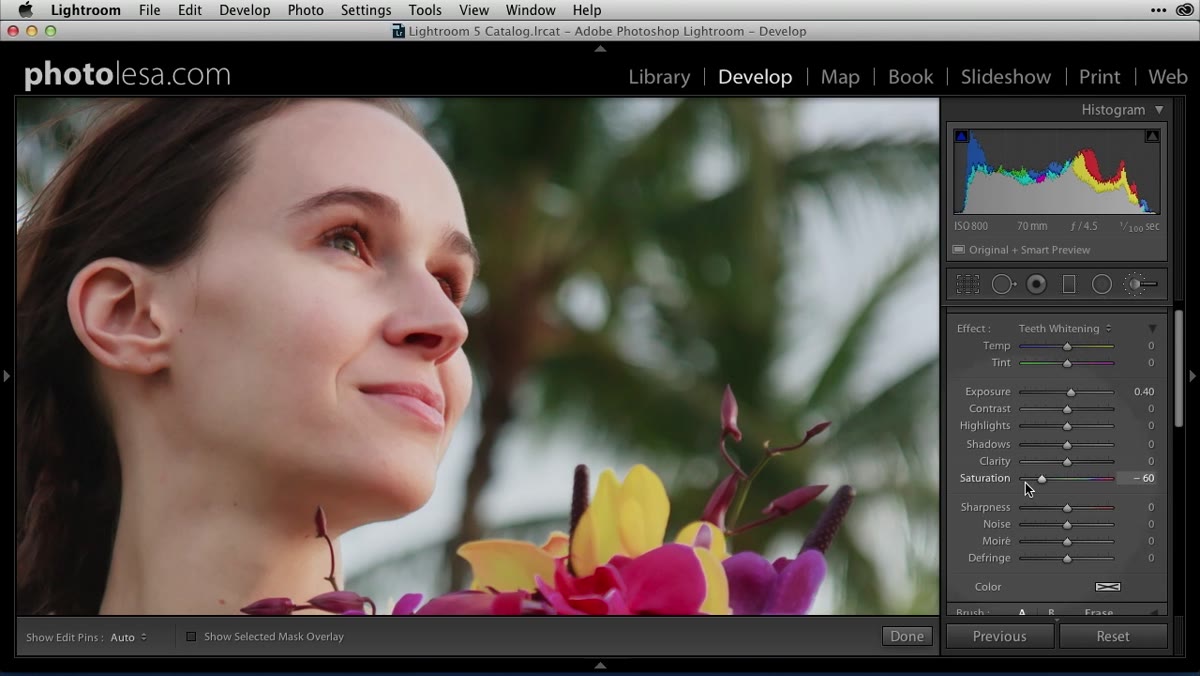 Teeth Whitening preset showing negative Saturation instead of increased Exposure
Now click Teeth Whitening and look at the sliders again. The instinctive approach to brightening teeth is to increase Exposure in that area. But the preset doesn’t lead with that. It drops Saturation instead — pulling the yellow tone out of the enamel rather than just blasting brightness at it. The effect reads as whiter and cleaner because it addresses the actual problem, which is color cast, not luminosity.
Teeth Whitening preset showing negative Saturation instead of increased Exposure
Now click Teeth Whitening and look at the sliders again. The instinctive approach to brightening teeth is to increase Exposure in that area. But the preset doesn’t lead with that. It drops Saturation instead — pulling the yellow tone out of the enamel rather than just blasting brightness at it. The effect reads as whiter and cleaner because it addresses the actual problem, which is color cast, not luminosity.
This is the kind of thing that takes people years to figure out on their own. Set aside some time — this tutorial suggests a Friday evening with your preferred drink, which honestly isn’t bad advice — and click through each preset systematically. Write down what combination of sliders each one uses. You’ll start to see patterns in how professional retouching decisions are made.
Step 4: Resize Your Brush with Bracket Keys, Not the Panel
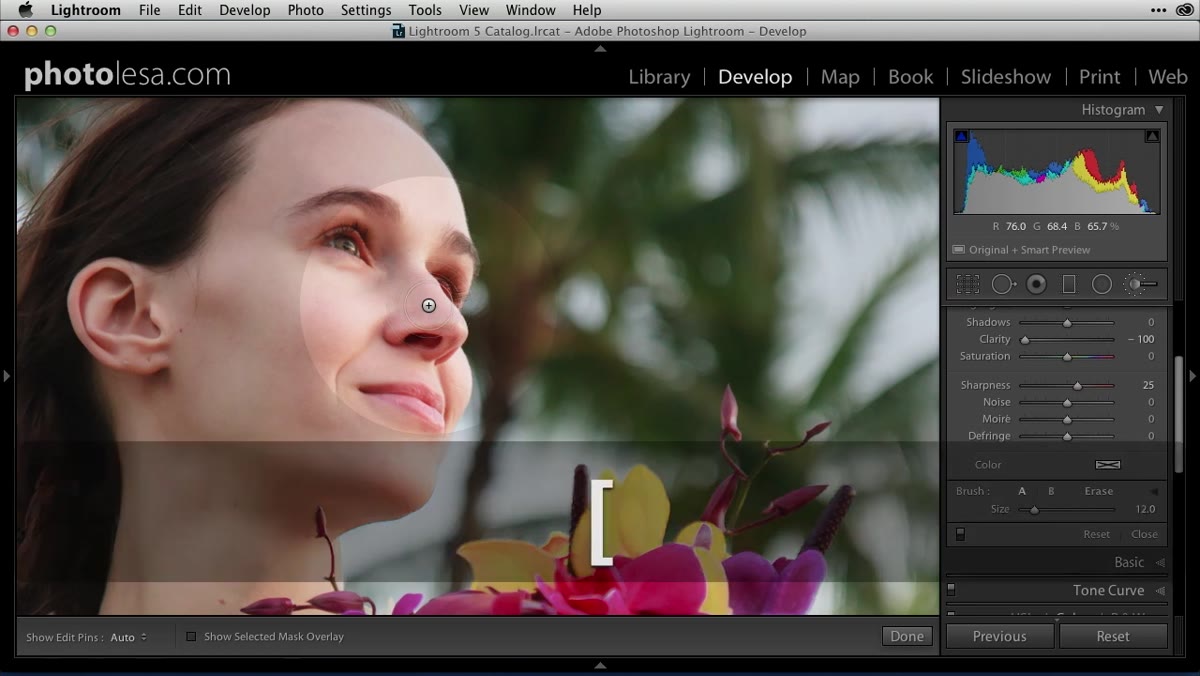 Brush resizing with bracket keys showing two rings around cursor
Once you’ve selected a preset and you’re ready to paint it onto the image, resize your brush using the left and right bracket keys on your keyboard rather than the panel slider. Left bracket shrinks the brush, right bracket grows it. This keeps your hands on the image area instead of commuting back and forth to the panel. If you can’t find the bracket keys, they sit directly to the right of the P key.
Brush resizing with bracket keys showing two rings around cursor
Once you’ve selected a preset and you’re ready to paint it onto the image, resize your brush using the left and right bracket keys on your keyboard rather than the panel slider. Left bracket shrinks the brush, right bracket grows it. This keeps your hands on the image area instead of commuting back and forth to the panel. If you can’t find the bracket keys, they sit directly to the right of the P key.
You’ll notice two concentric rings around the brush cursor. The inner ring marks the full-effect zone. The gap between the inner and outer ring is the feather zone — the transition area where the adjustment gradually fades out. That feather is what prevents hard visible edges around your paint strokes. Keep feather at the default unless you’re doing very precise edge work.
Step 5: Paint with the Mask Overlay On
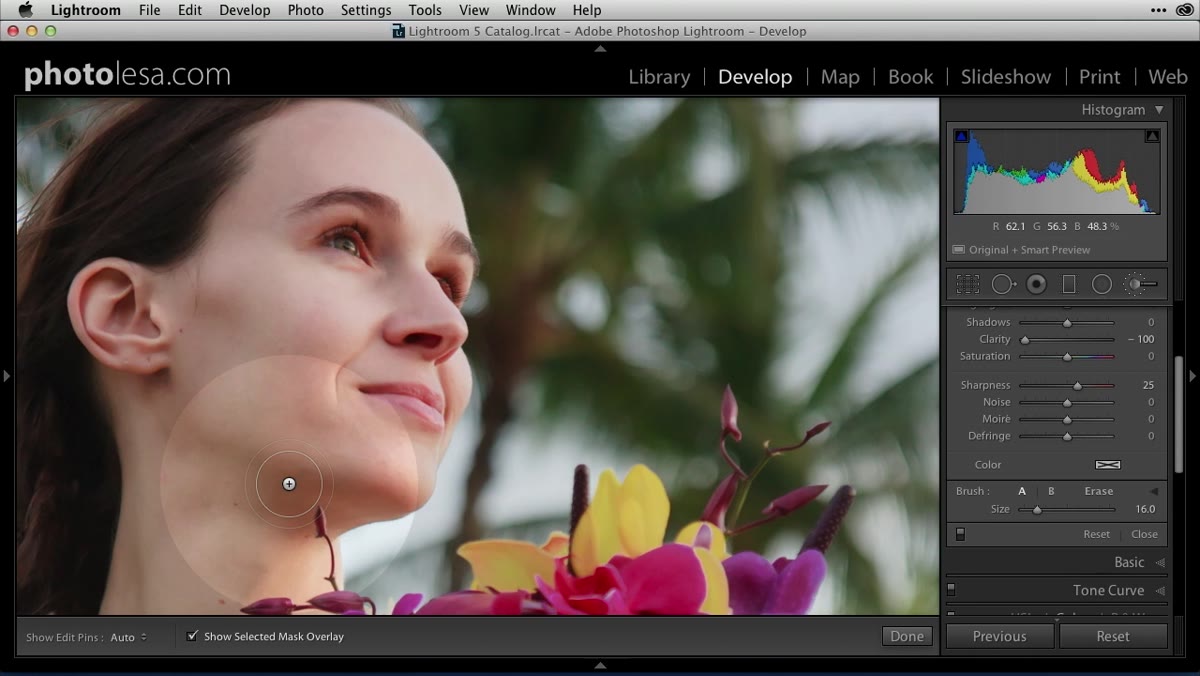 Red mask overlay showing painted skin areas on portrait
Before you start painting, toggle on the mask overlay. There’s a “Show Selected Mask Overlay” checkbox at the bottom of the image area, or you can press O on your keyboard. This renders your painted area in a red tint as you work, which makes it much easier to see where you’ve been and where you’ve missed.
Red mask overlay showing painted skin areas on portrait
Before you start painting, toggle on the mask overlay. There’s a “Show Selected Mask Overlay” checkbox at the bottom of the image area, or you can press O on your keyboard. This renders your painted area in a red tint as you work, which makes it much easier to see where you’ve been and where you’ve missed.
You don’t need to paint in a single continuous stroke. Release the mouse, reposition, and continue. The mask accumulates. Paint across the skin areas you want to soften, avoiding areas where you want texture to stay sharp — eyebrows, eyelashes, lips, and the background.
Step 6: Erase Mistakes with a Modifier Key, Not the Panel Button
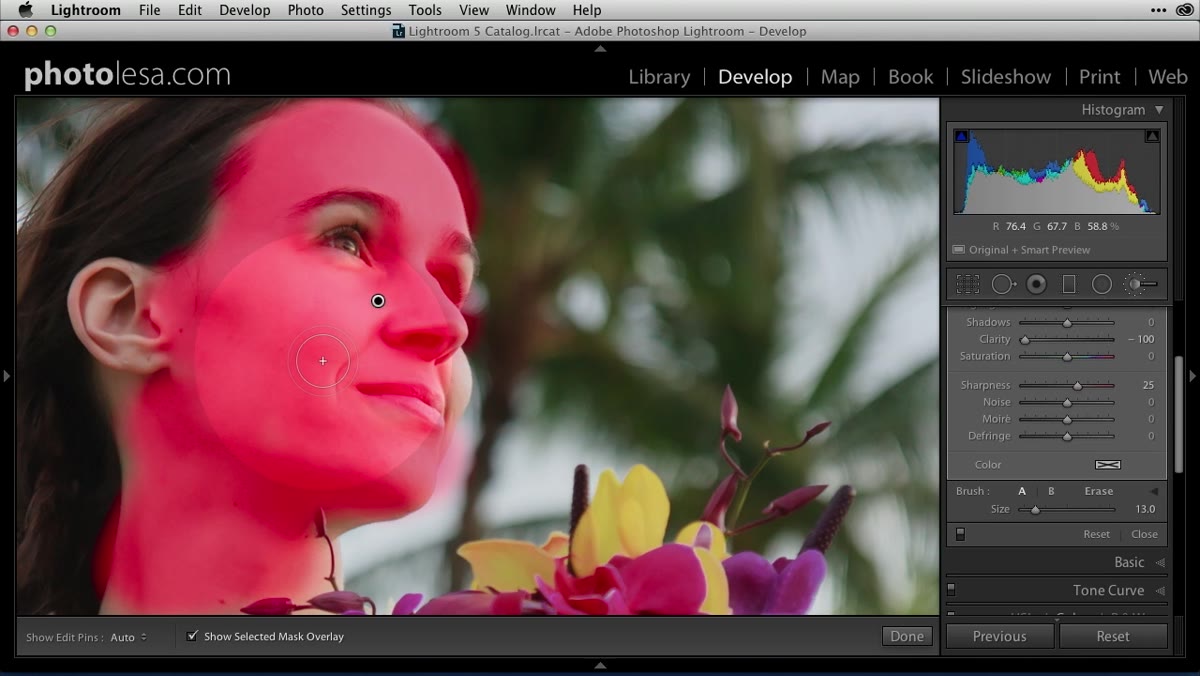 Minus sign in brush center indicating subtract/erase mode is active
If you paint over an area you didn’t intend to hit, don’t click over to the “Erase” button in the panel. That trip costs you time and breaks your rhythm. Instead, hold Option on a Mac or Alt on a PC while you’re still over the image. The brush cursor will display a minus sign in the center, indicating it’s now in subtract mode. Paint over the area you want to undo, then release the modifier key to return to additive mode.
Minus sign in brush center indicating subtract/erase mode is active
If you paint over an area you didn’t intend to hit, don’t click over to the “Erase” button in the panel. That trip costs you time and breaks your rhythm. Instead, hold Option on a Mac or Alt on a PC while you’re still over the image. The brush cursor will display a minus sign in the center, indicating it’s now in subtract mode. Paint over the area you want to undo, then release the modifier key to return to additive mode.
This one keyboard modifier genuinely changes how fluidly you can work. You’re never locked into a stroke. The ability to add and subtract from a mask in real time without touching the panel is the difference between retouching that feels like drawing and retouching that feels like filling out a form.
What I’d Add From My Own Work
The reverse-engineering habit this tutorial builds is exactly how I approach any unfamiliar preset or action that lands in my workflow. Before I apply something to a client’s images, I open it up and see what it’s actually doing. On a recent beauty campaign, I caught a third-party skin preset that was applying a subtle green hue shift alongside the expected Clarity reduction. Fine for certain skin tones, disastrous for others. Because I’d developed the habit of reading presets rather than just trusting them, I caught it in the test phase instead of after delivery.
The deeper skill here isn’t Lightroom-specific. It’s learning to treat every preset, action, or automated step as a transparent process rather than a black box. That mindset compounds over time in ways that are hard to overstate.
The single most useful thing this tutorial offers is permission to treat shipped software presets as study material rather than just shortcuts. Adobe’s engineers made deliberate decisions about every value in those presets. Reading those decisions teaches you retouching logic faster than almost anything else. Watch the full tutorial on YouTube and spend time with the preset menu open before you even touch a portrait.
Comments
Leave a Comment