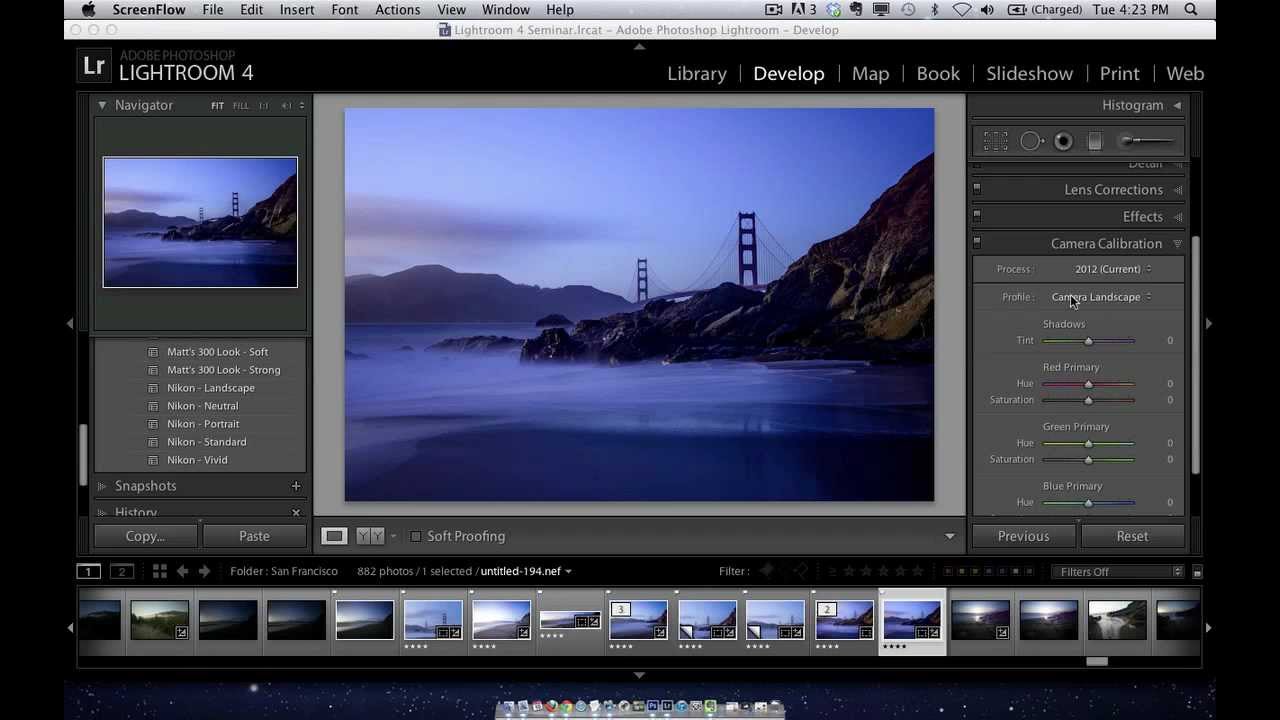
Every photographer who shoots raw has had the same deflating moment. You nail a landscape shot. The back of your camera shows a punchy, saturated image with great contrast. You import it into Lightroom, and suddenly it looks like a flat, lifeless file that makes you question your career choices. Nothing changed in the field. What changed is that Lightroom stripped out the picture style your camera was applying to the JPEG preview and replaced it with its own default Adobe Standard profile. You’ve been staring at a lie on your camera’s LCD this whole time.
I’ve been dealing with this for years, mostly by correcting it after the fact, one session at a time. That’s the inefficient version. In this KelbyOne tutorial, Watch the full tutorial on YouTube, the presenter walks through a smarter approach: turning camera calibration profiles into actual Lightroom presets and applying them at the point of import. It sounds minor until you realize it collapses what used to be a correction step for every single shoot into something that happens automatically while your files are still copying off the card.
For anyone who processes high volumes of images, this kind of friction reduction adds up fast. I track this stuff obsessively. A two-minute correction step repeated across 50 shoots a year is not a rounding error.
Step 1: Find the Camera Calibration Panel in the Develop Module
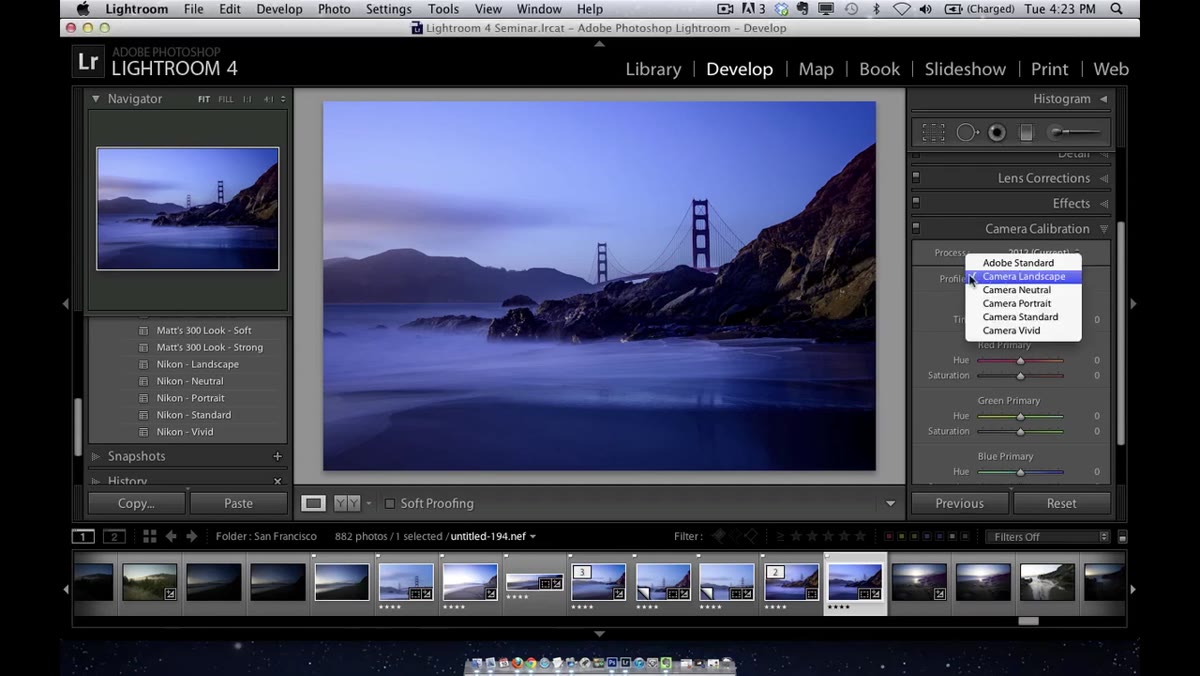 Camera calibration panel open in Lightroom’s Develop module
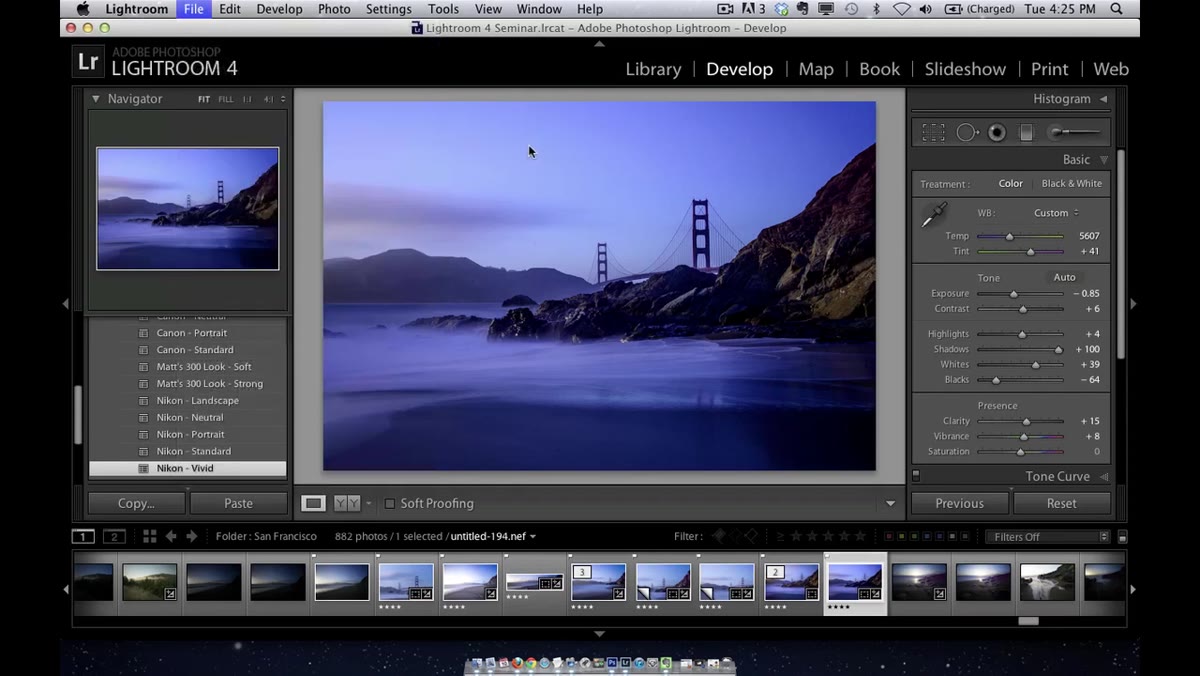
Open a raw file in Lightroom’s Develop module and scroll all the way down in the right-hand panel. At the bottom you’ll find the Camera Calibration panel. If you’ve never opened it, you’re not alone. Most people spend their entire Lightroom lives in HSL, Tone Curve, and Basic. The Camera Calibration panel is easy to ignore, but it contains something important: the Profile dropdown.
Camera calibration panel open in Lightroom’s Develop module
Open a raw file in Lightroom’s Develop module and scroll all the way down in the right-hand panel. At the bottom you’ll find the Camera Calibration panel. If you’ve never opened it, you’re not alone. Most people spend their entire Lightroom lives in HSL, Tone Curve, and Basic. The Camera Calibration panel is easy to ignore, but it contains something important: the Profile dropdown.
This only works with raw files. JPEG files won’t show meaningful options here because the camera has already baked in its processing. If you try this on a JPEG, you’ll see the dropdown but it won’t do much worth talking about. Stick to raw.
Step 2: Understand What the Profile Options Actually Are
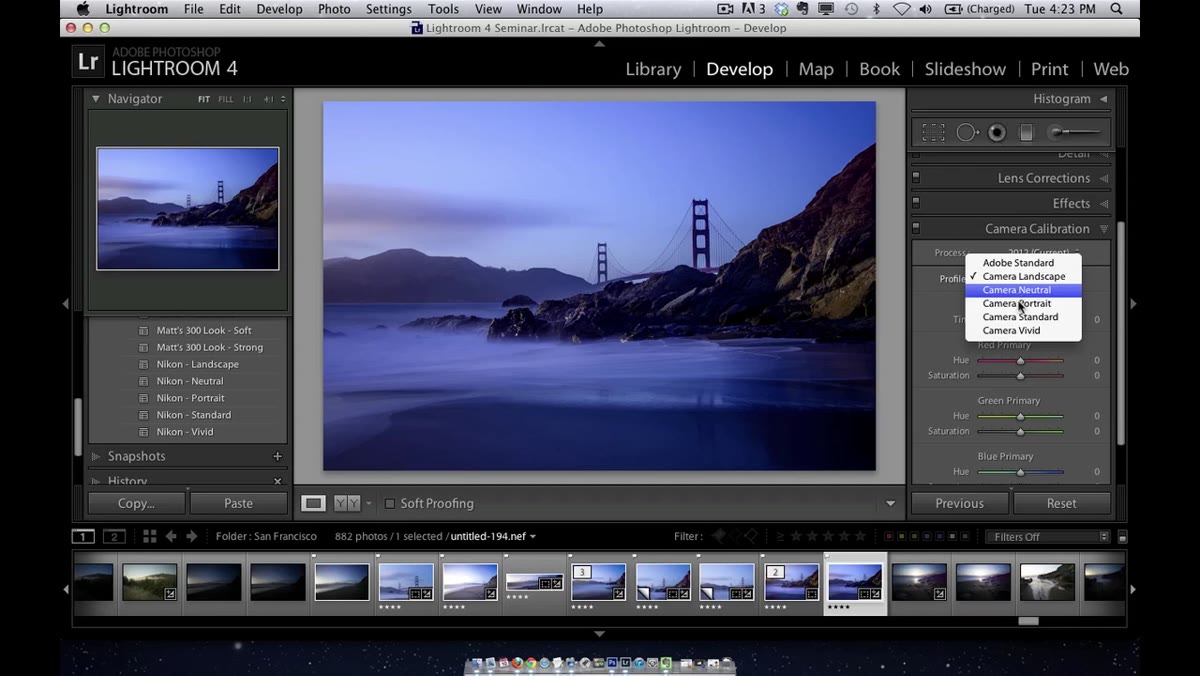 Profile dropdown showing camera-specific options like Landscape, Portrait, Vivid
When you click the Profile dropdown, you’ll see options like Camera Landscape, Camera Neutral, Camera Portrait, Camera Standard, and Camera Vivid. The names match the picture styles available inside your camera body. If you’re shooting Nikon, you’ll see Nikon’s picture styles. Canon shooters will see Canon’s equivalents. The point is these profiles simulate what your camera would have shown you on the LCD if you’d been shooting JPEG.
Profile dropdown showing camera-specific options like Landscape, Portrait, Vivid
When you click the Profile dropdown, you’ll see options like Camera Landscape, Camera Neutral, Camera Portrait, Camera Standard, and Camera Vivid. The names match the picture styles available inside your camera body. If you’re shooting Nikon, you’ll see Nikon’s picture styles. Canon shooters will see Canon’s equivalents. The point is these profiles simulate what your camera would have shown you on the LCD if you’d been shooting JPEG.
Each profile adds a different flavor of contrast and color saturation. Landscape and Vivid tend to push things in a direction most photographers actually want to go, with richer colors and better micro-contrast out of the gate. Neutral and Standard are closer to the flat Adobe default. The presenter is honest about this: he’s never heard anyone rave about Neutral. It’s mostly a placeholder.
Step 3: Create a Preset from a Profile Setting
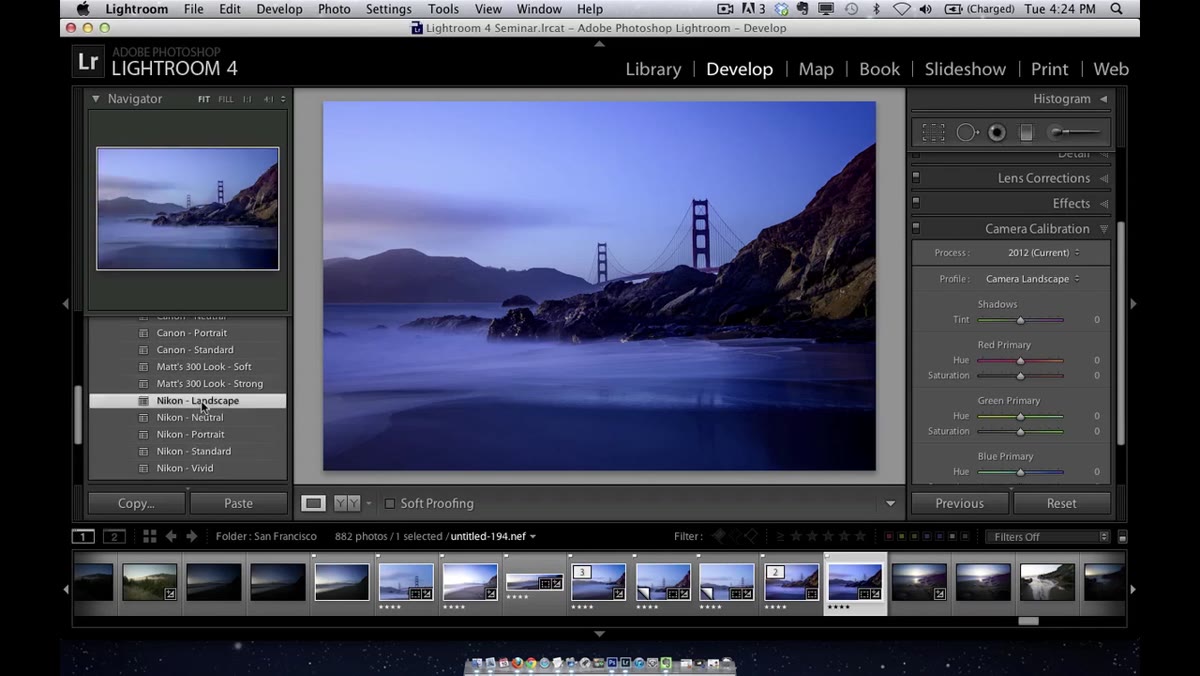 Preset panel showing a profile-based preset being clicked to change the camera profile
Once you’ve selected the profile you want, go to the Presets panel on the left side of the Develop module and create a new preset. The key thing to understand here is that this preset is not a complex recipe. It’s not a combination of tone curves, HSL shifts, and vignetting. It’s a single-setting preset that does exactly one thing: changes the Profile dropdown to a specific value.
Preset panel showing a profile-based preset being clicked to change the camera profile
Once you’ve selected the profile you want, go to the Presets panel on the left side of the Develop module and create a new preset. The key thing to understand here is that this preset is not a complex recipe. It’s not a combination of tone curves, HSL shifts, and vignetting. It’s a single-setting preset that does exactly one thing: changes the Profile dropdown to a specific value.
That simplicity is actually its strength. When you apply it, it won’t override any of your exposure adjustments or creative edits. It just sets the baseline profile. The presenter frames these as shortcuts rather than replacements for your normal editing workflow, and that framing is correct. Think of it as setting the starting point for a particular type of shoot, not as a finished look.
Step 4: Use the Navigator Panel to Preview Profiles Before Committing
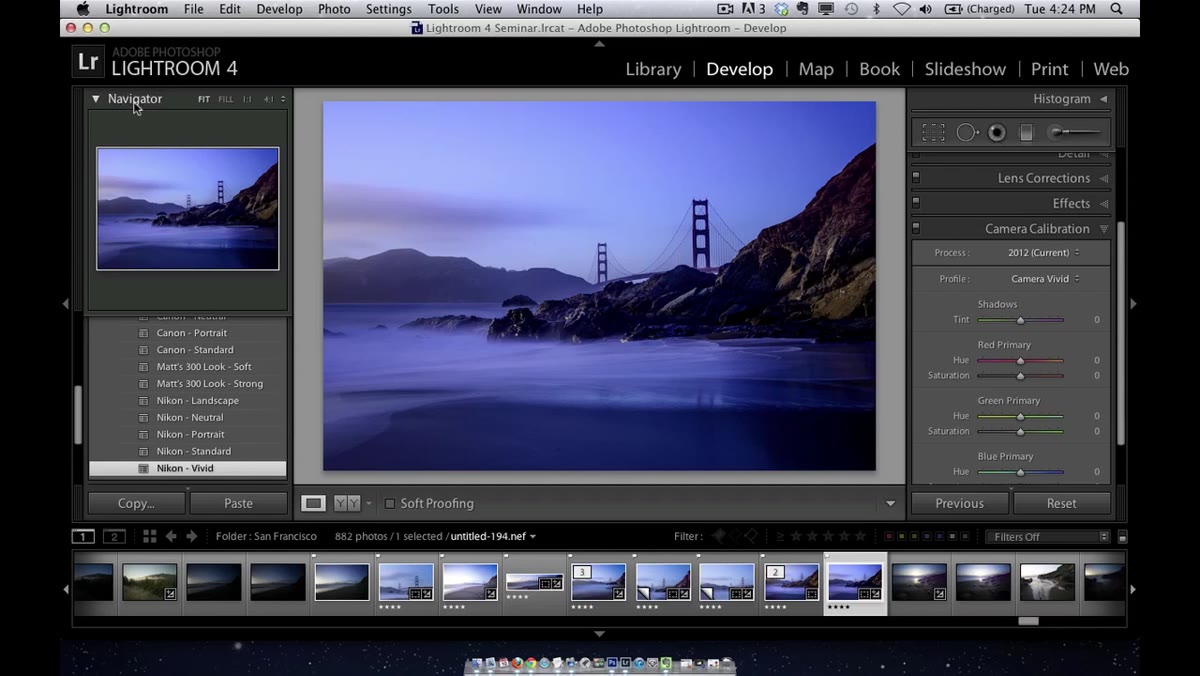 Navigator panel showing live preview as cursor hovers over presets
Here’s a workflow improvement that’s easy to miss. If you have the Navigator panel open at the top of the left panel column, you can hover over your profile presets in the Presets panel and see a live preview in the Navigator without clicking anything. The main image in the center of your screen doesn’t change until you actually click, but the Navigator thumbnail updates in real time as your cursor moves.
Navigator panel showing live preview as cursor hovers over presets
Here’s a workflow improvement that’s easy to miss. If you have the Navigator panel open at the top of the left panel column, you can hover over your profile presets in the Presets panel and see a live preview in the Navigator without clicking anything. The main image in the center of your screen doesn’t change until you actually click, but the Navigator thumbnail updates in real time as your cursor moves.
This is the same reason the presenter originally built white balance presets: because you can’t hover over a dropdown and see the change, you have to click each option and wait. By turning those settings into presets, you get visual feedback before committing. It’s a small thing, but when you’re trying to decide between Landscape and Vivid on an image that might go either way, seeing a thumbnail comparison in two seconds beats clicking back and forth.
Step 5: Apply Your Profile Preset During Import
 Import dialog with Apply During Import panel showing preset dropdown
This is where the whole system earns its place in a real workflow. When you open Lightroom’s Import dialog, look at the right-hand panel for the “Apply During Import” section. There’s a Develop Settings dropdown there. This is where you can select any saved preset and have Lightroom apply it automatically to every photo as it imports.
Import dialog with Apply During Import panel showing preset dropdown
This is where the whole system earns its place in a real workflow. When you open Lightroom’s Import dialog, look at the right-hand panel for the “Apply During Import” section. There’s a Develop Settings dropdown there. This is where you can select any saved preset and have Lightroom apply it automatically to every photo as it imports.
So if you spent the morning shooting a landscape session, you select your Camera Landscape preset before clicking Import. Lightroom processes every raw file with that profile already applied. You open your first image in the Develop module and it already has contrast, color, and character. You’re not starting from a flat Adobe Standard file and wondering where your shot went. The correction that used to happen reactively now happens proactively, built into the import step you were already doing anyway.
A Note on Stacking This With Your Existing Presets
After watching this tutorial, I started thinking about how this fits into batch processing setups more broadly. The profile preset works cleanly as a foundation layer because it only touches one setting. That means you can build on top of it, either with additional presets applied in sequence during a session, or by starting with this baseline and running a more complex action on top for specific deliverables.
For anyone processing large e-commerce or advertising batches, the import-level application is particularly valuable. I’ve run afternoons where 400-plus product shots came in from a client’s photographer and every single file needed a consistent starting point before any color correction happened. Having that starting point baked into import rather than applied after the fact as a separate pass cuts one whole step out of the pipeline. On a job that size, that’s not a small thing.
The single most important idea in this tutorial is that the best time to apply a consistent setting is the moment the file enters your system, not after you’ve already opened it and started working. Build the profile preset once, assign it to your import workflow, and let Lightroom do the work while you pour your coffee.
Watch the full tutorial on YouTube to see the presenter demonstrate the import dialog setup and compare profiles side by side on his own images.
Comments (6)
Wow, I had no idea you could do this. Mind blown.
I keep coming back to this article. It's that useful.
Excellent tutorial. I'd add that from a color grading standpoint, this technique is incredibly versatile.
Quality content like this is rare. Keep it up.
Just used this on a wedding shoot edit. Client was thrilled.
Great article! I actually covered something related on my site — the landscape angle is really complementary to this.
Leave a Comment