
Every commercial shoot I run ends with the same conversation with a client: “Can you get rid of that person in the background?” Sometimes it’s a tourist, sometimes it’s a crew member who wandered into frame, sometimes it’s just a stranger whose presence undermines the whole composition. My answer used to involve a lot of time in Photoshop, careful masking, and Content-Aware Fill working harder than it wanted to. That workflow is not dead, but it just got a serious competitor.
In this Matt Kloskowski tutorial covering the Lightroom June 2025 update, he walks through two significant new features that Adobe quietly packed into what they’re calling a dot release. Version 14.4 for Lightroom Classic, 17.4 for Camera Raw, and 8.4 for standard Lightroom. The one I want to talk about is the people removal tool, because after testing it on a handful of location shots from a recent retail campaign, I think it’s going to change how I handle a whole category of retouching jobs. Watch the full tutorial on YouTube
The short version: this feature uses generative AI to detect and remove people from photos, then reconstructs the background behind them. It runs inside Lightroom without any round-tripping to Photoshop. That alone is worth paying attention to.
Step 1: Confirm You’re on the Right Version
 Lightroom version numbers displayed in tutorial intro
Before anything else, check that your software is actually on the June 2025 update. In Lightroom Classic, that’s 14.4. If you’re running Camera Raw inside Photoshop, you need 17.4. The standard Lightroom desktop app should show 8.4. All three received the same feature set simultaneously, which is a welcome change from Adobe’s usual staggered rollouts.
Lightroom version numbers displayed in tutorial intro
Before anything else, check that your software is actually on the June 2025 update. In Lightroom Classic, that’s 14.4. If you’re running Camera Raw inside Photoshop, you need 17.4. The standard Lightroom desktop app should show 8.4. All three received the same feature set simultaneously, which is a welcome change from Adobe’s usual staggered rollouts.
Open your Adobe Creative Cloud app, hit Check for Updates, and let it run. If updates are being stubborn, a full system restart usually clears whatever cache is blocking the refresh. Adobe support is the right call if you’re still stuck, not the comment section of any tutorial.
Step 2: Find the New Icon in the Toolbar
 Lightroom Classic toolbar with new AI status icon highlighted
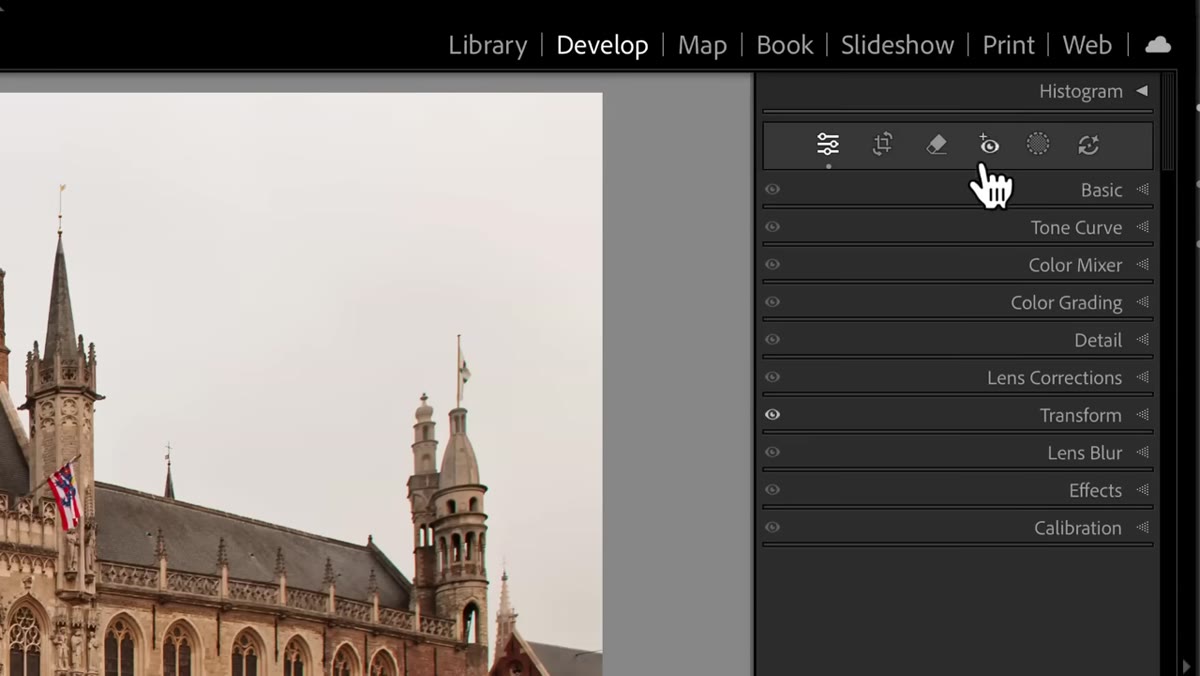
Once you’re in Lightroom Classic’s Develop module, look at the toolbar along the top of the editing panel area. There’s a new icon on the right side that wasn’t there before. This is the AI Edit Status indicator. It’s not the main event, but it matters: it tells you whether any AI-generated edits applied to a photo need to be refreshed or updated. More on why that’s useful in a moment.
Lightroom Classic toolbar with new AI status icon highlighted
Once you’re in Lightroom Classic’s Develop module, look at the toolbar along the top of the editing panel area. There’s a new icon on the right side that wasn’t there before. This is the AI Edit Status indicator. It’s not the main event, but it matters: it tells you whether any AI-generated edits applied to a photo need to be refreshed or updated. More on why that’s useful in a moment.
The icon you actually want to click first is the eraser, which was already there but has new capabilities underneath it. Click it to open the Remove tool panel.
Step 3: Open the Remove Tool and Select “People”
 Remove tool panel showing Reflections and People options
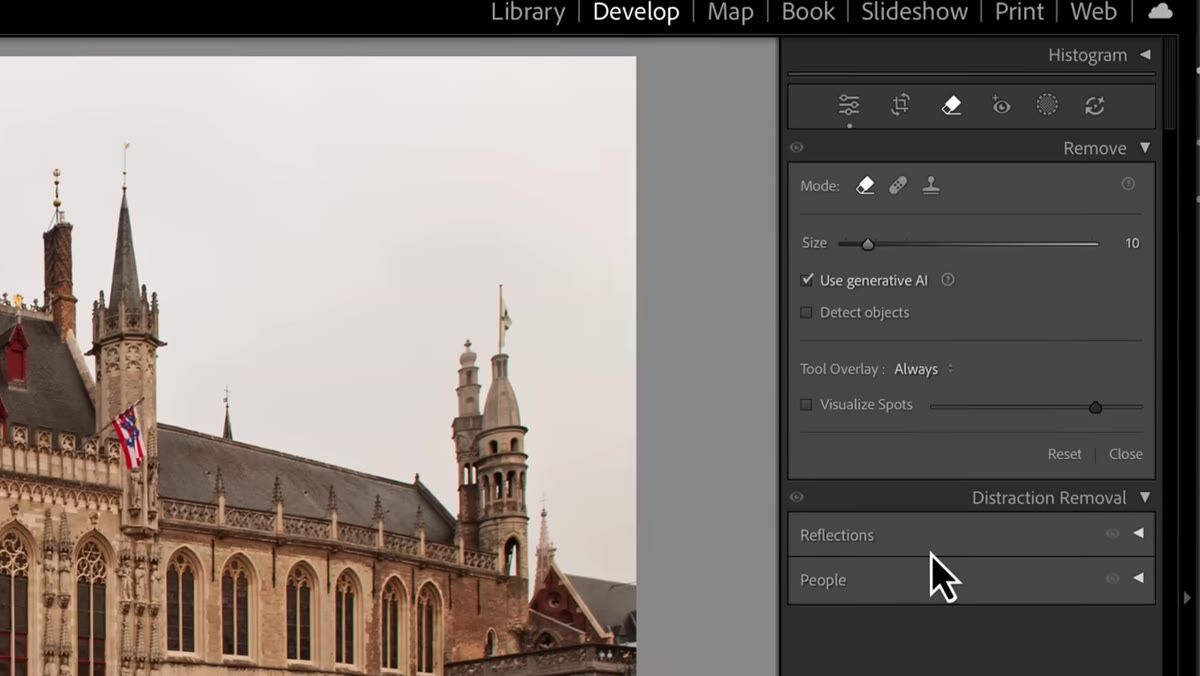
Inside the Remove tool panel, you’ll now see two options listed: Reflections and People. Reflections is also new, but the People option is what this walkthrough is focused on. Click the arrow next to People to expand it.
Remove tool panel showing Reflections and People options
Inside the Remove tool panel, you’ll now see two options listed: Reflections and People. Reflections is also new, but the People option is what this walkthrough is focused on. Click the arrow next to People to expand it.
The first time you run this on a photo, give it a few seconds. The AI needs to analyze the image and generate its initial detection pass. Matt mentions it took six or seven seconds on his first run through a particular shot. On my machine with a mid-complexity background, I saw similar timing. After that initial generation, the results are cached and faster to revisit.
Step 4: Review What the AI Has Detected
 AI highlighting detected people in the photograph
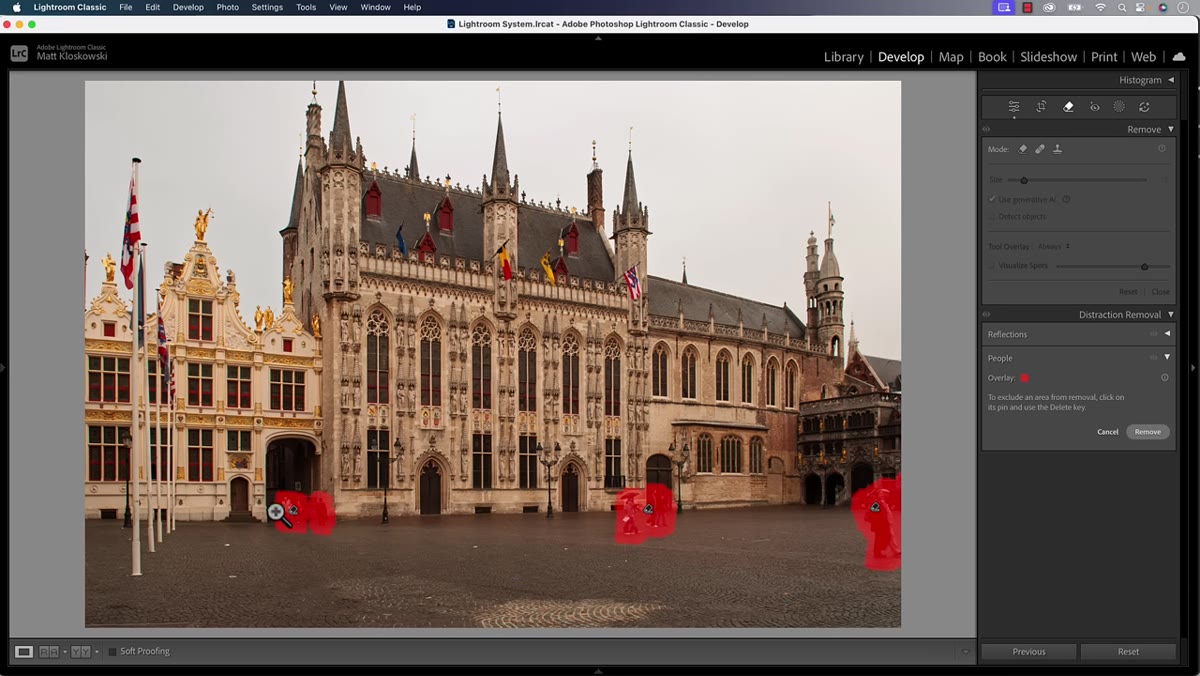
Lightroom will highlight every person it detects in the frame. These show up as masked overlays so you can see exactly what’s been selected before anything is removed. This is worth taking a moment to actually look at, because the AI doesn’t limit itself strictly to humans. In Matt’s example, it also caught a car in the lower right corner and flagged it for removal alongside the people.
AI highlighting detected people in the photograph
Lightroom will highlight every person it detects in the frame. These show up as masked overlays so you can see exactly what’s been selected before anything is removed. This is worth taking a moment to actually look at, because the AI doesn’t limit itself strictly to humans. In Matt’s example, it also caught a car in the lower right corner and flagged it for removal alongside the people.
If there’s something highlighted that you want to keep, click its edit pin and press Delete to remove just that selection from the queue. You’re not removing it from the photo yet, just deselecting it from the removal operation. This gives you granular control before you commit.
Step 5: Hit Remove and Let the AI Do the Work
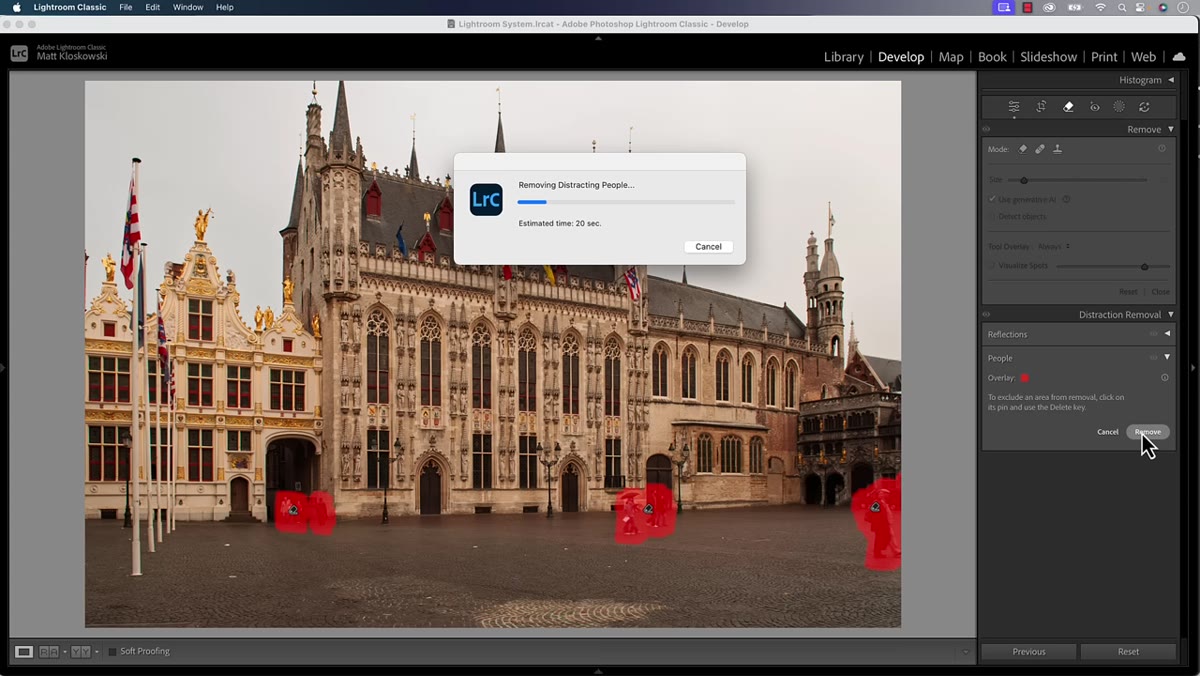 Clicking the Remove button to trigger AI people removal
Once you’ve reviewed the detections and removed any pins you don’t want actioned, hit the Remove button. Lightroom processes the image and fills in the areas where people (and any other selected elements) were standing. It’s not a simple clone stamp operation. The AI reconstructs what it thinks should be behind the subjects, which means it’s making intelligent guesses about background content.
Clicking the Remove button to trigger AI people removal
Once you’ve reviewed the detections and removed any pins you don’t want actioned, hit the Remove button. Lightroom processes the image and fills in the areas where people (and any other selected elements) were standing. It’s not a simple clone stamp operation. The AI reconstructs what it thinks should be behind the subjects, which means it’s making intelligent guesses about background content.
The results are non-destructive, so nothing about your original file changes at the raw level. This is important for a professional workflow because it means you can always roll back.
Step 6: Regenerate Variations if the Result Isn’t Right
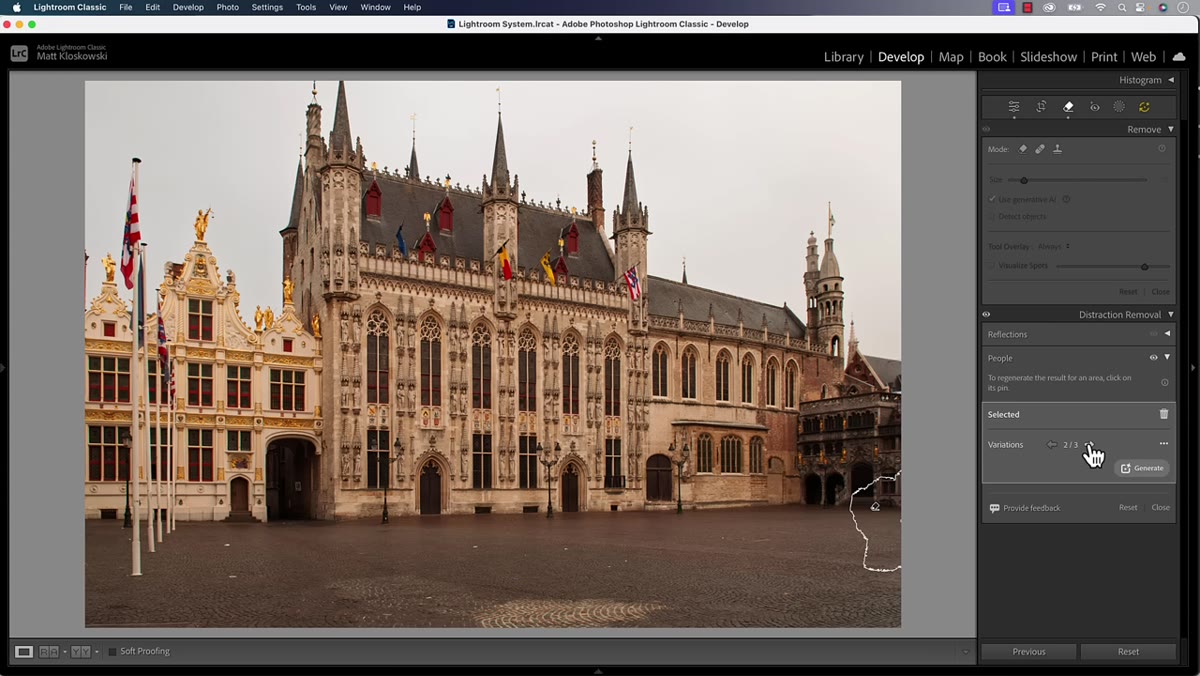 Three AI variation options shown after clicking a pin
If the initial removal result looks off in a specific area, click the pin for that region. The panel gives you three different generated variations to choose from. Each one represents a different interpretation of how the background should be reconstructed. This is genuinely useful when the first pass produces something that doesn’t hold up at 100% zoom.
Three AI variation options shown after clicking a pin
If the initial removal result looks off in a specific area, click the pin for that region. The panel gives you three different generated variations to choose from. Each one represents a different interpretation of how the background should be reconstructed. This is genuinely useful when the first pass produces something that doesn’t hold up at 100% zoom.
Cycling through variations takes a few seconds each time, but the ability to compare options before committing is a meaningful workflow improvement over guessing and undoing repeatedly.
Step 7: Check the AI Edit Status After You’re Done
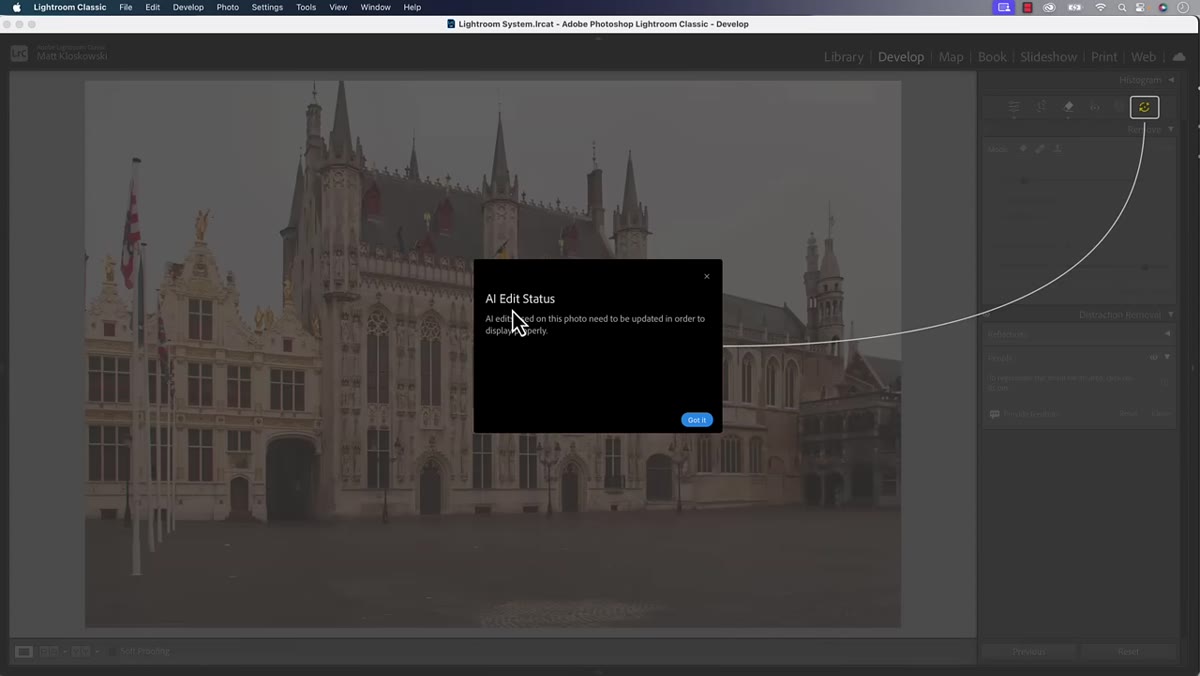 AI Edit Status icon alerting that edits need updating
After removal is complete, the new AI Edit Status icon in the toolbar may light up with an alert. This is Lightroom telling you that an AI-dependent edit, such as an adaptive profile, needs to be recalculated now that the image content has changed. Click the icon, see what’s flagged, and hit Update.
AI Edit Status icon alerting that edits need updating
After removal is complete, the new AI Edit Status icon in the toolbar may light up with an alert. This is Lightroom telling you that an AI-dependent edit, such as an adaptive profile, needs to be recalculated now that the image content has changed. Click the icon, see what’s flagged, and hit Update.
This used to happen silently in older versions. You’d apply an adaptive profile, make a significant change, and never know the profile had become stale. The new status indicator surfaces that problem clearly, which saves the kind of quality-control headaches that only show up after you’ve already sent files to a client.
How This Changes My Retouching Process
For e-commerce and editorial location work, my previous people-removal pipeline was: flag the shot in Lightroom, open as Smart Object in Photoshop, spend anywhere from two minutes to twenty depending on background complexity, save back. For a shoot with fifty selects that each need a person removed, that round-trip adds up fast. I track time obsessively, and a two-minute-per-image Photoshop round-trip on fifty images is over an hour and a half of work that could be replaced by a button and a few seconds of generation time.
That said, I wouldn’t retire the Photoshop pipeline entirely. For hero images, high-stakes composites, or anything where a client is going to zoom in during a review call, I still want the control that Photoshop gives me. But for batch cleanup on location shoot selects, architectural photography with incidental pedestrians, or any scenario where “good enough at delivery resolution” is actually fine, this is now my first stop.
The real unlock here is that it all stays inside Lightroom. No file management, no round-tripping, no Smart Object versioning to keep track of. The fewer context switches in a workflow, the fewer places something can go wrong.
The most important thing this update does is move a task that used to require a separate application into the same tool where the rest of your raw processing lives. That friction reduction is often worth more than the raw capability. If you want to see exactly how Matt demonstrates the full feature, including the reflections removal and the AI status tool in action, Watch the full tutorial on YouTube.
Comments (3)
The tip about remove people from photos auto was the missing piece for me. Thank you.
The tip about remove people from photos auto was the missing piece for me. Thank you.
Really solid breakdown. This pairs perfectly with the photography work I've been writing about.
Leave a Comment