
Every commercial shoot ends with a folder of images that are 90% there. The light is good, the subject looks great, and then there’s a tourist walking through the background, or a web of power lines cutting across an otherwise clean skyline. For most of my career, fixing those problems meant careful selections, Content-Aware Fill, a lot of cloning, and the quiet acceptance that this was just part of the job. Billable time, sure, but not the kind of work that makes you feel sharp.
In this Aaron Nace (PHLEARN) tutorial, Watch the full tutorial on YouTube, the focus is squarely on Photoshop’s Remove Tool and its AI-powered “Find Distractions” feature. What Aaron walks through in under ten minutes covers the kind of cleanup that used to eat a significant chunk of my post-production time on e-commerce and ad agency deliverables. I want to break it down step by step so you can follow along in Photoshop without having to scrub through the video.
The core insight here isn’t just that the tool is fast. It’s that Photoshop is now making intelligent decisions about what counts as a distraction, not just filling pixels blindly. That distinction matters a lot when you’re working on images where the background needs to look natural, not patched.
Step 1: Select the Background Layer and Open the Remove Tool
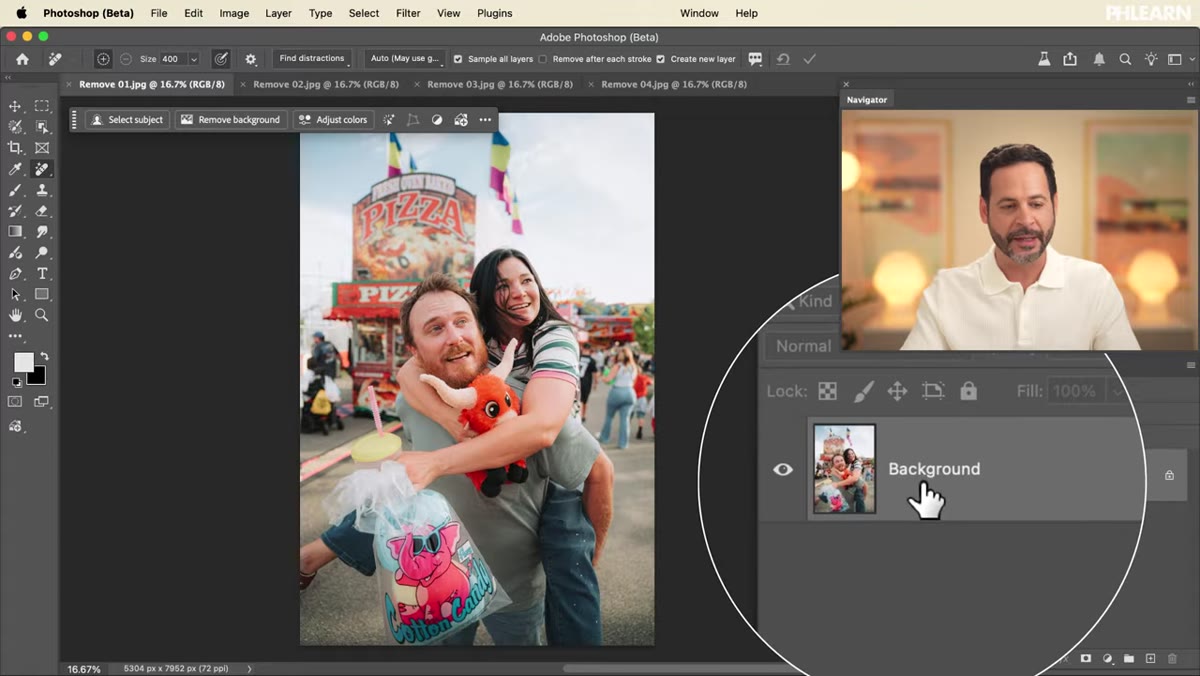 Remove Tool selected in the Photoshop toolbar
Start by clicking your background layer in the Layers panel. You want to be working on the actual image content, not an adjustment layer or a group. Then navigate to the Remove Tool in the left toolbar. It is not buried in a submenu. It has its own dedicated slot, which tells you how seriously Adobe is taking this feature.
Remove Tool selected in the Photoshop toolbar
Start by clicking your background layer in the Layers panel. You want to be working on the actual image content, not an adjustment layer or a group. Then navigate to the Remove Tool in the left toolbar. It is not buried in a submenu. It has its own dedicated slot, which tells you how seriously Adobe is taking this feature.
Once selected, look at the options bar running across the top of the screen. Two settings matter most before you do anything else.
Step 2: Configure the Remove Tool Options
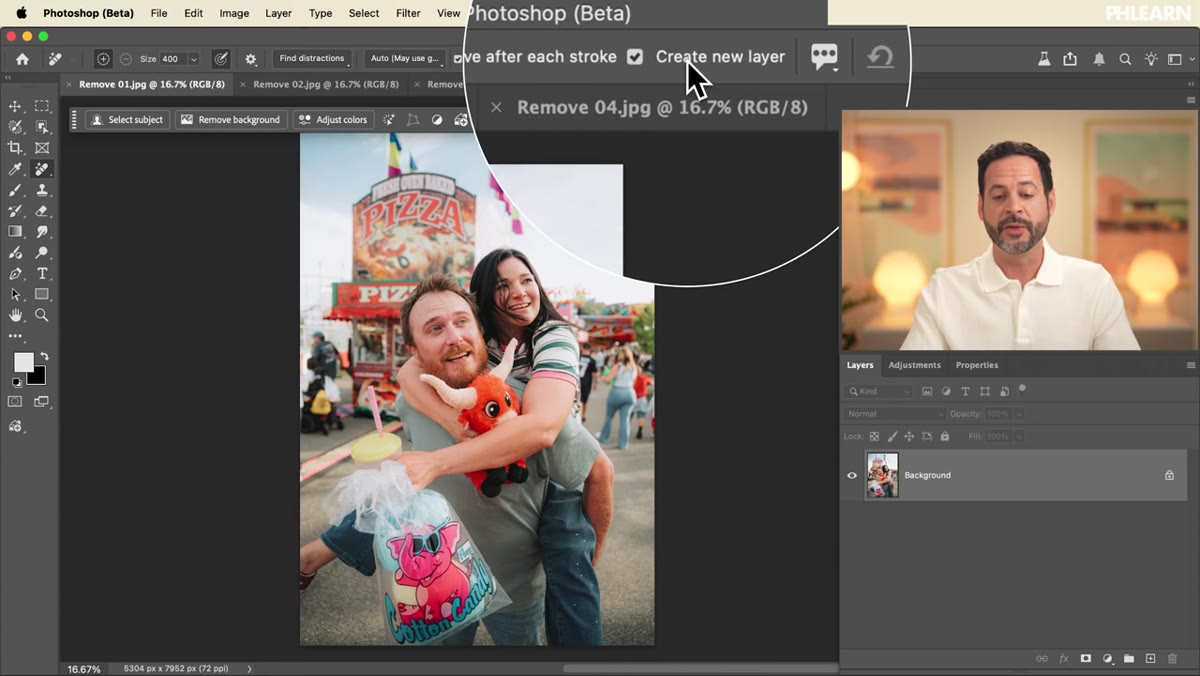 Options bar showing Create New Layer and Remove After Each Stroke checkboxes
In the options bar, check “Create New Layer.” This is non-negotiable for professional work. It means every removal lands on a separate layer, leaving your original untouched. If the AI does something unexpected, you can dial it back, mask it, or swap it out without starting over. I would treat this the same way I treat running any destructive action: always preserve the source.
Options bar showing Create New Layer and Remove After Each Stroke checkboxes
In the options bar, check “Create New Layer.” This is non-negotiable for professional work. It means every removal lands on a separate layer, leaving your original untouched. If the AI does something unexpected, you can dial it back, mask it, or swap it out without starting over. I would treat this the same way I treat running any destructive action: always preserve the source.
The second option is “Remove After Each Stroke.” Uncheck it. When this is active, Photoshop processes each brushstroke as a separate removal pass, which interrupts your workflow and makes it harder to handle complex areas cleanly. With it unchecked, you can paint over everything you want to remove in a single session and trigger the removal once when you’re ready.
Step 3: Use “Find Distractions” to Remove Background People
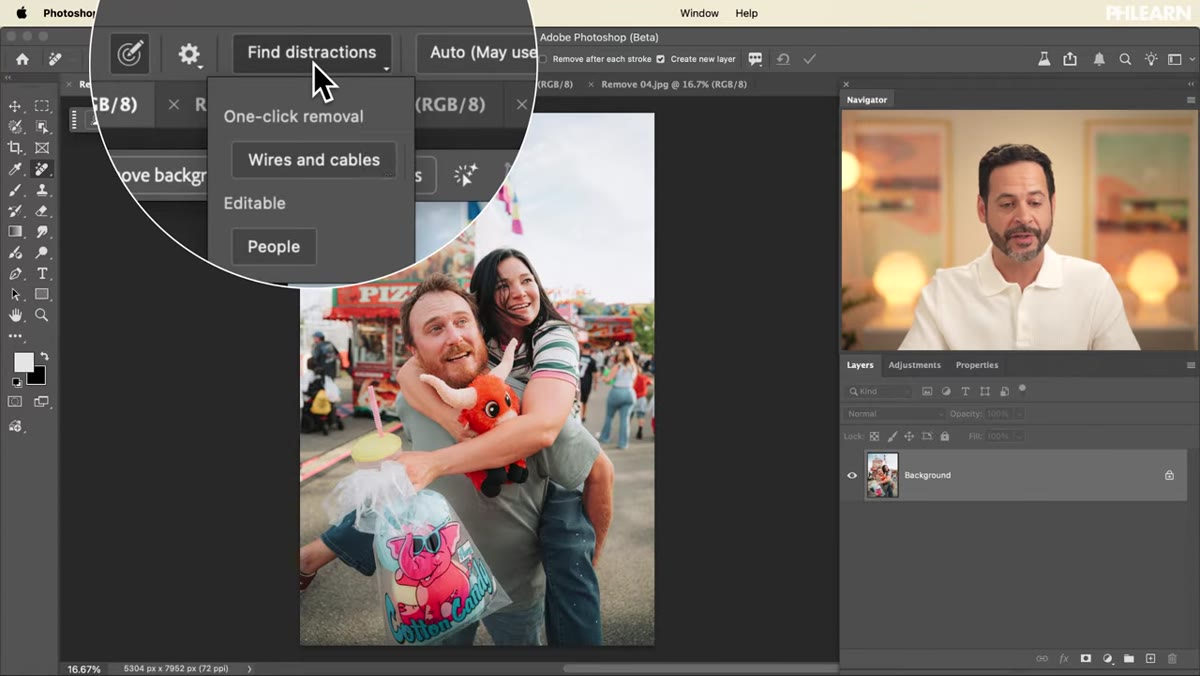 Find Distractions dropdown open with People option highlighted
This is where the tool earns its place in a professional pipeline. In the options bar, there is a dropdown labeled “Find Distractions.” Click it and select “People.” Photoshop uses AI to scan the image, identify your primary subject in the foreground, and then flag any other people in the background as distractions. Those flagged areas appear with a pink highlight overlay.
Find Distractions dropdown open with People option highlighted
This is where the tool earns its place in a professional pipeline. In the options bar, there is a dropdown labeled “Find Distractions.” Click it and select “People.” Photoshop uses AI to scan the image, identify your primary subject in the foreground, and then flag any other people in the background as distractions. Those flagged areas appear with a pink highlight overlay.
You do not paint anything manually. You do not make a selection. You just confirm the result by pressing Enter or clicking the checkmark in the options bar, and Photoshop removes every flagged person in a single pass. The AI is running two separate processes here: one to define your main subject so it is protected, and one to identify secondary figures for removal. The results land on that new layer you set up in Step 2, fully toggleable.
Step 4: Use “Find Distractions” to Remove Wires and Cables
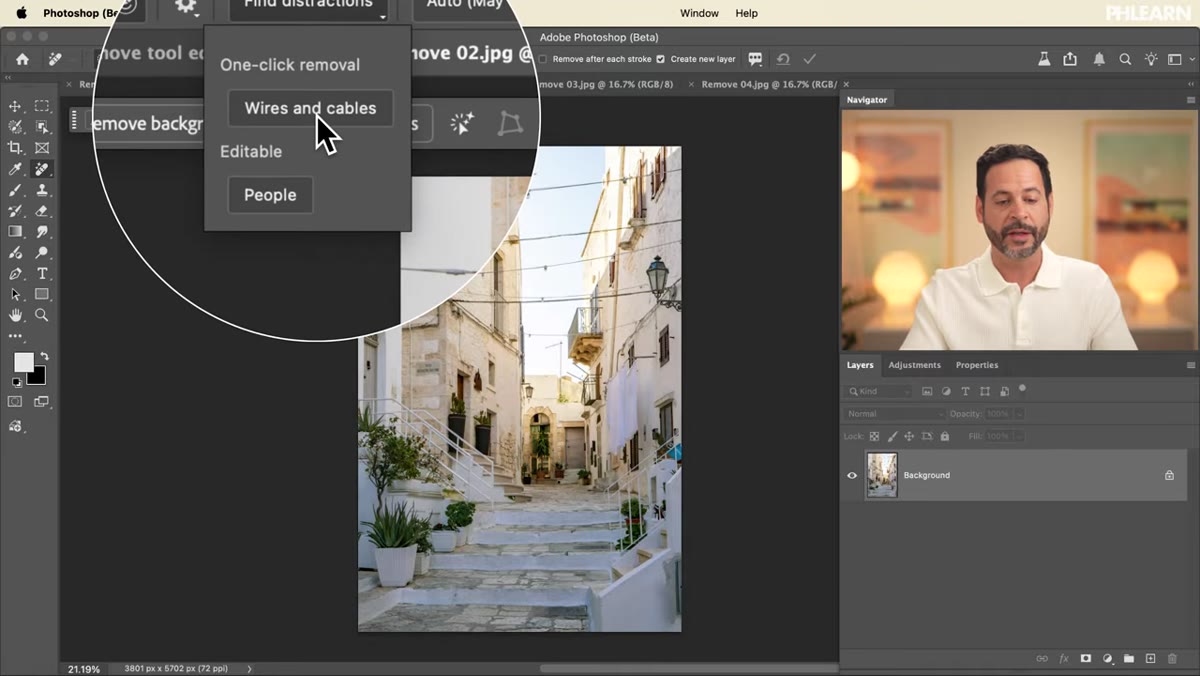 Find Distractions set to Wires and Cables, highlighted lines visible across image
Switch to an image with utility lines, cables, or any linear infrastructure cutting through the frame. Go back to the “Find Distractions” dropdown and this time select “Wires and Cables.” The process is identical to the people removal: Photoshop scans the image, highlights everything it identifies as wire-type content, and waits for your confirmation.
Find Distractions set to Wires and Cables, highlighted lines visible across image
Switch to an image with utility lines, cables, or any linear infrastructure cutting through the frame. Go back to the “Find Distractions” dropdown and this time select “Wires and Cables.” The process is identical to the people removal: Photoshop scans the image, highlights everything it identifies as wire-type content, and waits for your confirmation.
One detail worth noting: make sure the mode is set to “Auto” in the options bar. Aaron mentions this specifically, and it’s the setting that allows Photoshop to use Generative AI fill when standard Content-Aware Fill isn’t sufficient. For complex wire tangles against varied backgrounds, generative fill produces significantly cleaner results. Hit Enter and let it run.
Step 5: Paint Manually to Clean Up Remaining Distractions
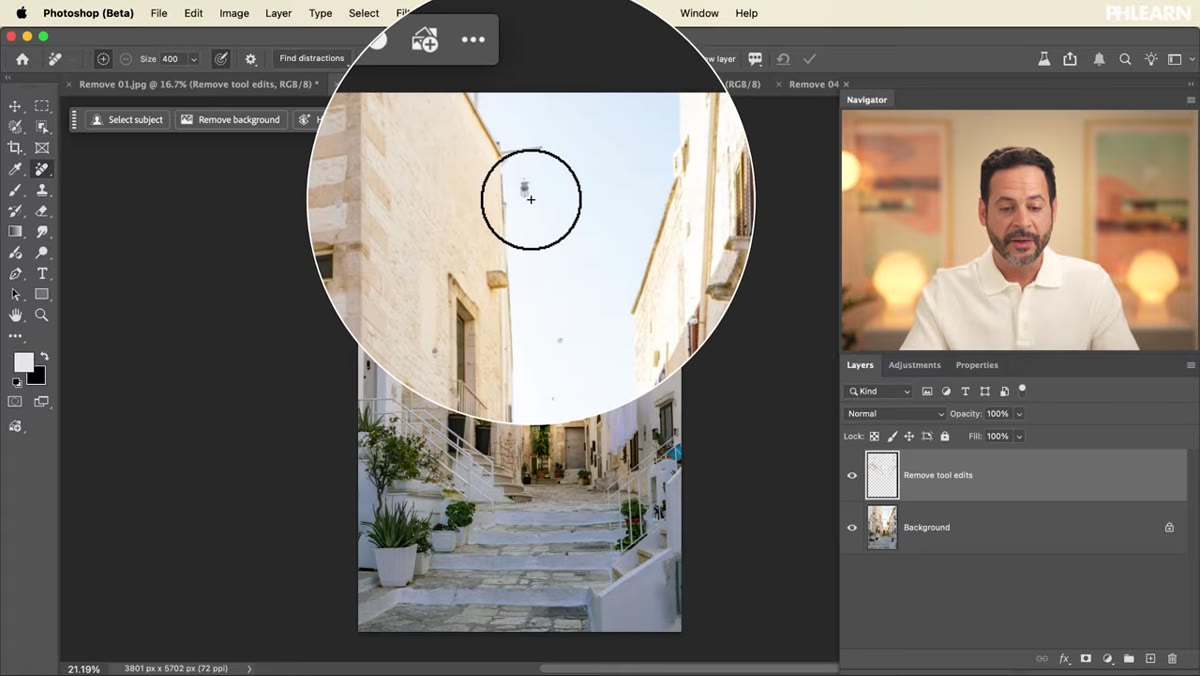 Painting over remaining cable supports and light bulbs with the Remove Tool brush
Automated detection won’t catch everything. In the tutorial, after the wire removal pass, a few mounting hardware pieces and dangling light fixtures remain. These are small, irregular shapes that don’t cleanly fit the “wire” category the AI was looking for.
Painting over remaining cable supports and light bulbs with the Remove Tool brush
Automated detection won’t catch everything. In the tutorial, after the wire removal pass, a few mounting hardware pieces and dangling light fixtures remain. These are small, irregular shapes that don’t cleanly fit the “wire” category the AI was looking for.
For these, switch to manual mode and simply paint over anything left that you want gone. Use a brush size that covers the object with a little margin on each side. You are not being surgical here. The AI handles the fill, so your job is just to indicate the target area clearly. Once you’ve painted over all remaining items, hit the checkmark or press Enter. Photoshop processes everything in that painted region and fills it in. The result goes on the same new layer, keeping everything organized.
What I’d Do Differently in a Production Environment
The Remove Tool’s non-destructive layer approach is solid, but on a high-volume job, I’d push it one step further. I batch my workflows heavily. After running the Find Distractions pass, I always do a zoom-in review at 100% before flattening anything. AI fill can introduce subtle texture inconsistencies, especially in areas with strong directional light or detailed architectural backgrounds. On a product shot going into a print ad, that matters.
I also keep the original and the removal layer in a group, labeled clearly, before I deliver the PSD to a client or pass it downstream to a designer. It takes thirty seconds and has saved awkward conversations more than once. The tool is impressive enough that it’s tempting to treat it as finished output. It usually is. But the layer structure is your insurance policy, and keeping it clean costs nothing.
The Remove Tool in its current form, specifically the Find Distractions feature, represents a genuine workflow shift. Not because it does something that was previously impossible, but because it compresses what used to be a 20-minute task into under a minute without sacrificing quality on most images. That is the kind of efficiency that compounds across a full project.
If you work with client photography, event images, architectural shots, or really anything shot in an environment you don’t fully control, this tool belongs in your regular workflow. Watch the full tutorial on YouTube to see Aaron walk through all four examples with the actual results on screen.
Comments
Leave a Comment