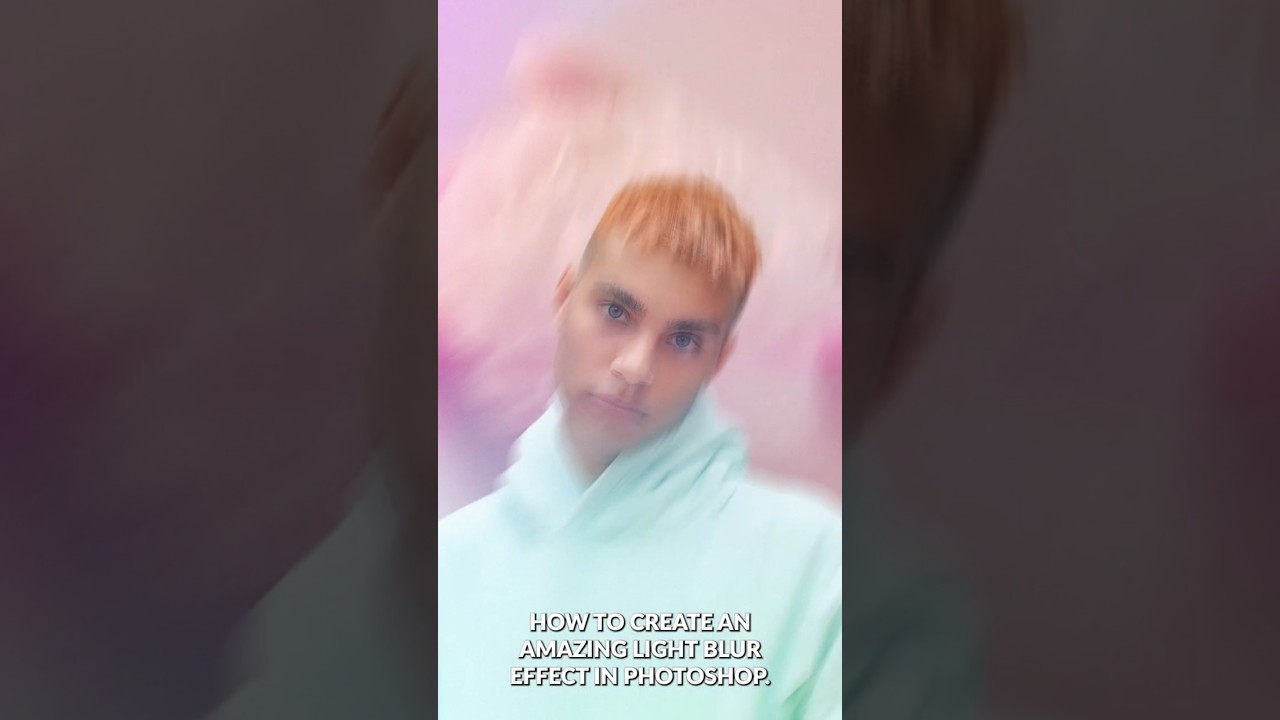
I was sitting on a job last month, a cosmetics campaign with a handful of hero shots that needed that polished, high-end glow you see in magazine spreads. The kind of light that feels like it’s moving. My usual approach, stacking a few soft light layers and leaning on Gaussian Blur, was getting me to “pretty good” but not quite to “that.” I knew the gap was in how I was handling directional light. Then I watched Aaron Nace’s one-minute Path Blur tutorial from PHLEARN and immediately understood what I was missing.
Why Path Blur Beats Gaussian Blur for Light Effects
Most photographers default to Gaussian Blur when they want soft, dreamy light in Photoshop. It works, but it blurs in every direction equally, which is not how light actually moves. Real light has direction. Path Blur, found under Filter > Blur Gallery > Path Blur, lets you define the exact trajectory of that blur. You draw a path, and the blur follows it. For a light streak or a glowing highlight, that directionality is everything. It’s the difference between a smear and a beam.
In this Aaron Nace (PHLEARN) tutorial, the entire effect hinges on that one distinction. The technique is fast on paper but precise in execution, and understanding why each step exists makes it repeatable across different images.
The Setup: Smart Objects Before You Touch a Pixel
The first move Nace makes is converting the layer to a Smart Object before applying any filter. Right-click the layer in the Layers panel and choose “Convert to Smart Object.” This is non-negotiable if you want to stay flexible.
Once you apply Path Blur as a Smart Filter, the blur lives as an editable layer underneath the Smart Object rather than being baked into the pixels. If the client comes back and wants the light pulling in a slightly different direction (and they always do), you double-click the Smart Filter and adjust the path. No starting over. In fifteen years of commercial retouching, the number of times “non-destructive” has saved a deadline is a number I stopped counting.
Building the Path Blur: Settings That Actually Matter
After converting to Smart Object, go to Filter > Blur Gallery > Path Blur. You’ll see a default path appear on the canvas, a straight line with two endpoints. This is your starting configuration.
Nace draws the path to follow the direction he wants the light to travel, pulling the endpoints across the area where the highlight sits. The key controls to pay attention to in the Path Blur panel are Speed and Taper. Speed controls the intensity of the blur, essentially how long the streak appears. Taper controls whether the blur fades at the ends, which is what gives the effect that natural falloff instead of a hard stop. For a convincing light effect, Taper should be set fairly high, somewhere in the 80 to 100 range, so the light eases off rather than cutting out abruptly.
Once the path and settings look right, hit OK. The blur renders and attaches as a Smart Filter beneath the Smart Object thumbnail in the Layers panel.
Blending the Effect Into the Image
Applying the blur is only half the job. The layer’s blend mode and opacity are where the effect either integrates or fights the image.
Nace sets the blurred layer’s blend mode to Screen, which is the correct call for anything simulating light. Screen blend mode ignores dark values and only brightens, so the blur adds luminosity without muddying the underlying image. From there, opacity is dialed back until the light feels like it belongs in the scene rather than sitting on top of it. There’s no universal number here, it depends on the image, but somewhere between 50 and 80 percent is a reasonable starting range for most portraits or product shots.
If you want more control over where the light appears, add a layer mask to the blurred Smart Object and paint with a soft black brush to pull the effect away from areas where you don’t want it. A light effect that bleeds onto a subject’s face when it should be behind them will read as amateur immediately.
Where I’d Push This Further (and Where It Falls Short)
The technique works beautifully on isolated light sources, rim lights, background highlights, product sheen. Where it gets harder is when you’re trying to add light effects to a scene with complex geometry, like a face with a lot of shadow variation. The Path Blur doesn’t understand the three-dimensional form underneath it, so you can end up with a streak that crosses a nose or eyelid in a way that reads as flat.
My workaround for that problem is to isolate the areas I want the light to affect before I apply the effect. I’ll duplicate the layer, make a rough selection around the specific region, such as a cheekbone or a shoulder, and apply the Path Blur only to that isolated piece. It takes a few more minutes but the result holds up at full resolution, which is where ad agencies are reviewing final files.
I also keep the blurred layers organized in a labeled group. Old habit, maybe, but if a file comes back six months later and someone new is touching it, I want the architecture to be readable in thirty seconds.
The Single Most Important Thing
Smart Objects are what make this technique worth using in production. Without them, every client revision means rebuilding the effect from scratch. With them, the whole thing stays live and editable in under a minute.
Watch Aaron Nace’s full tutorial on PHLEARN for the visual walkthrough, especially the part where he demonstrates how the path interacts with the underlying highlights. Seeing the path placement in motion makes the setting choices click in a way that text can only approximate.
Comments
Leave a Comment