Every time I onboard a new retoucher at my consultancy, the same conversation happens within the first week. They’ve downloaded a beautiful custom brush pack, they open Photoshop, and then they stare at it like it’s a locked door with no handle. Brush installation is one of those things that feels like it should be obvious but genuinely isn’t the first time. And if you get it wrong, you end up with a brush that loads but doesn’t appear where you expect, or duplicates stacking up invisibly in your panel while you wonder why nothing looks right.
In this Aaron Nace (PHLEARN) tutorial, Watch the full tutorial on YouTube, the focus is a smoke and fog brush, but the installation method he walks through works for any .abr file you’ll ever download. I want to break this down step by step, because there are a couple of small moves in here that will save you from the confusion I see trip people up repeatedly.
Step 1: Open the Preset Manager
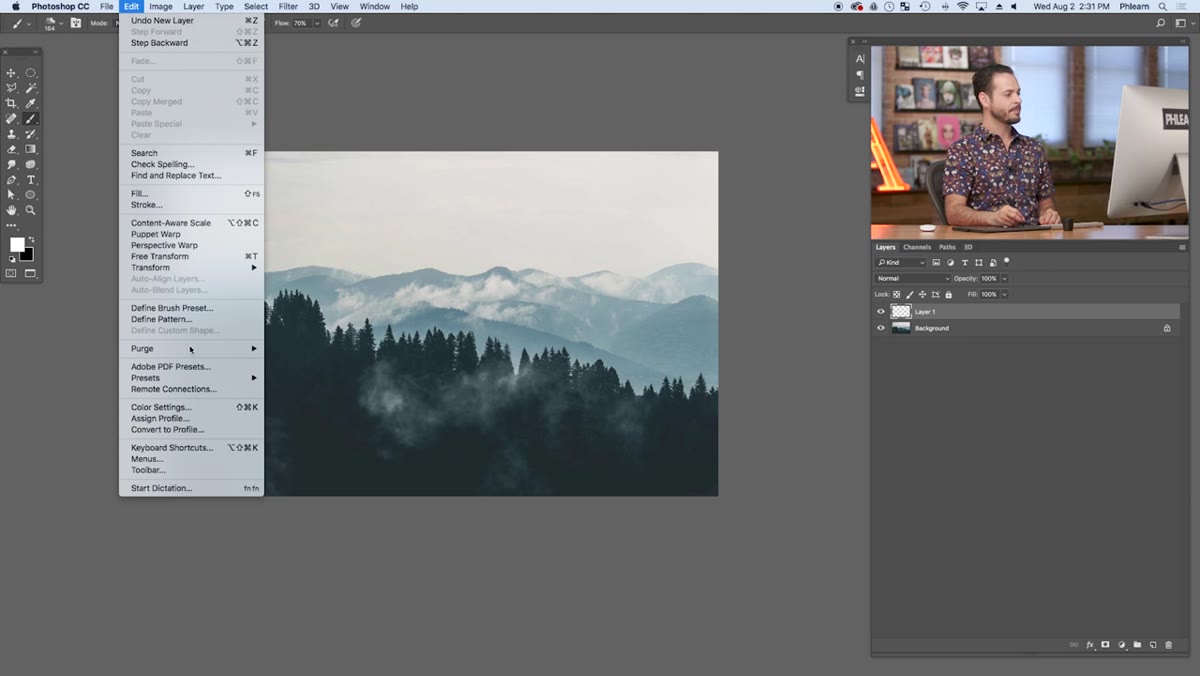 Edit menu open with Presets submenu highlighted
Navigate to Edit > Presets > Preset Manager. This is the central hub Photoshop uses to manage not just brushes, but swatches, styles, contours, gradients, and more. A lot of people look for brush installation somewhere in the Brushes panel itself and can’t find it. The Preset Manager is the right place, and it’s been there across multiple versions of Photoshop, so this method is reliable regardless of which recent version you’re running.
Edit menu open with Presets submenu highlighted
Navigate to Edit > Presets > Preset Manager. This is the central hub Photoshop uses to manage not just brushes, but swatches, styles, contours, gradients, and more. A lot of people look for brush installation somewhere in the Brushes panel itself and can’t find it. The Preset Manager is the right place, and it’s been there across multiple versions of Photoshop, so this method is reliable regardless of which recent version you’re running.
Once the dialog opens, make sure the Preset Type dropdown at the top is set to Brushes. If you were last working with swatches or patterns, it may default to something else. One click to confirm you’re in the right category before you proceed.
Step 2: Load Your Brush File
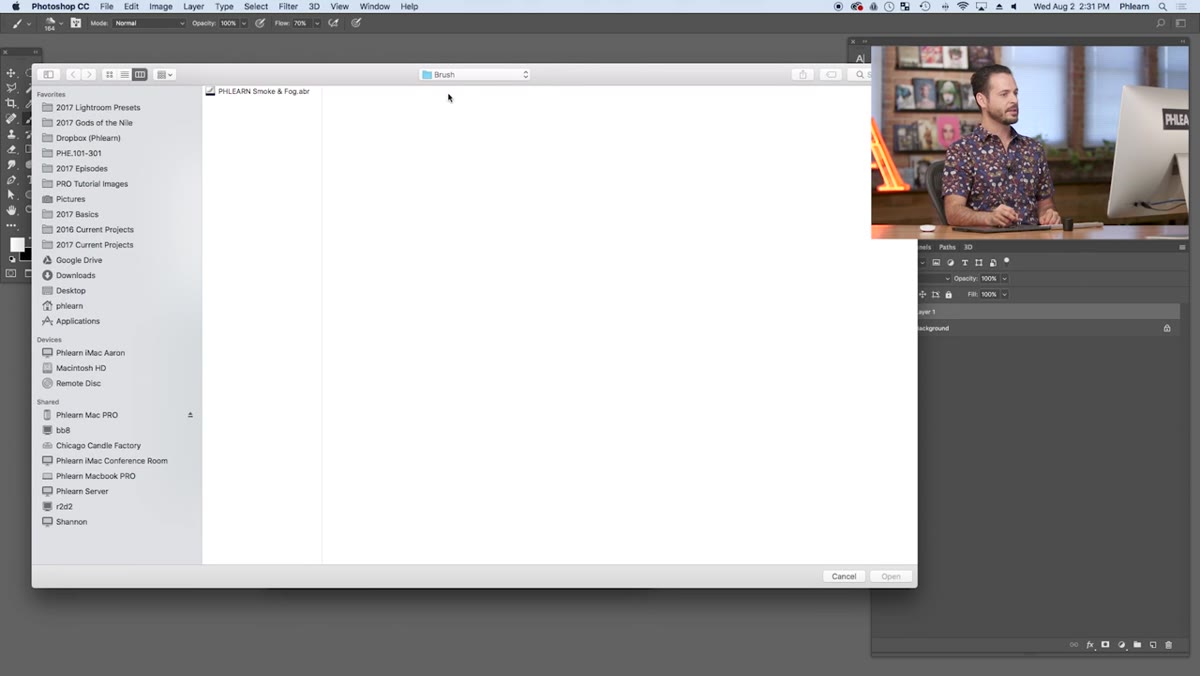 Preset Manager dialog open, Load button visible
With the Brushes preset type selected, click the Load button on the right side of the Preset Manager dialog. This opens a standard file browser where you navigate to wherever you saved your downloaded brush file. Photoshop brush files carry the
Preset Manager dialog open, Load button visible
With the Brushes preset type selected, click the Load button on the right side of the Preset Manager dialog. This opens a standard file browser where you navigate to wherever you saved your downloaded brush file. Photoshop brush files carry the .abr extension, which is what you’re looking for in your downloads folder or wherever you organize your assets.
Select the file and click Open. Photoshop loads the brush and appends it to the end of your existing brush list. You won’t get a confirmation dialog or any fanfare. The brush just appears at the bottom of the thumbnails in the Preset Manager.
Step 3: Confirm the Brush Loaded Correctly
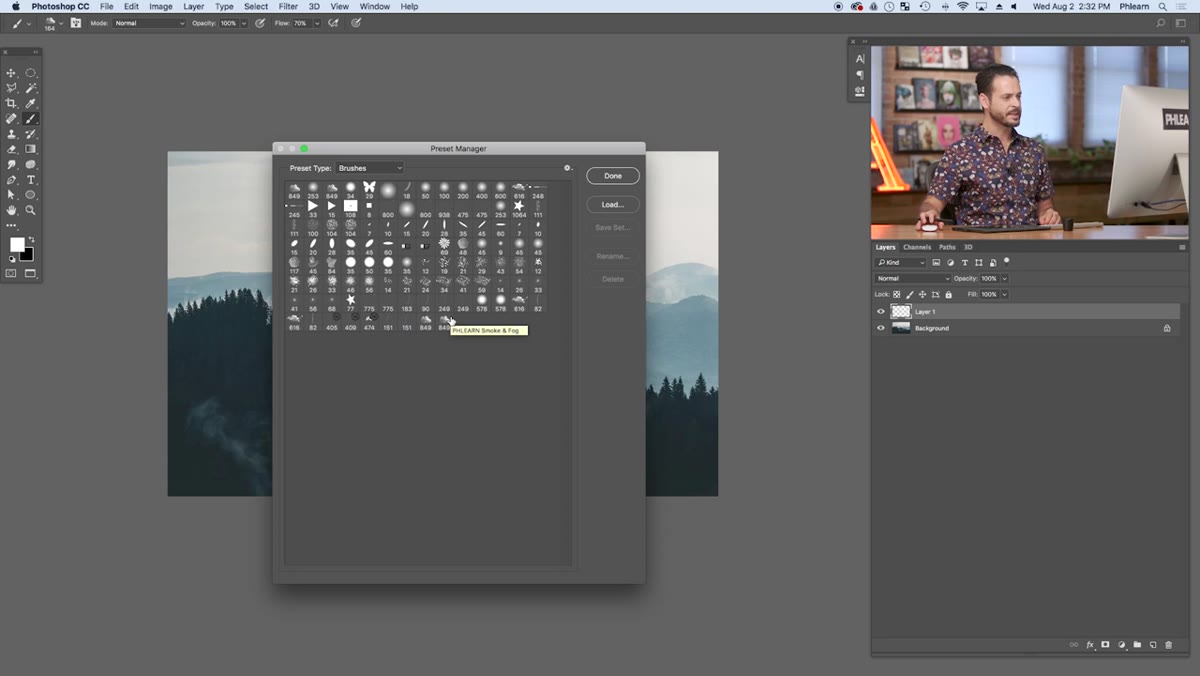 Brush thumbnail at end of list with name tooltip visible
Hover over the newly added brush thumbnail at the end of the list. A tooltip will appear showing the brush name, which lets you confirm Photoshop loaded the right file. If the name matches what you expected from the brush pack, you’re in good shape.
Brush thumbnail at end of list with name tooltip visible
Hover over the newly added brush thumbnail at the end of the list. A tooltip will appear showing the brush name, which lets you confirm Photoshop loaded the right file. If the name matches what you expected from the brush pack, you’re in good shape.
This hover-to-confirm step sounds trivial, but I’ve made the mistake of loading the wrong file from a folder full of assets and not noticing until I was twenty minutes into a project wondering why my brush wasn’t behaving. Take the two seconds to check.
Step 4: Reorder and Remove Duplicates
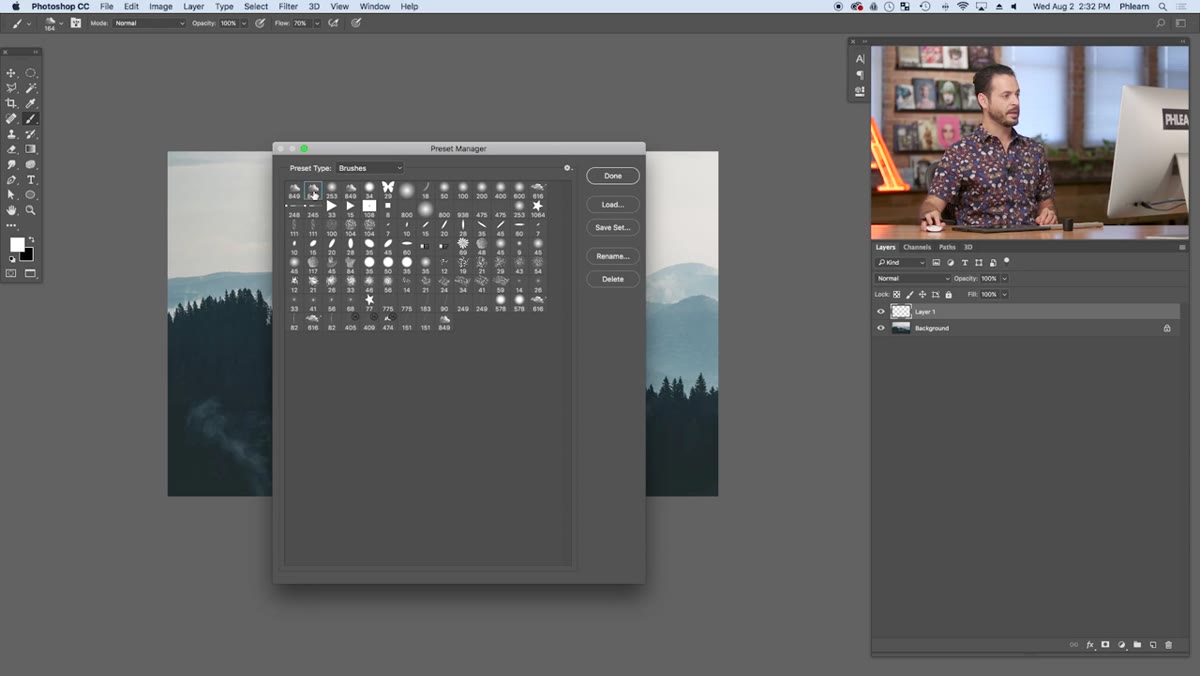 Dragging brush thumbnail to top of the list
You can click and drag brush thumbnails within the Preset Manager to reorder them. If you want this new brush to be the first one you see when you open the brush picker, drag it to the top of the list. This is purely a convenience move, but if you’re working with a brush repeatedly on a job, having it at the top beats scrolling every time.
Dragging brush thumbnail to top of the list
You can click and drag brush thumbnails within the Preset Manager to reorder them. If you want this new brush to be the first one you see when you open the brush picker, drag it to the top of the list. This is purely a convenience move, but if you’re working with a brush repeatedly on a job, having it at the top beats scrolling every time.
If you’ve accidentally loaded the same brush more than once, you can remove duplicates by holding Alt (Windows) or Option (Mac) and clicking the duplicate thumbnail. It disappears immediately without a confirmation prompt, so just make sure you’re clicking the right one. When your list is clean, click Done.
Step 5: Select the Brush in the Tool Panel
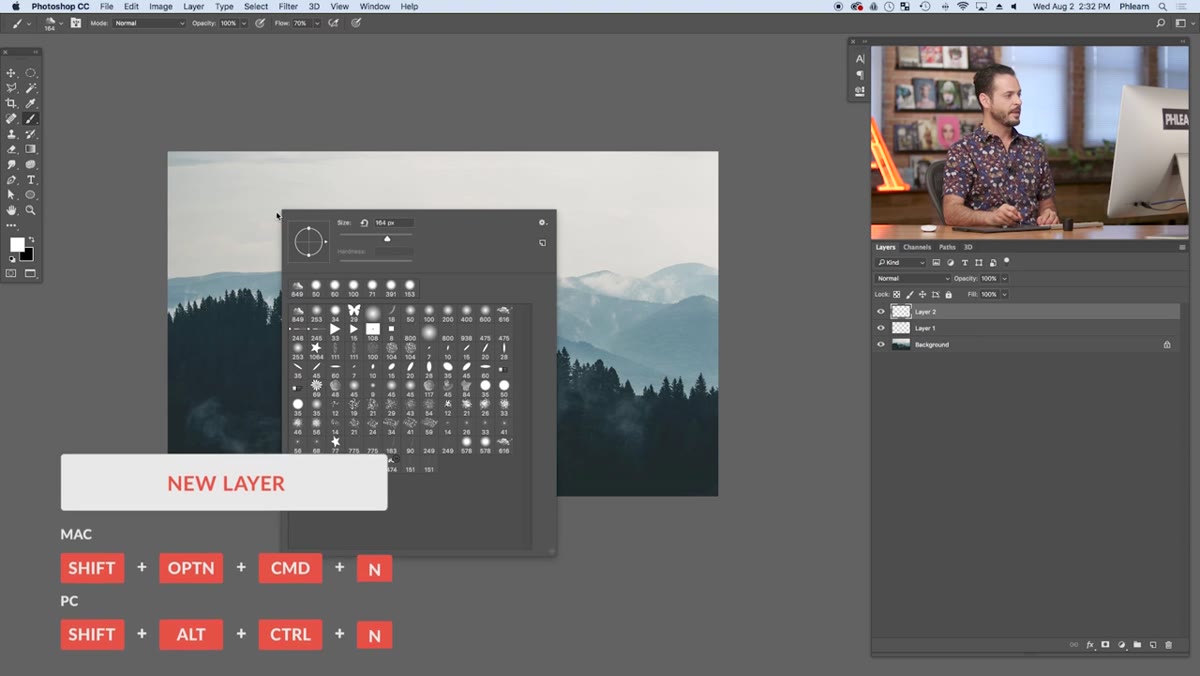 Brush picker open showing custom brush at top of list
Press B to activate the Brush tool, then right-click on your canvas to open the brush picker. Your newly installed brush should be visible, and if you reordered it in the previous step, it will be right at the top. Hovering over it in the picker shows the name again as a final confirmation before you start painting.
Brush picker open showing custom brush at top of list
Press B to activate the Brush tool, then right-click on your canvas to open the brush picker. Your newly installed brush should be visible, and if you reordered it in the previous step, it will be right at the top. Hovering over it in the picker shows the name again as a final confirmation before you start painting.
From here the brush behaves exactly like any native Photoshop brush. You can adjust size with the bracket keys, and all your standard brush settings in the Options Bar apply.
Step 6: Paint on a New Layer with Low Flow
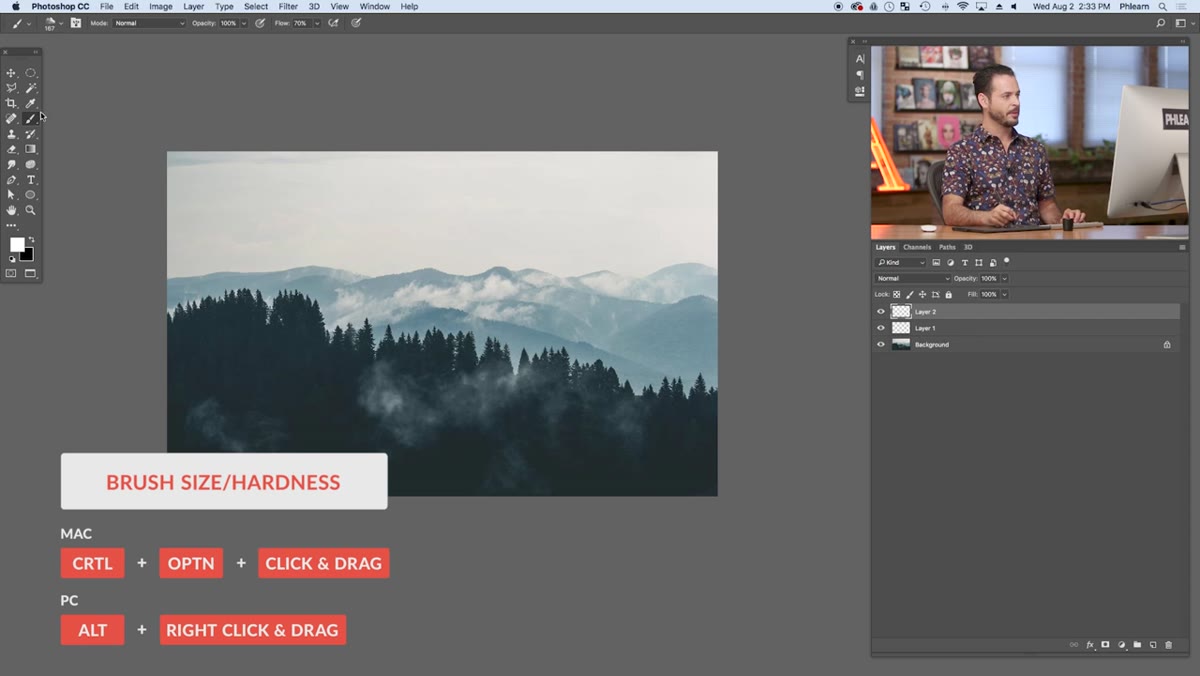 Painting smoke effect on new layer with flow set to 30%
Always create a new layer before painting with a custom brush. This keeps your effect non-destructive and gives you opacity and blend mode control after the fact. For atmospheric brushes like smoke or fog, set your Flow in the Options Bar to around 30%. Flow controls how quickly the paint builds up with each stroke, and a lower value lets you layer gradually rather than dumping the full opacity on the first click.
Painting smoke effect on new layer with flow set to 30%
Always create a new layer before painting with a custom brush. This keeps your effect non-destructive and gives you opacity and blend mode control after the fact. For atmospheric brushes like smoke or fog, set your Flow in the Options Bar to around 30%. Flow controls how quickly the paint builds up with each stroke, and a lower value lets you layer gradually rather than dumping the full opacity on the first click.
For smoke and fog specifically, changing the layer’s blend mode to Lighten means the brush will only brighten pixels rather than darken them, which is more physically accurate for how light scatters through haze. If you want more control, leave the blend mode on Normal and simply reduce the layer opacity after painting.
Step 7: Use the Same Brush on Your Eraser
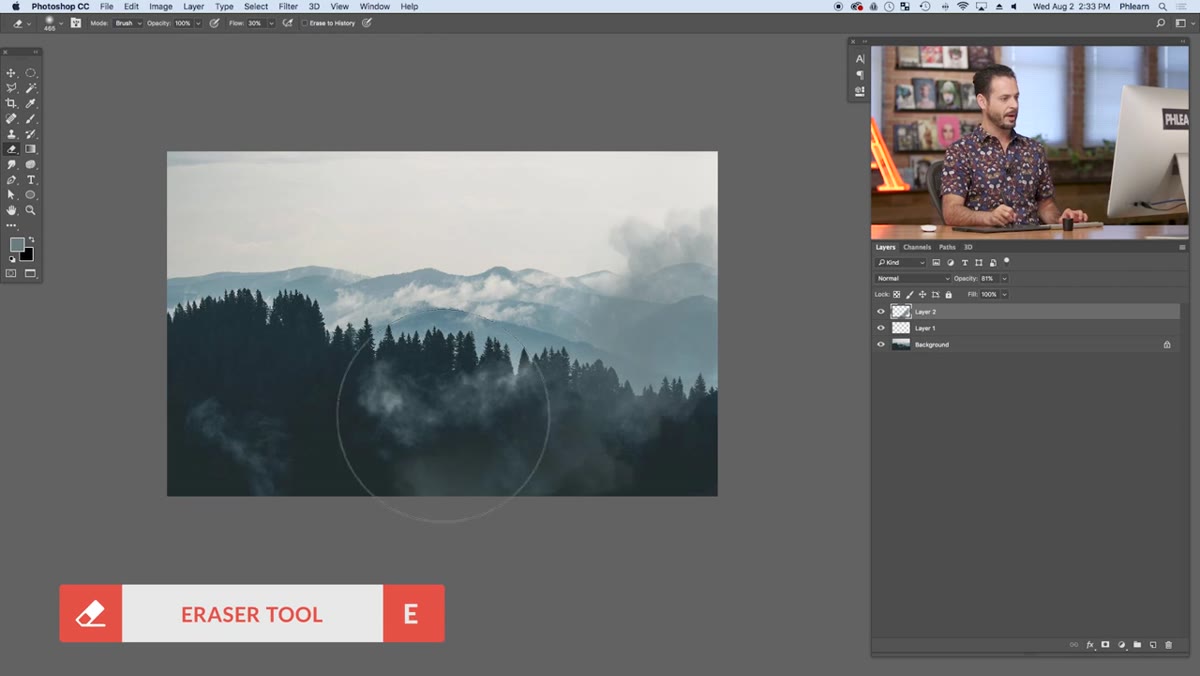 Eraser tool active with smoke brush selected in brush picker
This is the tip that elevates a decent smoke effect to a convincing one. Press E for the Eraser tool, right-click to open the brush picker, and select the same custom brush you just used for painting. Now when you erase back into your smoke layer, you’re erasing with a smoke-shaped mark rather than a soft round circle. The edges of the erasure pick up the same organic texture as the brush itself, and the result is smoke that looks like it was photographed rather than painted.
Eraser tool active with smoke brush selected in brush picker
This is the tip that elevates a decent smoke effect to a convincing one. Press E for the Eraser tool, right-click to open the brush picker, and select the same custom brush you just used for painting. Now when you erase back into your smoke layer, you’re erasing with a smoke-shaped mark rather than a soft round circle. The edges of the erasure pick up the same organic texture as the brush itself, and the result is smoke that looks like it was photographed rather than painted.
This approach works for any texture-based brush. A cloud brush used as an eraser gives you natural cloud edges. A foliage brush used as an eraser carves foliage-shaped gaps. It’s a simple toggle that most people never think to try.
One Thing I’d Add From My Own Work
The Preset Manager method shown here is solid and works in every version of Photoshop I’ve used professionally. But if you’re managing large brush libraries across multiple machines, which I do across my studio setup and a remote workstation, I’d strongly recommend keeping all your .abr files in a single organized folder that lives on a synced drive. Every time you reinstall Photoshop or move to a new machine, you can load your entire library back in minutes instead of hunting through downloads folders.
I maintain a folder structure by category: atmospheric, texture, light effects, grunge. It takes five minutes to set up and has saved me from the quiet panic of sitting down on a deadline and discovering a brush I need isn’t installed on the machine in front of me.
The single most important takeaway here is the Eraser trick. Installing the brush is mechanical and you’ll do it in under a minute once you’ve been through it once. But painting your smoke layer and then erasing back into it with the same brush is what separates an effect that reads as a Photoshop filter from one that reads as part of the image. It costs nothing extra and takes thirty seconds to set up.
Watch the full tutorial on YouTube to see Aaron walk through the complete effect with the smoke and fog brush in action.
Comments (3)
Tried this technique this morning. Game changer for real.
Just used this on a wedding shoot edit. Client was thrilled.
This is fantastic. I've been recommending this approach to my readers too.
Leave a Comment