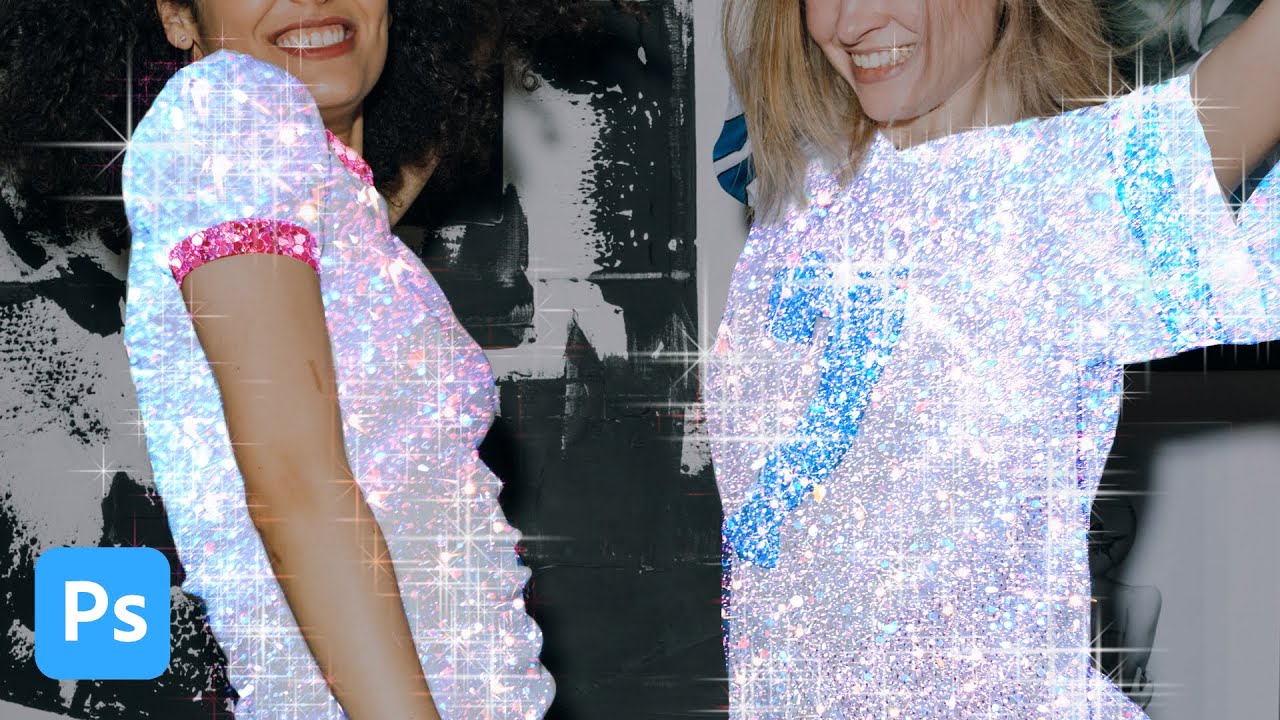
My clients come in two flavors: the ones who know exactly what they want, and the ones who send me a Pinterest board full of Instagram-aesthetic images and say “make it look like that.” The glitter sparkle effect falls firmly into the second category. I’ve been seeing it on product shots and portrait campaigns for a couple of years now, and every time a client sends me a reference I’ve had to reverse-engineer it on the fly. That stops today.
In this Aaron Nace (PHLEARN) tutorial, the technique turns out to be simpler than I expected – which is both a relief and slightly annoying given how long I’ve been improvising it. Watch the full tutorial on YouTube if you want to follow along with the source material. What I want to do here is break it down step by step so you can lift the workflow cleanly and adapt it to your own images, whether that’s a portrait, a product flat lay, or a fashion composite.
The core mechanic is elegant: bring in glitter texture images as Smart Objects, blend them over your base photo using Screen mode, and then use layer masks – refined with a brush – to control exactly where the sparkle lands. A custom Photoshop brush handles the finishing details. That’s the whole thing. The execution is what matters.
Step 1: Place Your Glitter Textures as Smart Objects
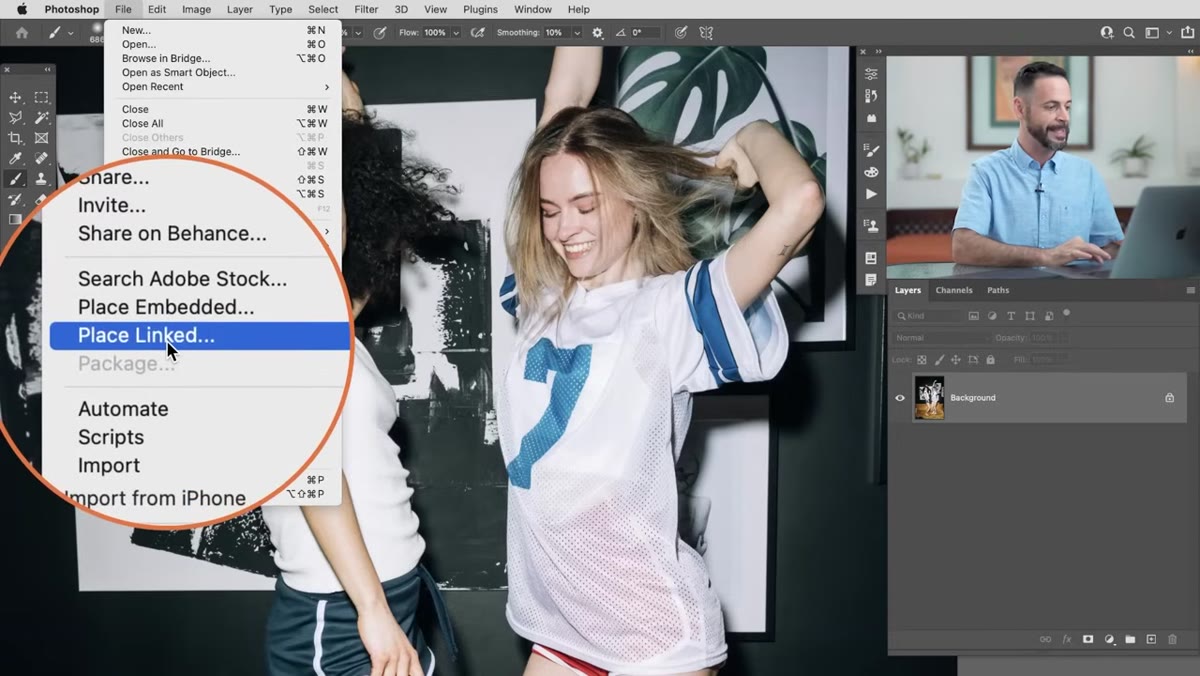 File menu open with Place Linked option highlighted
Start with your base image open in Photoshop. Instead of dragging textures in or using Place Embedded, go to File and choose Place Linked. This keeps your texture files connected to their source, which means if you ever swap out a texture later, Photoshop updates it automatically – no manual replacement needed. Place Linked is the right habit here, especially if you’re building toward a reusable action or a template workflow.
File menu open with Place Linked option highlighted
Start with your base image open in Photoshop. Instead of dragging textures in or using Place Embedded, go to File and choose Place Linked. This keeps your texture files connected to their source, which means if you ever swap out a texture later, Photoshop updates it automatically – no manual replacement needed. Place Linked is the right habit here, especially if you’re building toward a reusable action or a template workflow.
Aaron uses four different glitter textures, placing each one separately so they layer on top of the subject. You don’t need to resize or position them precisely at this stage. Just get them into the document stacked on top of your image. Each placed file will appear in your Layers panel as a Smart Object, which also means any filters you add later stay editable.
Step 2: Set All Glitter Layers to Screen Blend Mode
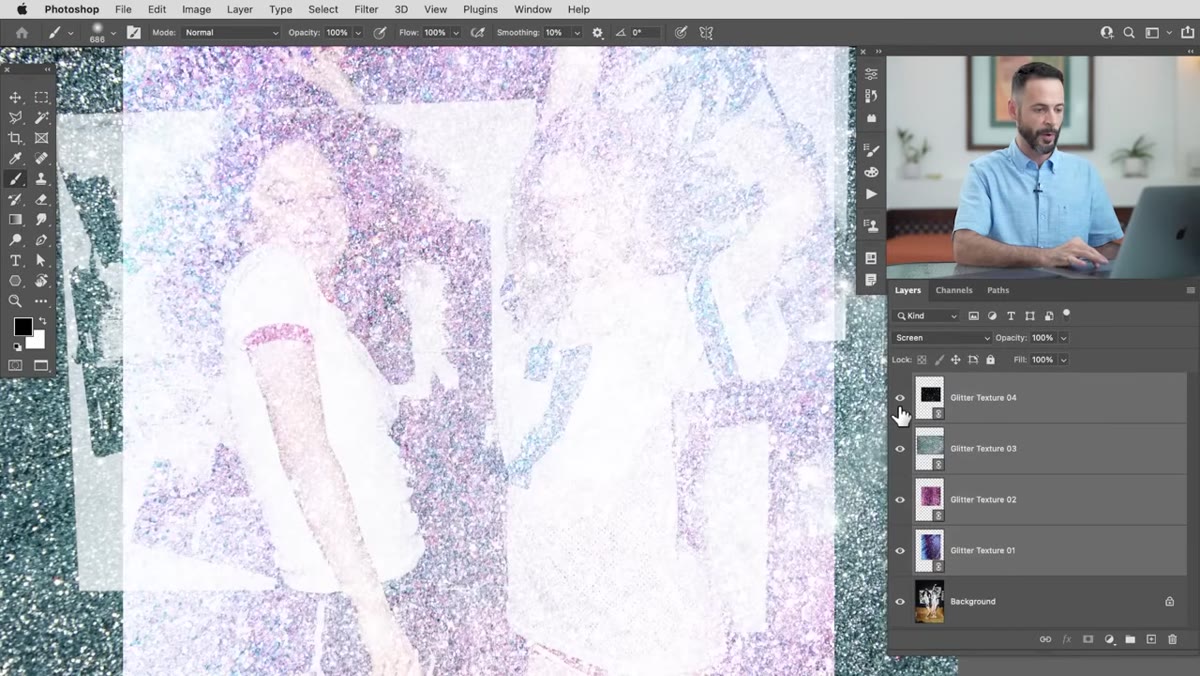 Blend mode dropdown changing from Normal to Screen
With all your glitter texture layers placed, shift-click to select them all in the Layers panel. Then change the blend mode from Normal to Screen. Screen mode drops out the dark tones in a layer and only lets the bright areas show through – which is exactly what you want with glitter. The dark background of a typical glitter texture image disappears, and all you’re left with is the light-catching sparkle sitting on top of your subject.
Blend mode dropdown changing from Normal to Screen
With all your glitter texture layers placed, shift-click to select them all in the Layers panel. Then change the blend mode from Normal to Screen. Screen mode drops out the dark tones in a layer and only lets the bright areas show through – which is exactly what you want with glitter. The dark background of a typical glitter texture image disappears, and all you’re left with is the light-catching sparkle sitting on top of your subject.
This is the foundational trick that makes the effect work, and it’s worth understanding why it works rather than just copying the setting. Screen mode is mathematically the inverse of Multiply. Anything pure black becomes transparent, anything pure white stays fully visible, and everything in between blends proportionally. Glitter textures – with their dark fields and bright specular highlights – are practically designed for it.
Step 3: Rough-Select Your Subject with the Lasso Tool
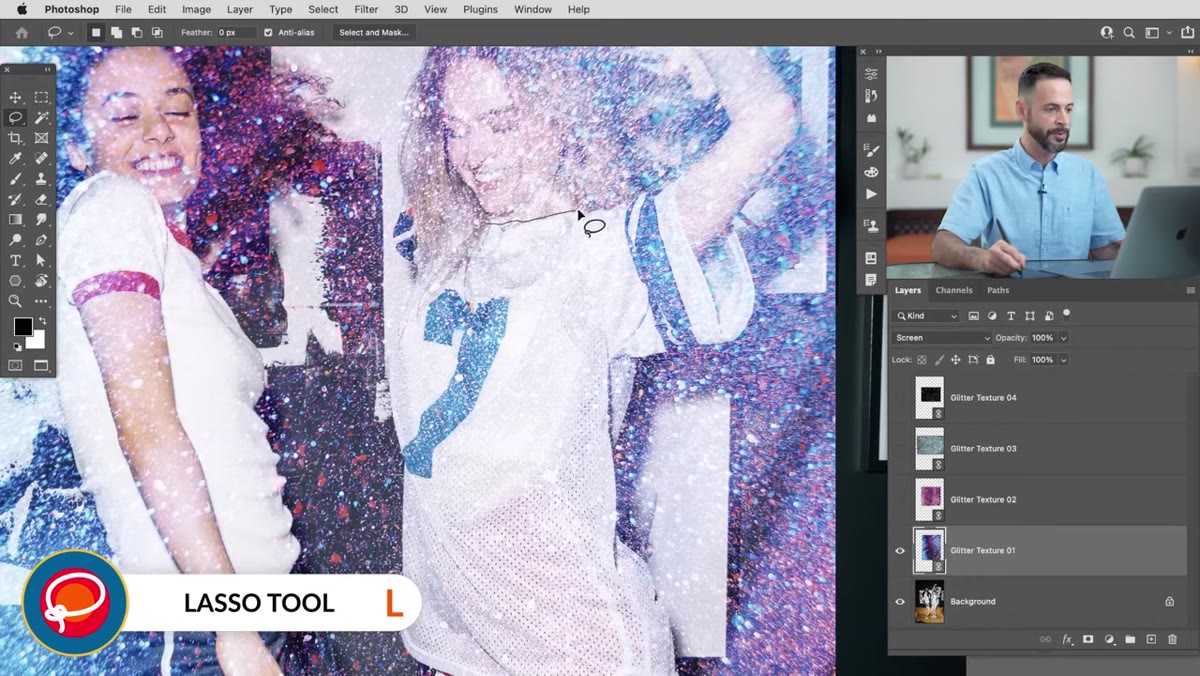 Lasso tool tracing around subject on canvas
Now you want to isolate the glitter to your subject rather than letting it cover the entire image including the background. Grab the Lasso tool (keyboard shortcut L) and draw a loose selection around your subject. Loose is the operative word here. You don’t need to nail the hair or the edges of clothing at this stage because you’re about to convert this into a layer mask that you’ll refine with a brush.
Lasso tool tracing around subject on canvas
Now you want to isolate the glitter to your subject rather than letting it cover the entire image including the background. Grab the Lasso tool (keyboard shortcut L) and draw a loose selection around your subject. Loose is the operative word here. You don’t need to nail the hair or the edges of clothing at this stage because you’re about to convert this into a layer mask that you’ll refine with a brush.
If you have multiple subjects or separate areas you want to include, hold Shift while drawing additional selections to add them to the existing one. Once you have your rough selection active, click on the layer mask icon at the bottom of the Layers panel. Photoshop converts your selection into a layer mask, making the glitter visible only inside the selected area and hiding it everywhere else.
Step 4: Refine the Mask with a Brush
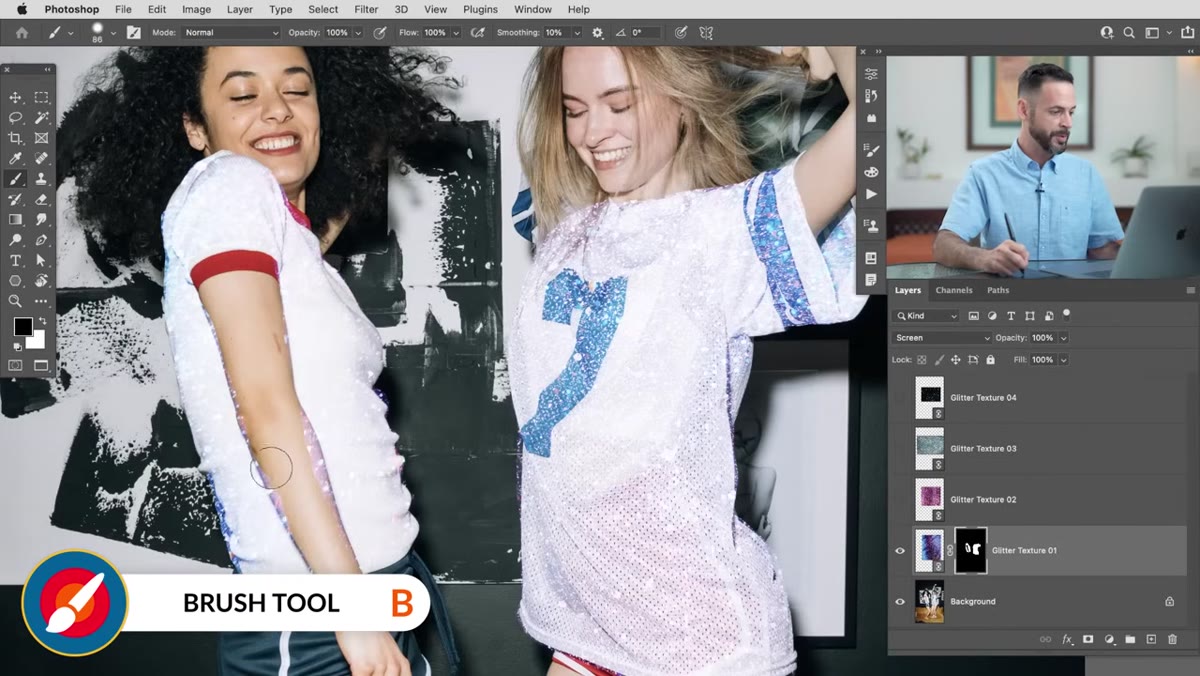 Painting black on layer mask to hide glitter from arm
Here’s where precision replaces approximation. With your layer mask selected (click directly on the mask thumbnail in the Layers panel), press B for the Brush tool. Paint with black to hide glitter in areas where it shouldn’t appear – exposed skin, faces, arms – and paint with white to reveal it anywhere your initial selection missed. The mask is fully non-destructive, so you can flip between black and white as many times as you need.
Painting black on layer mask to hide glitter from arm
Here’s where precision replaces approximation. With your layer mask selected (click directly on the mask thumbnail in the Layers panel), press B for the Brush tool. Paint with black to hide glitter in areas where it shouldn’t appear – exposed skin, faces, arms – and paint with white to reveal it anywhere your initial selection missed. The mask is fully non-destructive, so you can flip between black and white as many times as you need.
Aaron points out that this refinement step is exactly why your initial lasso selection doesn’t need to be perfect. The mask is the real control point. I’d add: use a soft-edged brush at reduced opacity for the edges of clothing and hair. It gives you a more natural falloff rather than a hard cutoff where the glitter meets skin.
Step 5: Darken the Background with a Levels Adjustment
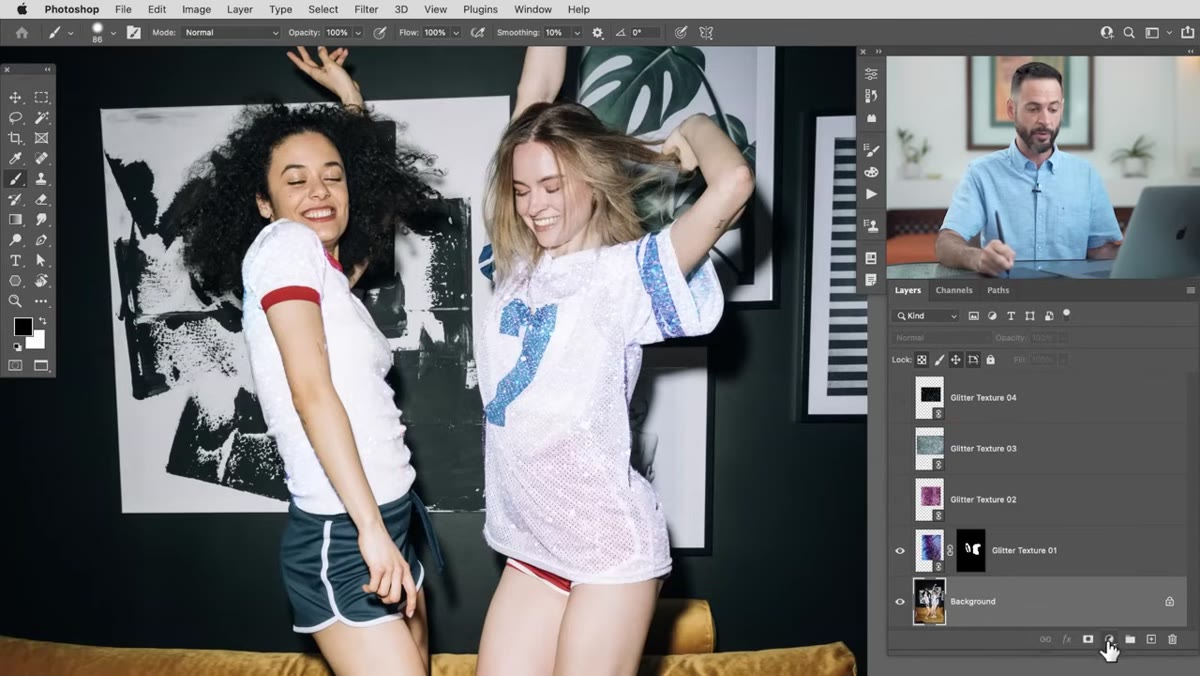 Levels panel with highlights pulled down to darken image
One detail that makes a real difference: slightly darken your background image before declaring the effect done. Add a Levels adjustment layer below your glitter layers, target it to your background, and pull the highlights output slider down just enough to drop the overall brightness of the base photo. This gives the glitter more visual contrast to pop against. A bright background competes with the sparkle effect; a slightly moodier base image lets it breathe.
Levels panel with highlights pulled down to darken image
One detail that makes a real difference: slightly darken your background image before declaring the effect done. Add a Levels adjustment layer below your glitter layers, target it to your background, and pull the highlights output slider down just enough to drop the overall brightness of the base photo. This gives the glitter more visual contrast to pop against. A bright background competes with the sparkle effect; a slightly moodier base image lets it breathe.
If you want to push the glitter itself even harder, you can apply Levels directly to a glitter Smart Object layer using Ctrl/Cmd + L. Because the layer is a Smart Object, this adds an editable Smart Filter rather than a destructive adjustment. Increase the contrast on the sparkle texture itself and the effect reads much more intensely without you needing additional texture layers.
One Workflow Upgrade Worth Adding
The technique Aaron demonstrates is manual and session-specific. For anyone doing this effect more than once – say, a client who wants it applied across a product line or a seasonal campaign – there’s a strong argument for recording the blend mode change, the adjustment layer setup, and even a default mask state as a Photoshop action. The lasso selection step stays manual since it’s image-dependent, but everything else is repeatable. I’ve built actions around techniques with similar structures and the time savings compound fast once you’re applying the same look across twenty or thirty images.
Also worth noting: Screen mode works best with glitter textures that have dark or black backgrounds. If you find a texture with a white or mid-gray background, try Lighten or Overlay instead and see which reads more naturally with your specific image.
The single most important thing to take from this technique is the blend mode logic. Screen mode transforms what would otherwise be a clunky texture overlay into something that feels like light, not like a sticker slapped on top of a photo. Once you internalize when and why to use Screen, you’ll start seeing other applications for it – lens flares, bokeh overlays, light leaks. The glitter effect is just one entry point into a broader set of compositing tools.
Watch the full tutorial on YouTube to see Aaron walk through every step with the actual source files – he also shares free textures and a custom brush download in the video description.
Comments (2)
Shared this with my photography group. Everyone loved it.
This is fantastic. I've been recommending this approach to my readers too.
Leave a Comment