
Distraction removal is one of those tasks that sounds simple until you’re staring at a client’s hero shot with a rogue piece of equipment cutting through an otherwise clean frame. I’ve been in that position more times than I can count, and the solution has changed dramatically over the last few years. What used to require careful cloning, patch work, and a lot of crossed fingers has become something closer to a creative decision than a technical grind.
In this Matt Kloskowski tutorial, Watch the full tutorial on YouTube, Matt walks through three real-world examples using AI-powered tools already baked into the standard release of Photoshop. No betas, no plugins. What I found most useful is that he doesn’t just demonstrate the steps – he reframes the whole process as a creative one. That mental shift alone is worth your time.
The thing that resonated with me was his point about stopping to think before you reach for the tool. After 15 years in commercial studios, I still catch myself defaulting to a clone stamp out of muscle memory when Generative Fill would solve the problem in seconds. This walkthrough is a good reset for anyone who’s been in Photoshop long enough to have built some bad habits.
Step 1: Evaluate Whether Removal or Cropping Makes More Sense
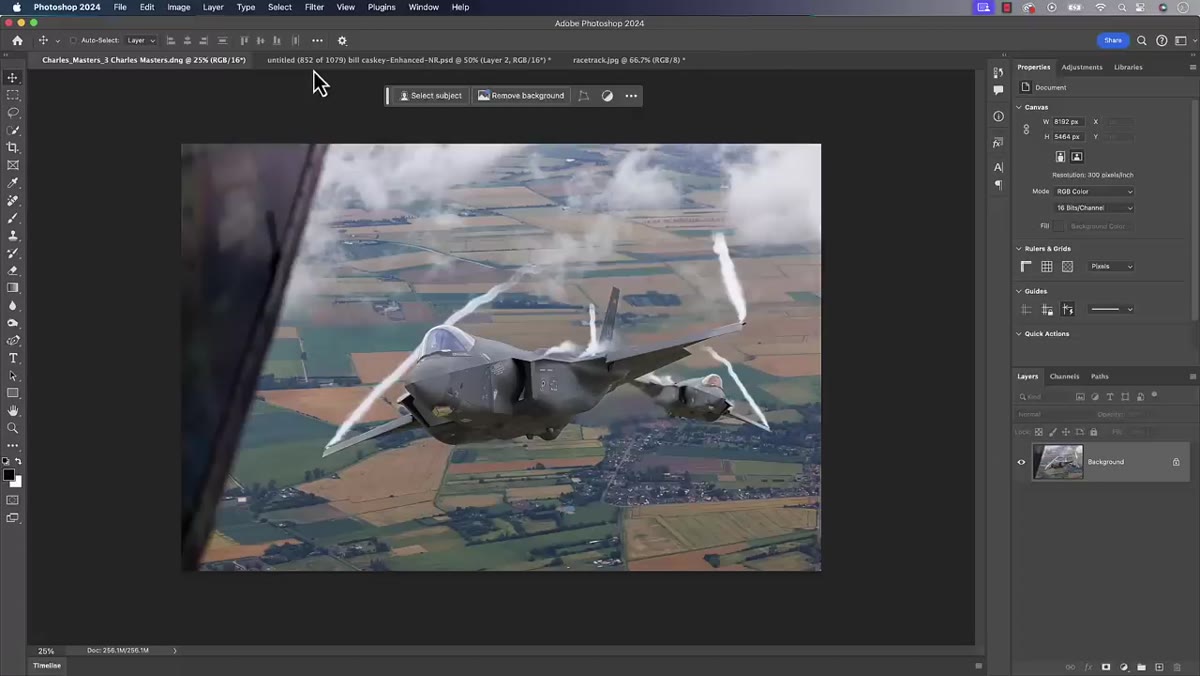 Aerial photo with plane door visible at left edge
Before you touch a single tool, Matt asks a question most people skip: is cropping actually the right answer here? In his first example, an aerial photo shot from the open door of a plane, cropping tight enough to eliminate the distraction would also cut too close to the subject. The composition only works if the frame stays wide.
Aerial photo with plane door visible at left edge
Before you touch a single tool, Matt asks a question most people skip: is cropping actually the right answer here? In his first example, an aerial photo shot from the open door of a plane, cropping tight enough to eliminate the distraction would also cut too close to the subject. The composition only works if the frame stays wide.
This is a real workflow consideration, not just a tutorial setup. Every time I’m handed an e-commerce shot with a stray prop or shadow at the edge, the first thing I check is whether a crop solves it cleanly. If it does, I crop. If it compresses the composition, I reach for the removal tools.
Step 2: Draw a Rough Lasso Selection Around the Distraction
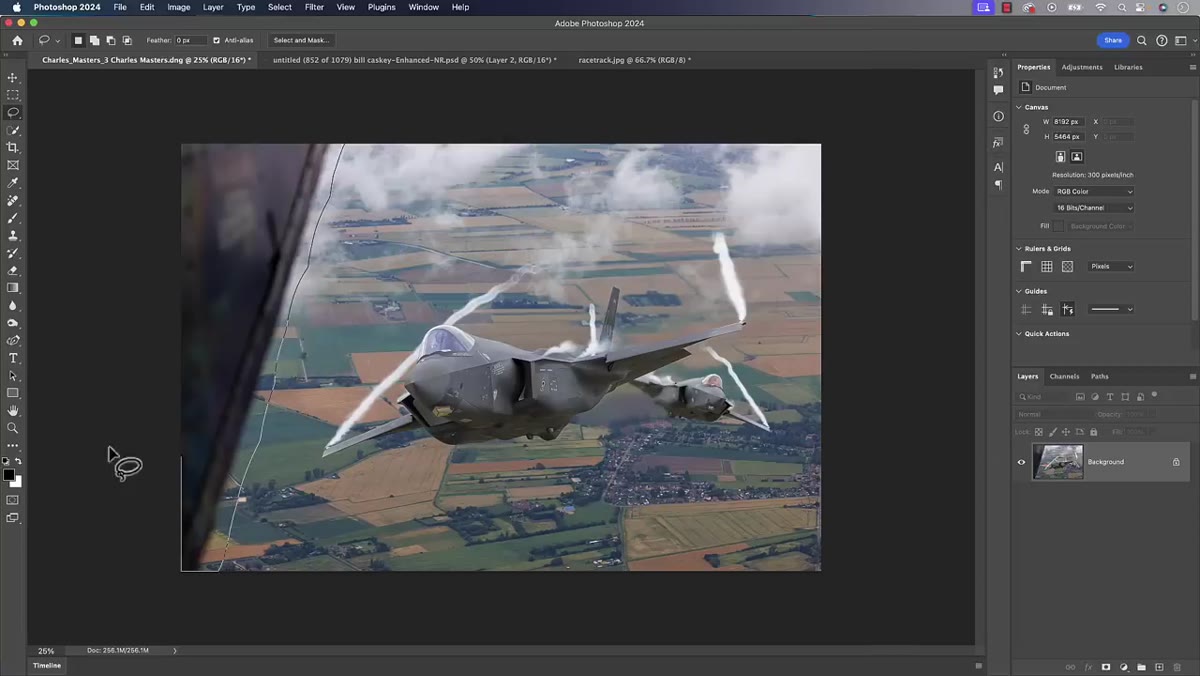
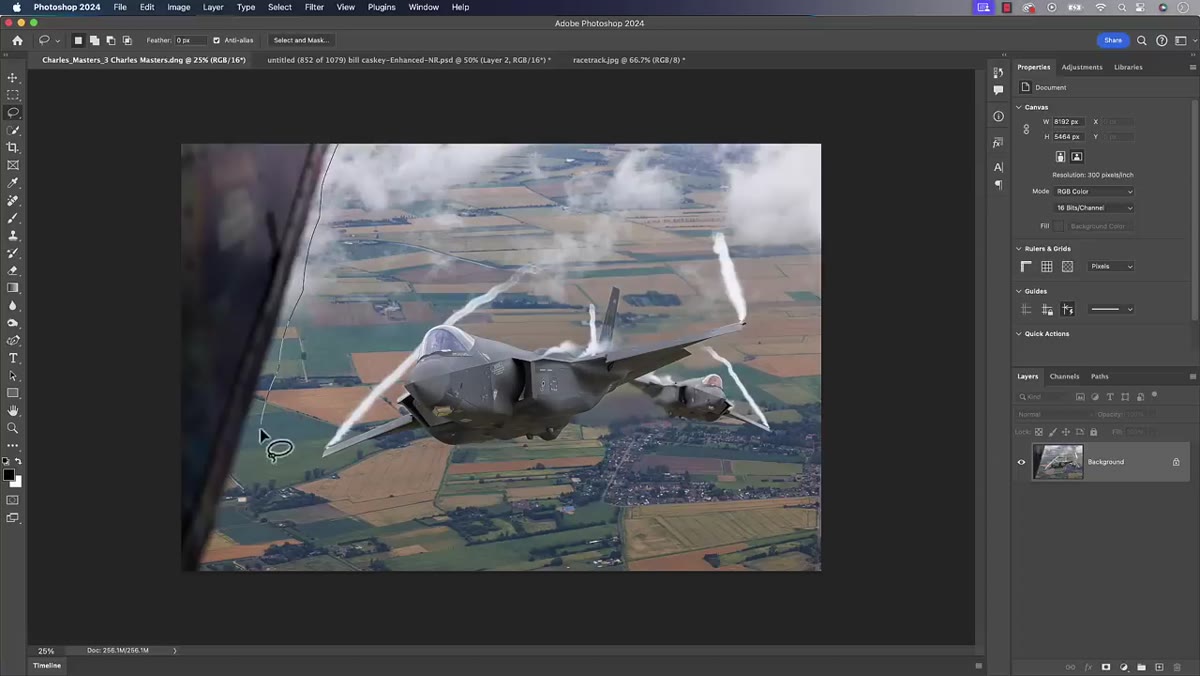 Lasso tool drawing loose selection around plane door
Once you’ve decided removal is the right call, grab the Lasso tool and draw a loose selection around the problem area. Matt is deliberate here about not being precise. You want some breathing room around the distraction so the fill algorithm has clean surrounding pixels to sample from. A tight selection that hugs the edges of the object tends to produce harder, more obvious seams.
Lasso tool drawing loose selection around plane door
Once you’ve decided removal is the right call, grab the Lasso tool and draw a loose selection around the problem area. Matt is deliberate here about not being precise. You want some breathing room around the distraction so the fill algorithm has clean surrounding pixels to sample from. A tight selection that hugs the edges of the object tends to produce harder, more obvious seams.
The selection doesn’t need to be artful. A quick, rough loop is exactly right. If you’re dealing with something near the edge of the frame, let your selection run off the canvas edge – Photoshop handles that gracefully.
Step 3: Run Generative Fill With No Prompt
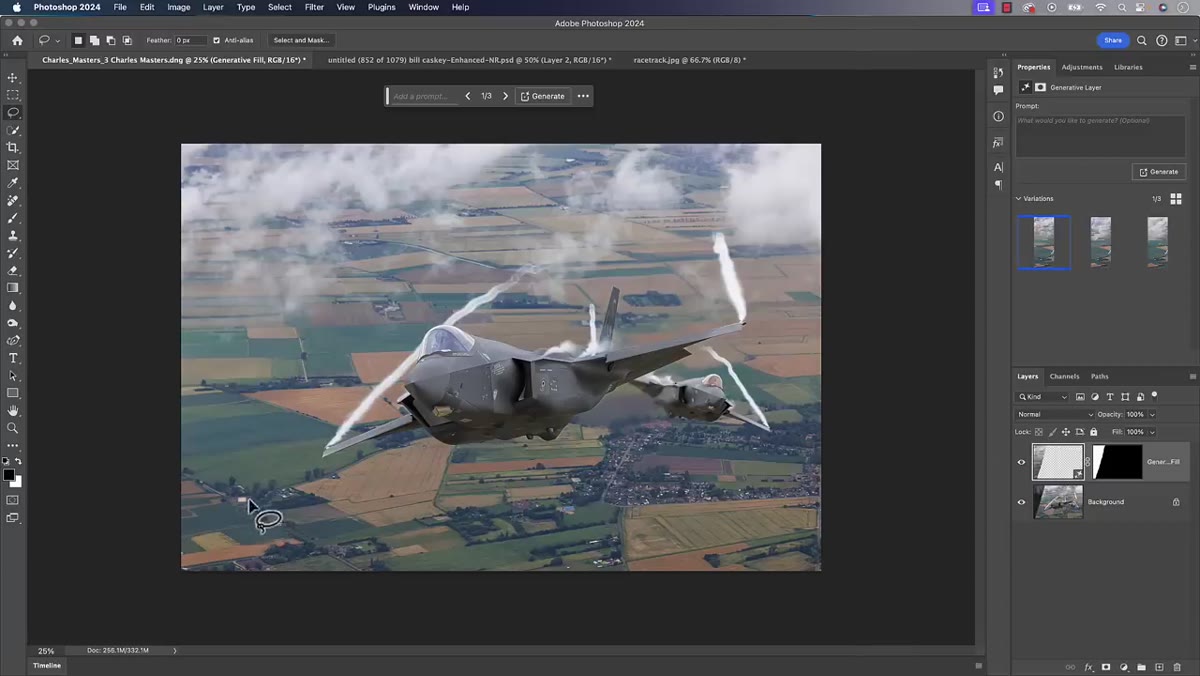
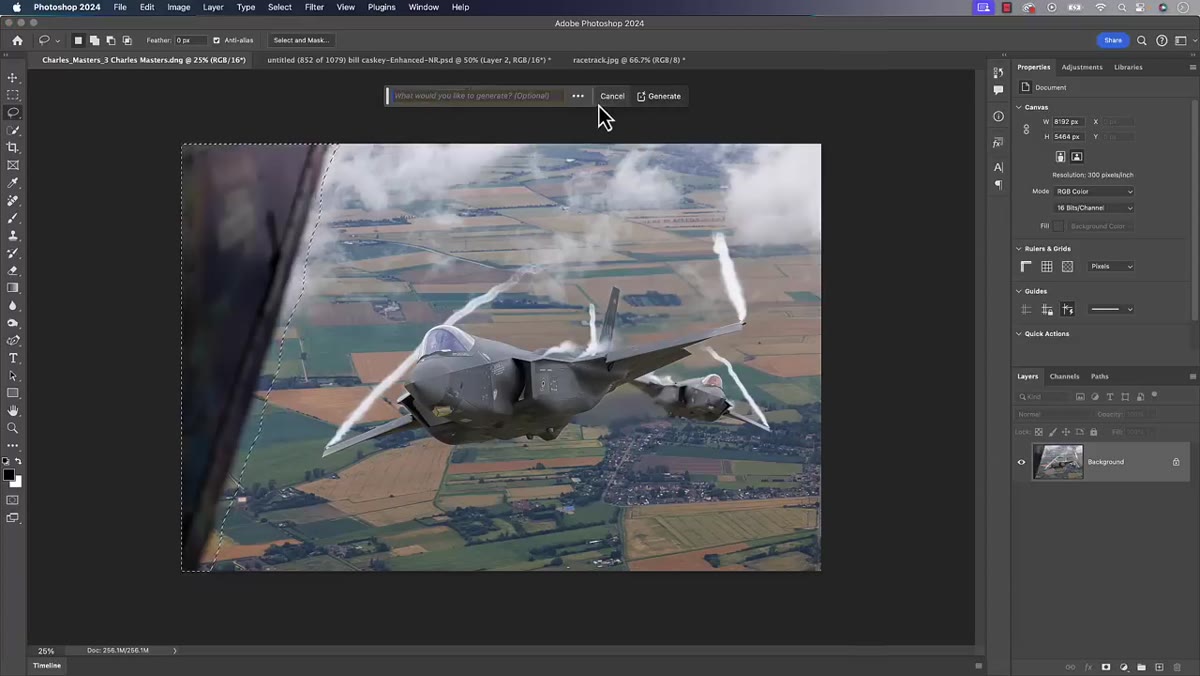 Generative Fill dialog open with empty prompt field
With your selection active, go to the contextual taskbar and click Generative Fill. Here’s the key detail Matt highlights: leave the prompt field empty. When your goal is removal rather than replacement, typing a description often produces worse results than letting the model decide what belongs there based on surrounding context.
Generative Fill dialog open with empty prompt field
With your selection active, go to the contextual taskbar and click Generative Fill. Here’s the key detail Matt highlights: leave the prompt field empty. When your goal is removal rather than replacement, typing a description often produces worse results than letting the model decide what belongs there based on surrounding context.
Click Generate, and Photoshop returns three variations. Each one is stored as a separate layer state, accessible via the Properties panel. Matt notes that in this particular shot the background is intentionally soft – shallow depth of field – which makes Generative Fill significantly more effective. The model doesn’t have to reproduce fine detail, just plausible texture and tone. When you’re working with sharp-focus backgrounds or high-frequency texture, results will vary.
Step 4: Cycle Through the Three Generated Variations
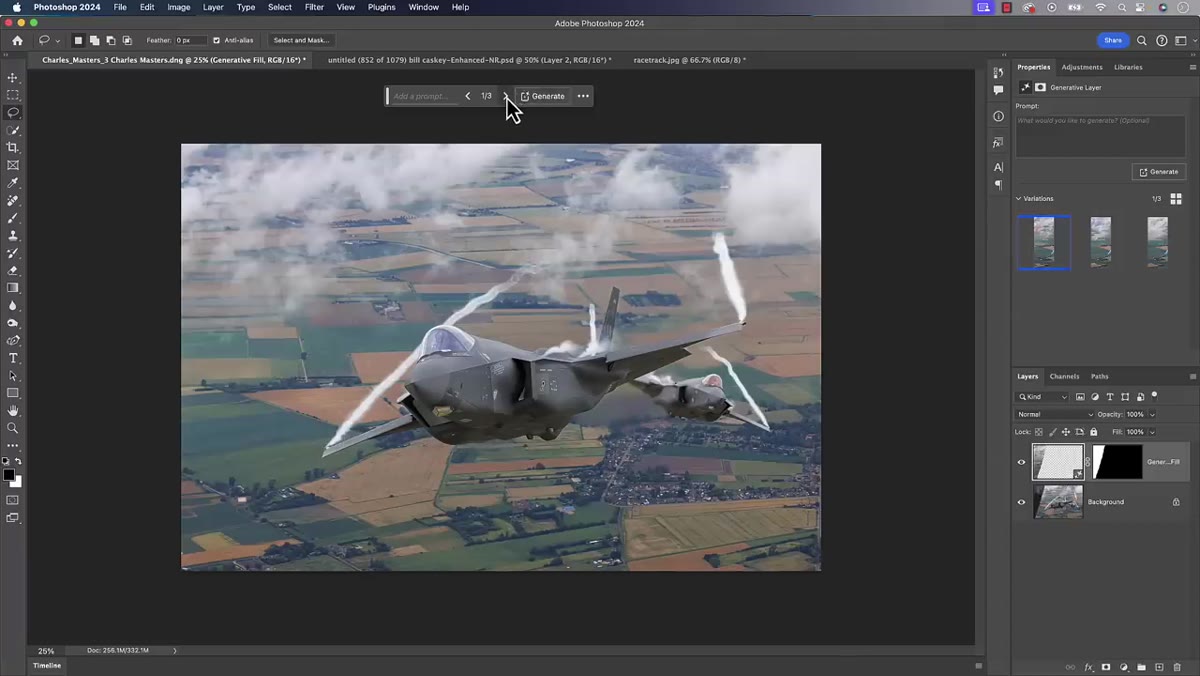 Properties panel showing three Generative Fill variations
Don’t settle for the first result. Photoshop generates three options by default, and they’re worth comparing side by side. In Matt’s example, two of the three variations are nearly identical and one is noticeably cleaner on the left edge. Selecting between them takes two seconds and can make the difference between a result that needs further cleanup and one that’s done.
Properties panel showing three Generative Fill variations
Don’t settle for the first result. Photoshop generates three options by default, and they’re worth comparing side by side. In Matt’s example, two of the three variations are nearly identical and one is noticeably cleaner on the left edge. Selecting between them takes two seconds and can make the difference between a result that needs further cleanup and one that’s done.
If none of the three work well, you can hit Generate again for three more variations without redrawing your selection. I’ve found that a second or third generation batch often solves problems the first batch introduced – slight tonal mismatches, repeated pattern artifacts, that kind of thing.
Step 5: Use Content-Aware Fill as a Non-AI Alternative
 Content-Aware Fill workspace with sampling area brush visible
For anyone who prefers to stay away from Generative Fill, Matt walks through Content-Aware Fill as a fully capable alternative. Go to Edit, then Content-Aware Fill. This opens a dedicated workspace where you can manually control which areas of the image Photoshop samples from when building the fill.
Content-Aware Fill workspace with sampling area brush visible
For anyone who prefers to stay away from Generative Fill, Matt walks through Content-Aware Fill as a fully capable alternative. Go to Edit, then Content-Aware Fill. This opens a dedicated workspace where you can manually control which areas of the image Photoshop samples from when building the fill.
The workspace shows a green overlay representing the sampling region. You can paint out areas you don’t want sampled – for example, if part of the distraction is bleeding into what Photoshop thinks is a usable source area. You can also paint in additional zones to give the algorithm more clean texture to work with. Matt makes a point I think is worth underlining: Content-Aware Fill is still computer-generated and model-driven. It’s an earlier generation of the same underlying idea as Generative Fill, just with a more manual control set.
Step 6: Crop to Finalize the Composition
 Crop tool trimming slight excess space from left side
After your fill looks clean, take a second look at the overall composition. Matt crops slightly into the left side of the aerial image after the fill, because removing the distraction left a little too much dead space in the frame. This is a small adjustment, but it matters – the removal changes the visual weight of the image, and a quick crop rebalances it.
Crop tool trimming slight excess space from left side
After your fill looks clean, take a second look at the overall composition. Matt crops slightly into the left side of the aerial image after the fill, because removing the distraction left a little too much dead space in the frame. This is a small adjustment, but it matters – the removal changes the visual weight of the image, and a quick crop rebalances it.
This is a step I almost always add to my own distraction-removal passes. Filling an area and calling it done without reconsidering the crop can leave a composition that feels slightly off without anyone being able to say exactly why.
How I’d Extend This in a Production Environment
The technique Matt demonstrates works exactly as shown for individual images. Where I’d push it further is in identifying which files in a shoot actually need distraction removal before you open them one by one. I use a simple flagging system in Lightroom – color labels, specifically – to mark images during culling that have edge distractions versus center-frame problems. Edge distractions are almost always faster to fix with Generative Fill and a loose Lasso. Center-frame removals, where the surrounding detail is more complex, usually need the manual sampling controls inside Content-Aware Fill.
Building that decision into your culling pass means by the time you’re in Photoshop, you already know which tool you’re reaching for. That front-loaded thinking is what keeps a high-volume retouching session from turning into a guessing game image by image.
The single most important thing Matt’s tutorial drives home is that leaving the Generative Fill prompt empty is often the smarter move. The instinct is to describe what you want, but for removal tasks, the model reads context better than it reads instructions. Let it fill – then decide.
Watch the full tutorial on YouTube to see all three of Matt’s examples, including cases where the background complexity changes which tool makes the most sense.
Comments (1)
Quality content like this is rare. Keep it up.
Leave a Comment