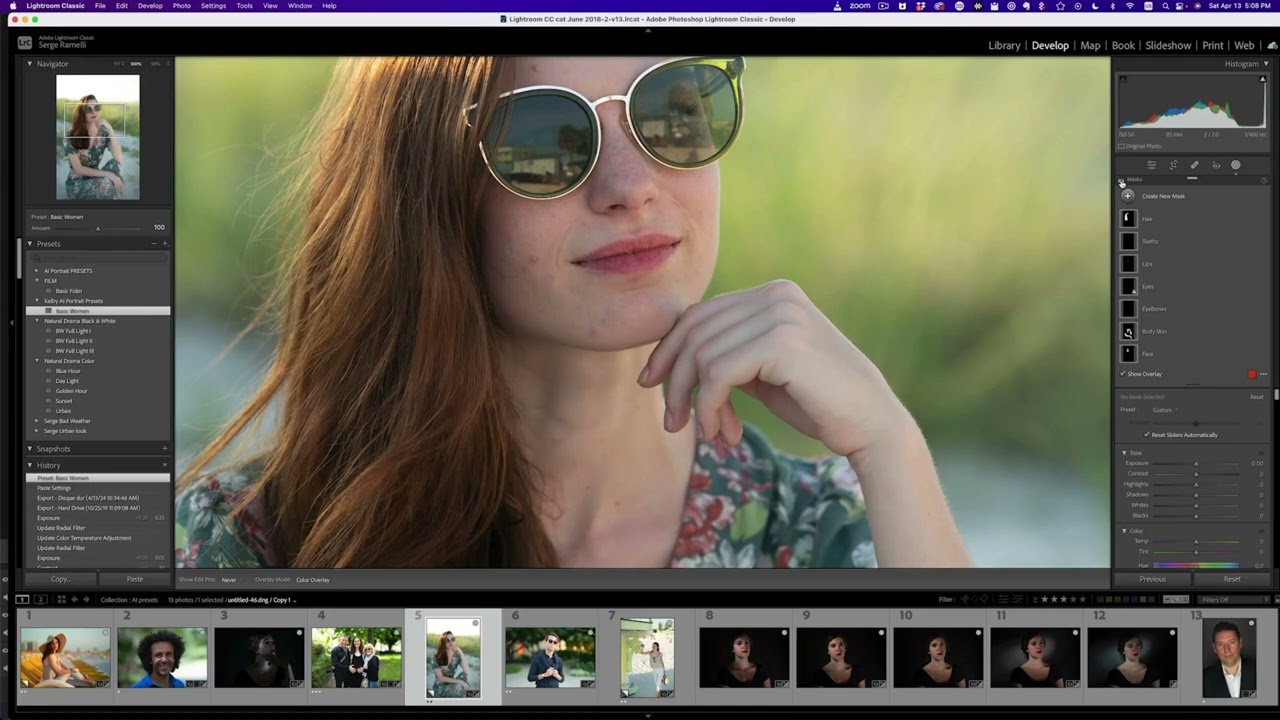
If there is one thing fifteen years in commercial photography has taught me, it is that the tasks you repeat most often are the ones worth eliminating first. Portrait retouching is my clearest example. Every shoot comes with the same list: smooth the skin a touch, pop the eyes slightly, add a little life to the lips, deepen the hair. The adjustments are almost always the same. The execution, until recently, was manual every single time.
That changed when I watched Serge Ramelli walk through an approach in this KelbyOne tutorial that I had honestly been dancing around for months without committing to it. Watch the full tutorial on YouTube. The core idea is simple but the implications are significant: use Lightroom’s AI people-detection and masking tools to build a preset that knows how to find a face, isolate individual features, and apply targeted adjustments, automatically, on any new portrait you open. You build it once. Then it works for you indefinitely.
What Ramelli demonstrates is not a heavy-handed beauty filter. It is a structured, modular system that you name carefully, adjust subtly, and save as a preset. The result adapts to each subject’s unique face because the AI is doing the detection work, not you. Here is how to build it.
Step 1: Open a Portrait and Navigate to the People Detection Tool
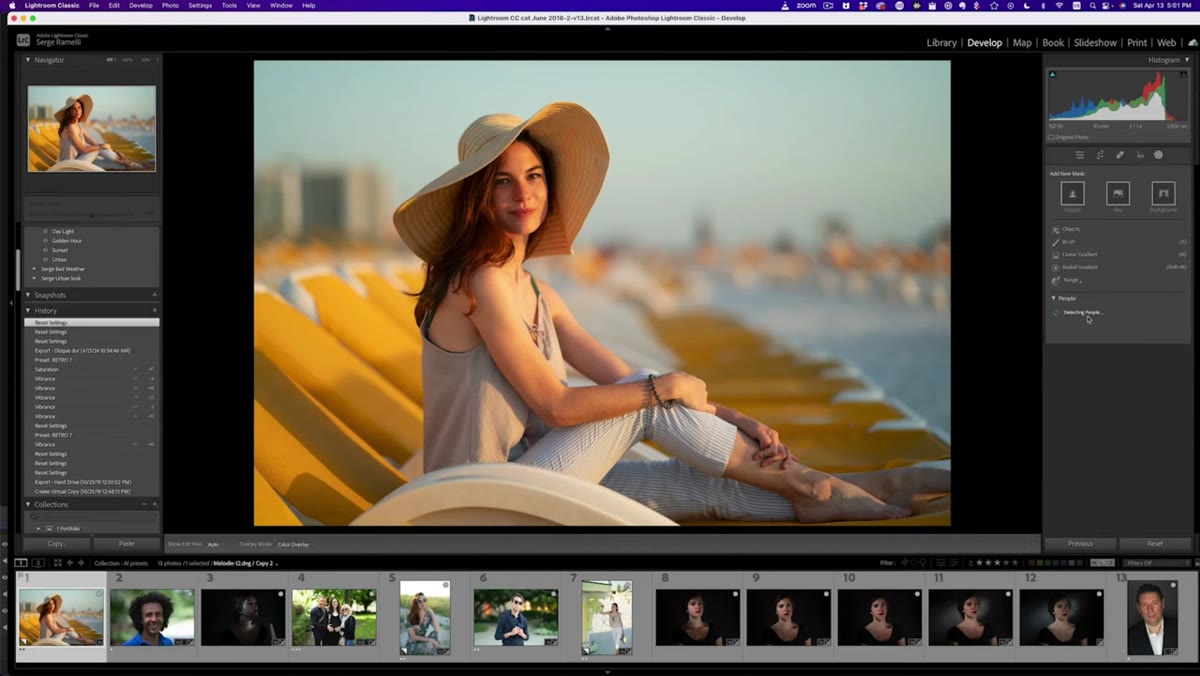 Lightroom detecting one person in the portrait panel
Skip global adjustments for now. The goal of this build session is to create the preset template, so resist the urge to touch exposure or white balance first. Go directly to the Masking panel and let Lightroom’s AI detect the people in your frame. It will scan the image and identify faces. Click on the detected subject to select them as your person of interest.
Lightroom detecting one person in the portrait panel
Skip global adjustments for now. The goal of this build session is to create the preset template, so resist the urge to touch exposure or white balance first. Go directly to the Masking panel and let Lightroom’s AI detect the people in your frame. It will scan the image and identify faces. Click on the detected subject to select them as your person of interest.
From here you are going to create multiple masks, one for each facial feature you want to control independently. That separation is what makes this preset genuinely powerful rather than just another skin softening trick.
Step 2: Create and Name Individual Feature Masks
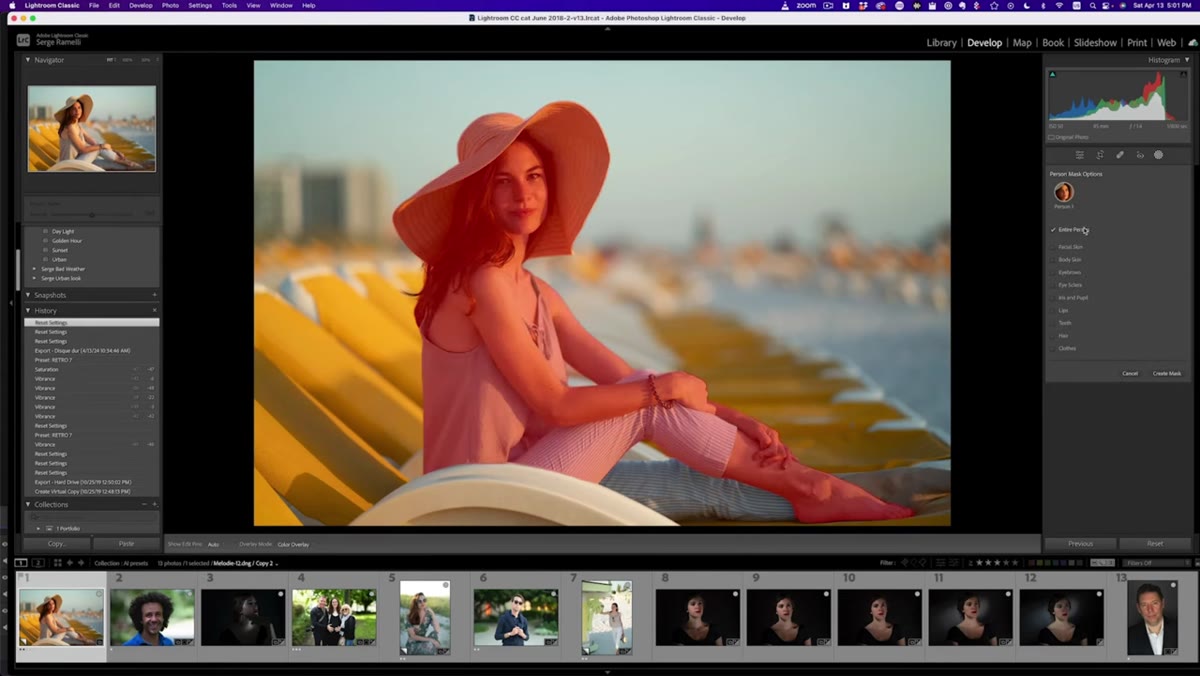 Creating a mask with facial feature checkboxes visible
With your subject selected, choose to create a mask and you will see a list of facial and body regions the AI can isolate: facial skin, body skin, eyebrows, eyes and pupils, lips, teeth, and hair. Select the features you want to control. Ramelli’s working selection includes facial skin, body skin, eyebrows, eyes and pupils, lips, teeth, and hair. He skips clothes and a few others that do not serve a portrait retouching workflow.
Creating a mask with facial feature checkboxes visible
With your subject selected, choose to create a mask and you will see a list of facial and body regions the AI can isolate: facial skin, body skin, eyebrows, eyes and pupils, lips, teeth, and hair. Select the features you want to control. Ramelli’s working selection includes facial skin, body skin, eyebrows, eyes and pupils, lips, teeth, and hair. He skips clothes and a few others that do not serve a portrait retouching workflow.
Here is the step most people rush and later regret: name every mask before you touch any sliders. Lightroom does not automatically label these with descriptive names, so you will end up with a list of generic entries like “Mask 6” that tell you nothing. Take two minutes now and rename each one clearly: Face Skin, Body Skin, Eyebrows, Eyes, Lips, Teeth, Hair. This naming investment pays back every time you open the preset on a new image and need to make a quick tweak.
Step 3: Adjust the Face Skin Mask
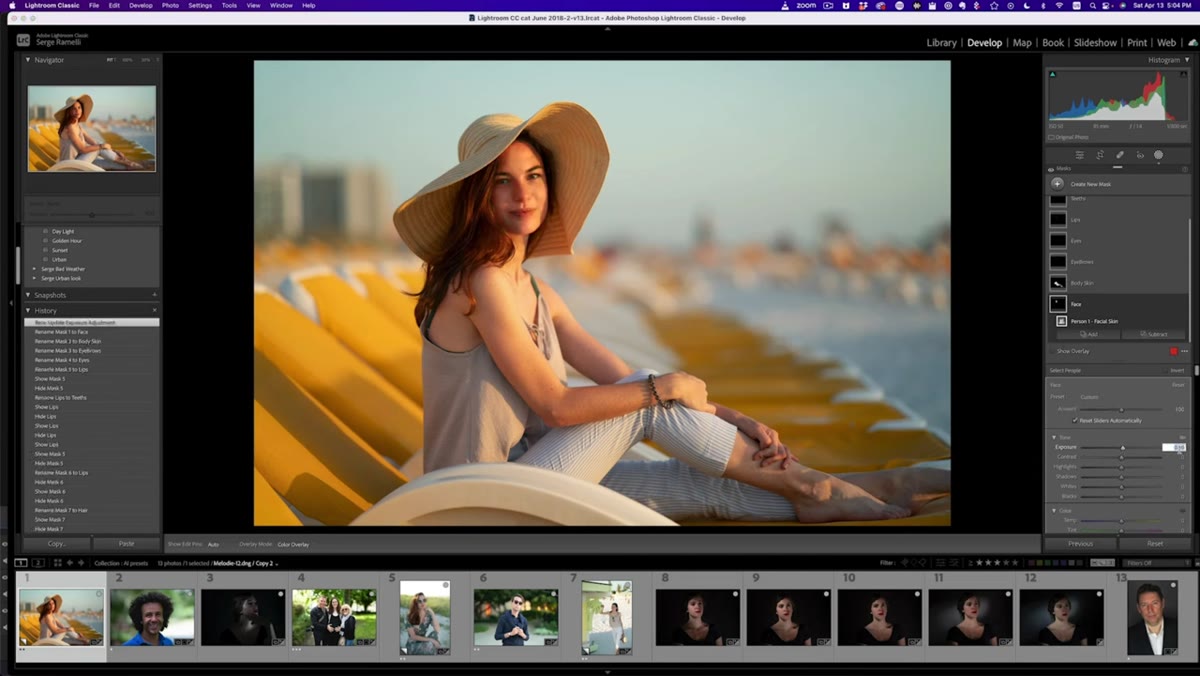 Face mask selected with contrast and clarity sliders pulled down
Select your Face Skin mask and apply adjustments that soften without flattening. A small positive exposure nudge, around plus 0.10, adds a subtle luminosity lift. Pulling contrast down, somewhere in the minus 15 to minus 25 range, reduces the harshness in skin texture without making it look plastic. The key move is a slight negative clarity adjustment. Clarity reduction at the mask level is far more controllable than doing it globally, and on facial skin it reads as genuine softness rather than an Instagram blur effect.
Face mask selected with contrast and clarity sliders pulled down
Select your Face Skin mask and apply adjustments that soften without flattening. A small positive exposure nudge, around plus 0.10, adds a subtle luminosity lift. Pulling contrast down, somewhere in the minus 15 to minus 25 range, reduces the harshness in skin texture without making it look plastic. The key move is a slight negative clarity adjustment. Clarity reduction at the mask level is far more controllable than doing it globally, and on facial skin it reads as genuine softness rather than an Instagram blur effect.
Toggle the mask visibility on and off as you work. Check the before and after frequently. If the skin starts looking like it belongs on a wax figure, you have gone too far on clarity. Subtlety is the whole point here.
Step 4: Tune Body Skin, Eyebrows, and Eyes
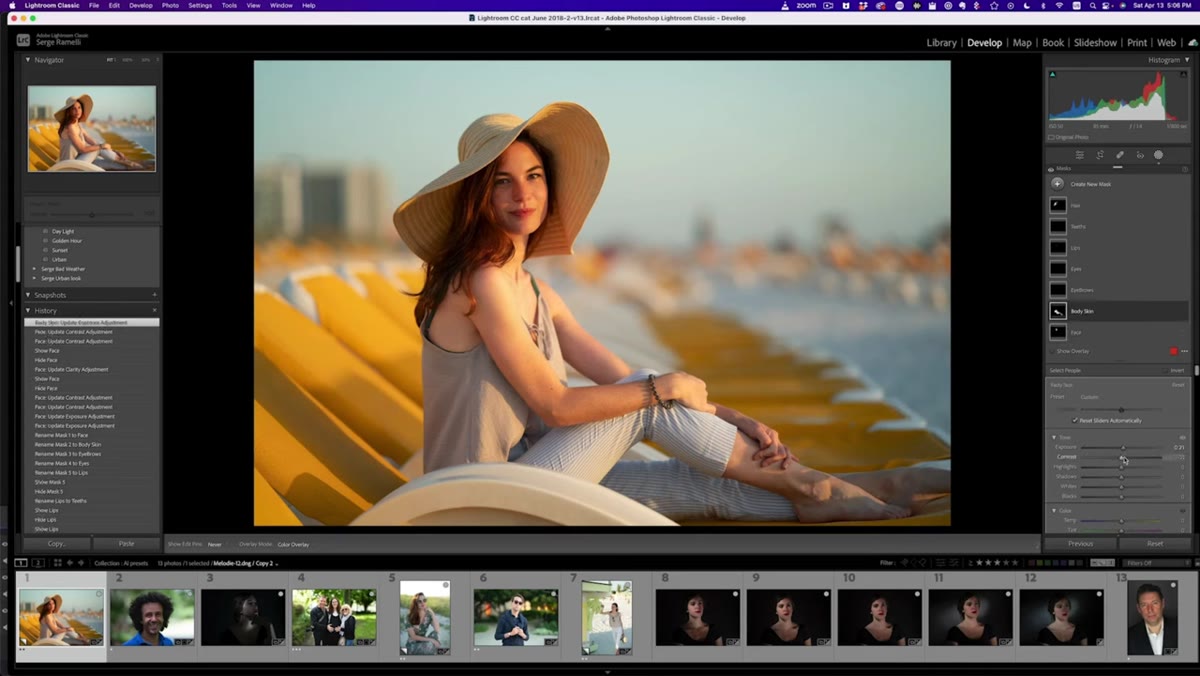 Cycling through eyebrow and eye masks with adjustments applied
Apply a similar but lighter treatment to Body Skin: a small exposure increase, a modest contrast reduction, a gentle clarity dip. The body skin adjustment is mostly about consistency so that the face and neck or shoulders do not look like they were lit differently in post.
Cycling through eyebrow and eye masks with adjustments applied
Apply a similar but lighter treatment to Body Skin: a small exposure increase, a modest contrast reduction, a gentle clarity dip. The body skin adjustment is mostly about consistency so that the face and neck or shoulders do not look like they were lit differently in post.
For Eyebrows, a slight darkening works well for most portrait subjects. A small negative exposure nudge on this mask deepens the brows without looking drawn on. For Eyes, go carefully. Even a small exposure increase makes the whites brighter and the irises more vivid, but push it past about plus 0.20 and your subject starts looking unsettling. Ramelli puts it plainly: you can make someone look like a snake faster than you expect on the eyes mask. Keep this adjustment conservative and check your results at full resolution.
Step 5: Add Saturation to Lips and Contrast to Hair
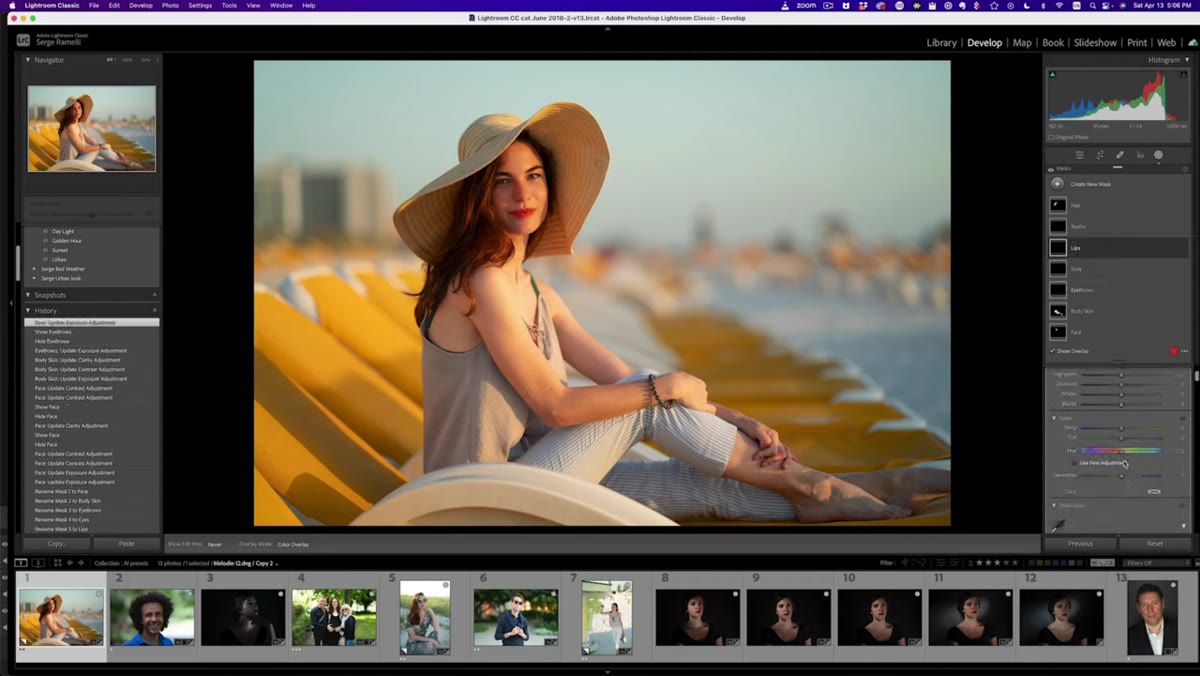 Lips mask selected with saturation slider increased
Select the Lips mask and add saturation. This is one of the more visually rewarding moves in the whole preset because lips respond immediately and naturally to a saturation boost. You do not need much. A value in the plus 15 to plus 25 range typically brings the lips forward without tipping into theatrical territory. If the subject has teeth visible, the Teeth mask can receive a small whitening adjustment, a slight exposure increase combined with a small desaturation, but only if the teeth are actually visible in your source image.
Lips mask selected with saturation slider increased
Select the Lips mask and add saturation. This is one of the more visually rewarding moves in the whole preset because lips respond immediately and naturally to a saturation boost. You do not need much. A value in the plus 15 to plus 25 range typically brings the lips forward without tipping into theatrical territory. If the subject has teeth visible, the Teeth mask can receive a small whitening adjustment, a slight exposure increase combined with a small desaturation, but only if the teeth are actually visible in your source image.
Hair benefits from added contrast more than anything else. A moderate contrast increase on the Hair mask adds dimension and separation, which matters especially on darker hair colors that can go flat in portraits. Keep other sliders neutral on this mask.
Step 6: Save the Entire Setup as a Preset
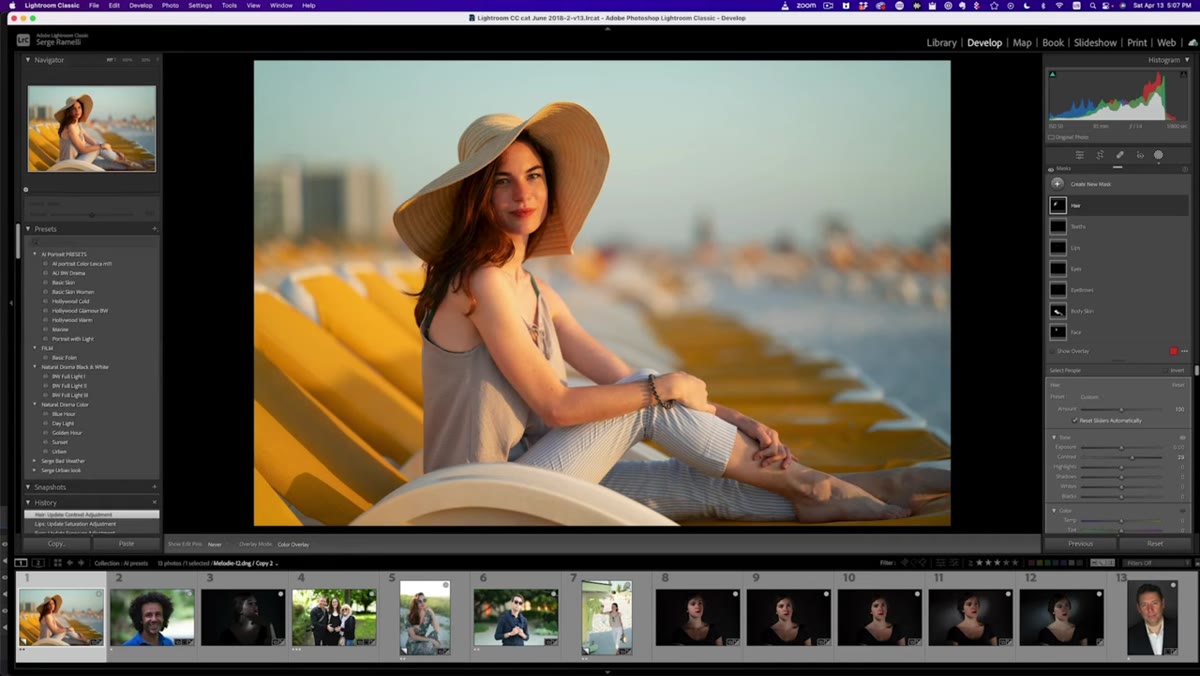 Saving settings as a new Lightroom preset
Once all your masks are adjusted and named, save the entire collection as a Lightroom preset. Give it a clear name that signals its purpose: something like “AI Portrait Base” works. When you apply this preset to a new portrait, Lightroom’s AI will reanalyze the new subject’s face, locate the same features, and apply your saved adjustments to the correct regions automatically. The preset is adaptive because the mask detection reruns on each new image.
Saving settings as a new Lightroom preset
Once all your masks are adjusted and named, save the entire collection as a Lightroom preset. Give it a clear name that signals its purpose: something like “AI Portrait Base” works. When you apply this preset to a new portrait, Lightroom’s AI will reanalyze the new subject’s face, locate the same features, and apply your saved adjustments to the correct regions automatically. The preset is adaptive because the mask detection reruns on each new image.
This is the moment where the investment pays off. You have now built a system, not just a one-time edit.
My Caveat: Build a Cinematic Variant at the Same Time
Once I built my base portrait preset using this method, I immediately duplicated it and pushed the adjustments further to create a second preset with a harder, more cinematic look: deeper contrast on the face, stronger saturation on lips, more aggressive contrast in the hair. Having both saved means I can make a creative call in one click rather than rebuilding from scratch per job. Ramelli touches on this idea in the latter part of his tutorial and it is worth planning for from the start rather than treating the cinematic variant as an afterthought.
The single most important thing this workflow does is remove the repetition tax from portrait retouching. You make the creative decisions once, encode them into a named, modular preset, and let the AI handle the detection work on every image after that. Over time those saved minutes become saved hours. I know because I track them.
Watch the full tutorial on YouTube to see Ramelli walk through the complete process, including how he extends this foundation into a full cinematic color treatment.
Comments
Leave a Comment