If you work in commercial production long enough, you develop a sixth sense for fragile files. You know the ones. Five versions of a logo buried across twelve layers, each one manually resized, each one slightly different because someone eyeballed the transform. A client calls with a color change and suddenly you’re hunting through every PSD you built over the last three weeks. I’ve been there more times than I’d like to admit, and it’s the kind of workflow problem that quietly eats hours every month.
Smart Objects are the structural solution to that problem, and most people barely scratch the surface of what they can do. In this Aaron Nace (PHLEARN) tutorial, Watch the full tutorial on YouTube, Aaron builds an entire fictional brand campaign called Polo Yoga from scratch, using Smart Objects at every stage. The result is a system where changing one core asset automatically ripples through mockups, billboards, and large-format layouts simultaneously. That’s not a party trick. In agency and e-commerce work, that’s the difference between a two-hour revision and a two-day one.
What makes this tutorial worth your time is the production context. Aaron isn’t demonstrating features in isolation. He’s showing you how a real campaign gets built, which means every technique has a reason behind it. Here’s how it breaks down, step by step.
Step 1: Build Your Logos as Vector Smart Objects
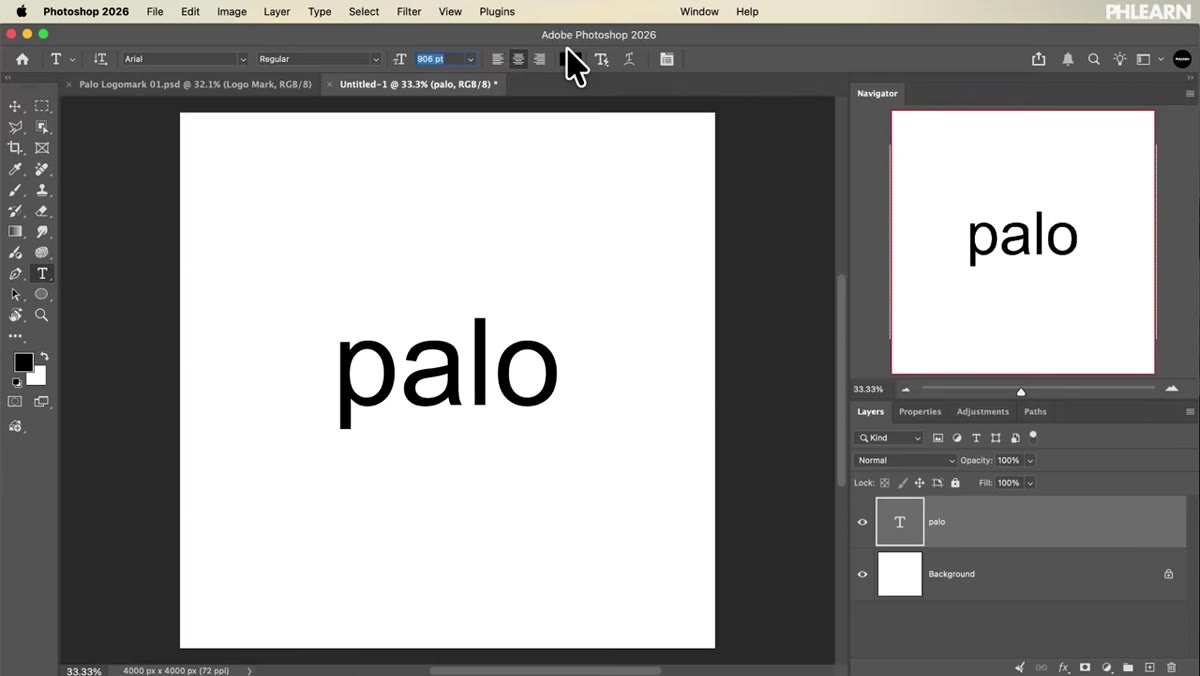 Vector logo being created inside a Smart Object
Start by placing or creating your logo artwork as a vector Smart Object inside Photoshop. You can do this by creating shapes or text directly in Photoshop and converting the layer group to a Smart Object (right-click the layer, select “Convert to Smart Object”), or by placing an Illustrator file via File > Place Embedded. The critical advantage here is infinite scalability. Because the content is vector, you can scale the Smart Object up to billboard size or down to a favicon and the edges stay clean. No rasterization until you explicitly ask for it. This is your foundation layer, and everything else in the project references it.
Vector logo being created inside a Smart Object
Start by placing or creating your logo artwork as a vector Smart Object inside Photoshop. You can do this by creating shapes or text directly in Photoshop and converting the layer group to a Smart Object (right-click the layer, select “Convert to Smart Object”), or by placing an Illustrator file via File > Place Embedded. The critical advantage here is infinite scalability. Because the content is vector, you can scale the Smart Object up to billboard size or down to a favicon and the edges stay clean. No rasterization until you explicitly ask for it. This is your foundation layer, and everything else in the project references it.
Step 2: Set Up a Master Brand File with Linked Smart Objects
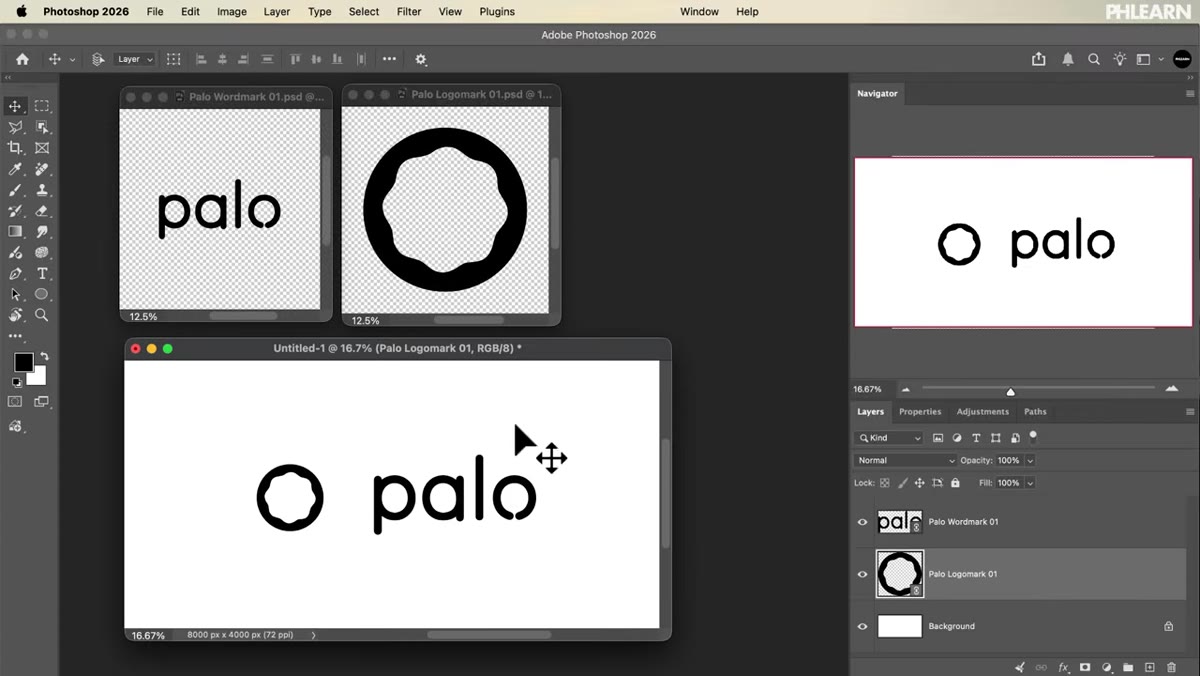 Master brand file open with linked Smart Object layers visible
Once your logo assets exist, consolidate them into a single master brand PSD. Then, instead of copying and pasting those assets into your other project files, use File > Place Linked. This keeps a live connection between the master file and every document that references it. When you open the master file and make a change, every linked instance across every other PSD updates the next time those files are opened. This is the architecture that makes campaign-wide revisions painless. Think of it as the equivalent of a CSS stylesheet for your visual assets. One source, many outputs.
Master brand file open with linked Smart Object layers visible
Once your logo assets exist, consolidate them into a single master brand PSD. Then, instead of copying and pasting those assets into your other project files, use File > Place Linked. This keeps a live connection between the master file and every document that references it. When you open the master file and make a change, every linked instance across every other PSD updates the next time those files are opened. This is the architecture that makes campaign-wide revisions painless. Think of it as the equivalent of a CSS stylesheet for your visual assets. One source, many outputs.
Step 3: Warp Smart Objects into Mockup Perspectives
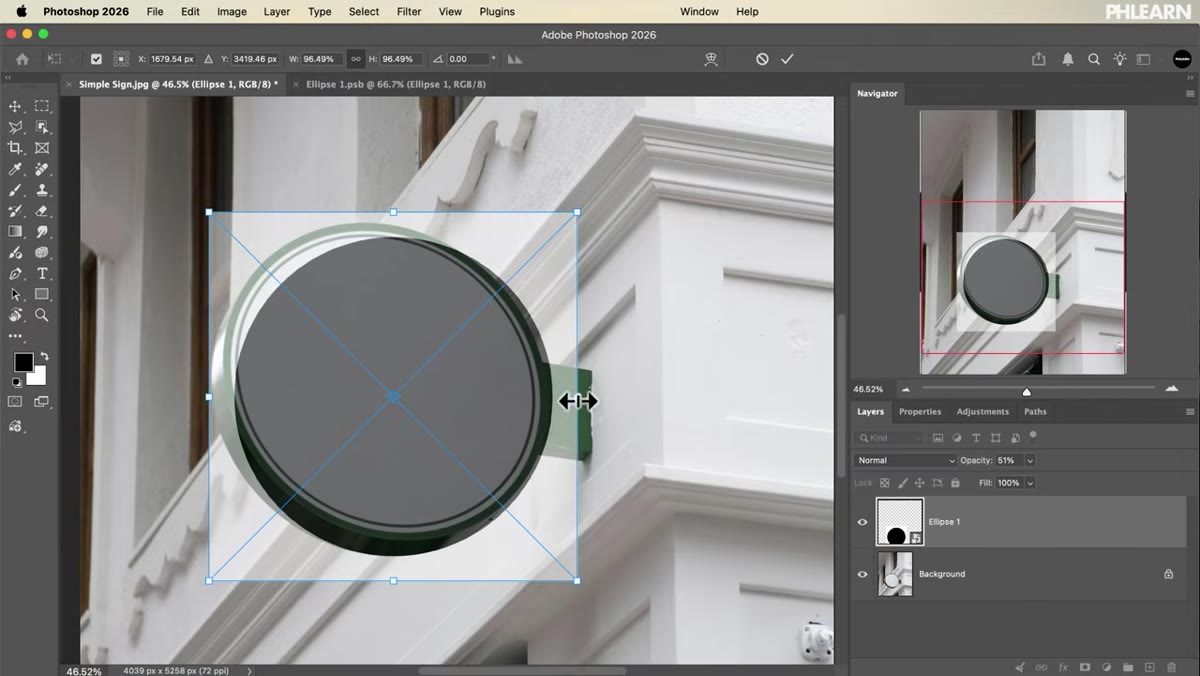 Smart Object being warped onto a sign in perspective
For the first practical project, Aaron places the logo onto a physical sign as a mockup. With your Smart Object layer selected, go to Edit > Transform > Warp, or use the Distort option to match the four corners of your artwork to the four corners of the sign surface. Because you’re warping a Smart Object rather than a rasterized layer, you can go back into the Smart Object and edit the artwork at any time. The warp updates automatically. Nest multiple Smart Objects together here if you need sub-components that should be editable independently. For example, a logo lockup might contain a wordmark and an icon as separate nested objects so each can be adjusted without breaking the overall composition.
Smart Object being warped onto a sign in perspective
For the first practical project, Aaron places the logo onto a physical sign as a mockup. With your Smart Object layer selected, go to Edit > Transform > Warp, or use the Distort option to match the four corners of your artwork to the four corners of the sign surface. Because you’re warping a Smart Object rather than a rasterized layer, you can go back into the Smart Object and edit the artwork at any time. The warp updates automatically. Nest multiple Smart Objects together here if you need sub-components that should be editable independently. For example, a logo lockup might contain a wordmark and an icon as separate nested objects so each can be adjusted without breaking the overall composition.
Step 4: Add Smart Filters and Layer Effects That Stay Non-Destructive
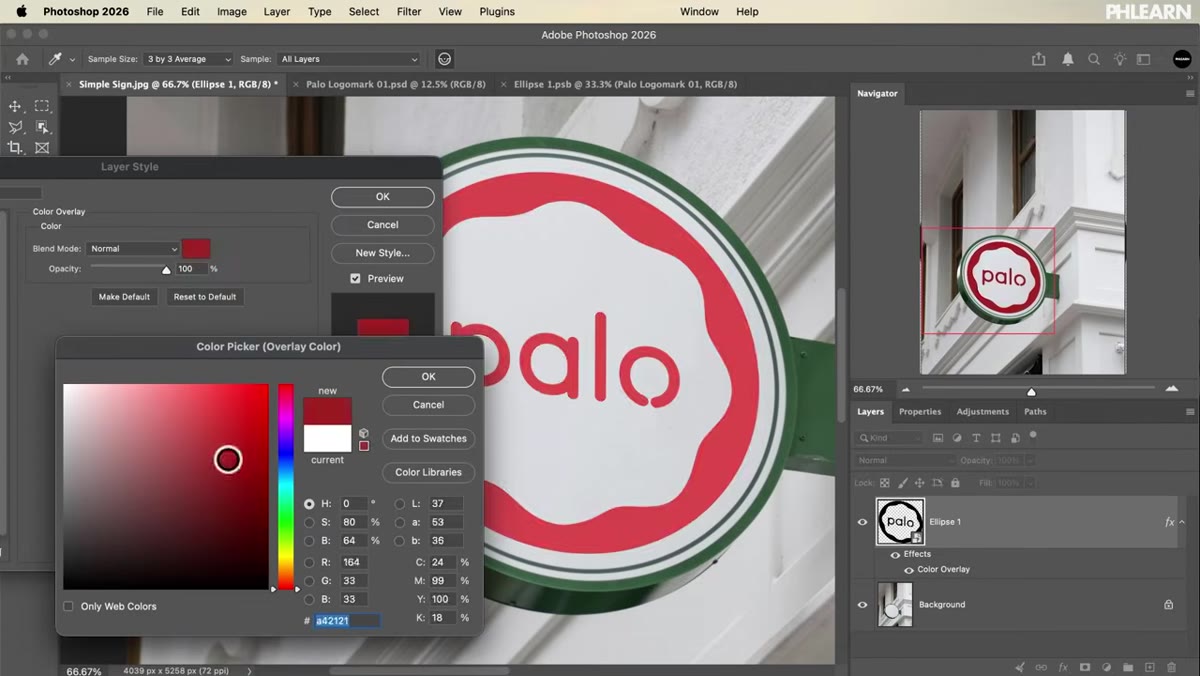 Smart Filter blur and grain applied to a Smart Object layer
Smart Objects unlock a class of adjustments that remain fully editable after the fact. For mockup work, you typically need to match the texture and atmosphere of the environment. Apply blur through Filter > Blur > Gaussian Blur and it attaches as a Smart Filter, visible as a sub-layer you can double-click to adjust later. Add grain via Filter > Filter Gallery > Texture > Grain. Layer effects such as Color Overlay (via the fx menu at the bottom of the Layers panel) sit on top of the Smart Object and can be toggled or modified without touching the artwork itself. The key workflow principle: never apply these destructively to a rasterized layer when you’re doing production work. You will always need to revise them.
Smart Filter blur and grain applied to a Smart Object layer
Smart Objects unlock a class of adjustments that remain fully editable after the fact. For mockup work, you typically need to match the texture and atmosphere of the environment. Apply blur through Filter > Blur > Gaussian Blur and it attaches as a Smart Filter, visible as a sub-layer you can double-click to adjust later. Add grain via Filter > Filter Gallery > Texture > Grain. Layer effects such as Color Overlay (via the fx menu at the bottom of the Layers panel) sit on top of the Smart Object and can be toggled or modified without touching the artwork itself. The key workflow principle: never apply these destructively to a rasterized layer when you’re doing production work. You will always need to revise them.
Step 5: Build the NYC Billboard Composite with a Replaced Smart Object
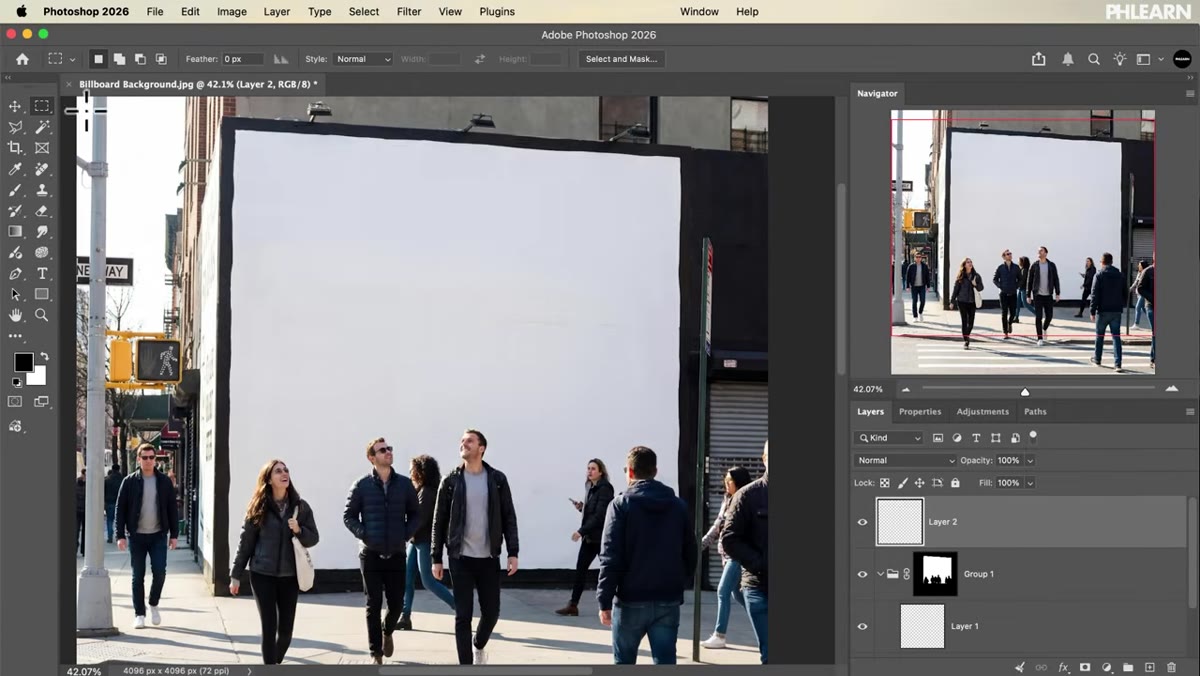 New artwork placed inside billboard Smart Object in city scene
For the billboard project, the process involves masking out the existing billboard from the photograph, then placing a Smart Object into that space with perspective matching applied. The power here is the same linked asset from your master brand file. Once the Smart Object is in position with its warp and blending applied, updating the master file automatically refreshes the billboard composite. You’re not re-doing the perspective work or re-applying the blending each time. The container stays in place. Only the content changes. For anyone building seasonal campaign swaps, product launches, or A/B creative testing, this saves a compounding amount of time with each revision cycle.
New artwork placed inside billboard Smart Object in city scene
For the billboard project, the process involves masking out the existing billboard from the photograph, then placing a Smart Object into that space with perspective matching applied. The power here is the same linked asset from your master brand file. Once the Smart Object is in position with its warp and blending applied, updating the master file automatically refreshes the billboard composite. You’re not re-doing the perspective work or re-applying the blending each time. The container stays in place. Only the content changes. For anyone building seasonal campaign swaps, product launches, or A/B creative testing, this saves a compounding amount of time with each revision cycle.
Step 6: Build 8K Layouts Using Shape-Based Smart Object Containers
 Vector shapes converted to Smart Objects in large format layout
For large-format print layouts, Aaron demonstrates two methods. The first uses vector shapes as clipping containers. Draw your shape, convert it to a Smart Object, then place your image inside it. The image fills the shape and can be swapped without redrawing the container. The second method uses pixel selections to create precise 50/50 horizontal splits, with live gradient layers keeping text readable over photography. The alignment advice here is practical: use Photoshop’s built-in alignment tools against your artboard guides rather than eyeballing margins. At 8K resolution, a two-pixel margin inconsistency is visible in print.
Vector shapes converted to Smart Objects in large format layout
For large-format print layouts, Aaron demonstrates two methods. The first uses vector shapes as clipping containers. Draw your shape, convert it to a Smart Object, then place your image inside it. The image fills the shape and can be swapped without redrawing the container. The second method uses pixel selections to create precise 50/50 horizontal splits, with live gradient layers keeping text readable over photography. The alignment advice here is practical: use Photoshop’s built-in alignment tools against your artboard guides rather than eyeballing margins. At 8K resolution, a two-pixel margin inconsistency is visible in print.
Step 7: Package and Deliver with Embedded Smart Objects
 Photoshop Package tool collecting linked files into one folder
Before delivery, go to File > Package. This collects all linked Smart Object files into a single folder alongside your PSD, so nothing breaks when a client opens it on a different machine. For extra security, Aaron recommends converting linked Smart Objects to embedded ones before the final send. Right-click the linked Smart Object layer and choose “Embed Linked.” The external file gets absorbed into the PSD itself. You lose the live link, but the client receives a completely self-contained file. For ongoing projects where you still need the live link, deliver the packaged folder. For final sign-off archives, embed everything.
Photoshop Package tool collecting linked files into one folder
Before delivery, go to File > Package. This collects all linked Smart Object files into a single folder alongside your PSD, so nothing breaks when a client opens it on a different machine. For extra security, Aaron recommends converting linked Smart Objects to embedded ones before the final send. Right-click the linked Smart Object layer and choose “Embed Linked.” The external file gets absorbed into the PSD itself. You lose the live link, but the client receives a completely self-contained file. For ongoing projects where you still need the live link, deliver the packaged folder. For final sign-off archives, embed everything.
What I’d Add from Commercial Production Work
The linked Smart Object system Aaron describes is genuinely how I’d approach any campaign with more than three deliverable formats. Where I’d extend it: keep a version-numbered naming convention on your master brand file from day one. Something like “PoloYoga-Brand-v01.psb”. When a client approves a revision and you update to v02, the older compositions still reference the original file path. You get a clean audit trail without any files mysteriously updating when you don’t want them to. It’s a small habit that prevents a specific kind of late-night panic I’ve experienced firsthand.
The single most important idea in this entire course is that Smart Objects are a system design choice, not just a layer type. If you commit to using them consistently from the start of a project, you build a campaign that’s inherently revisable. If you skip them and work with flattened layers, you’re essentially writing code without version control. Every change becomes manual, every revision compounds the risk of inconsistency.
The full course includes 20 sample images, 8 sample PSDs, and two PDFs covering both the step-by-step outline and a keyboard shortcut cheat sheet. It’s a well-structured resource for anyone who wants to move from using Smart Objects occasionally to building them into every production file by default.
Watch the full tutorial on YouTube and check out the complete course at phlearn.com.
Comments (1)
The before and after really sells it. Incredible difference.
Leave a Comment