
I have backup drives for my backup drives. My colleagues find this funny until one of them loses a shoot. I’ve been color-coding storage drives and labeling them obsessively since my early days in commercial studios, and the habit has saved me more than once. So when I came across Watch the full tutorial on YouTube from Peter McKinnon, where he walks through exactly how a single rugged drive failure nearly took down his entire library, it hit close to home. Not because I’ve lost everything, but because I’ve watched the conditions for that disaster quietly build in my own workflow more times than I’d like to admit.
What McKinnon breaks down in this tutorial is something most photographers and videographers don’t think about until it’s too late: the difference between having a backup and having a backup strategy. There’s a meaningful gap between those two things, and this video closes it in a way that’s practical for anyone from solo creators to small production teams. Whether you’re editing commercial product shots or travel vlogs, the principles here apply directly to how you organize, protect, and access your files under real working conditions.
Step 1: Understand Why Rugged Drives Fail as a Long-Term Strategy
 Rugged hard drive held up, showing physical size and ports
Rugged drives are marketed as portable workhorses, and they are useful in the right context. McKinnon is clear about this. The problem isn’t the drives themselves. It’s the way they quietly shift from backup device to primary storage. You edit one project off the drive. Then another. You bring it downstairs, you take it on a trip, and before long it’s the only place your files live. When it fails, and eventually it will, there’s nothing underneath it.
Rugged hard drive held up, showing physical size and ports
Rugged drives are marketed as portable workhorses, and they are useful in the right context. McKinnon is clear about this. The problem isn’t the drives themselves. It’s the way they quietly shift from backup device to primary storage. You edit one project off the drive. Then another. You bring it downstairs, you take it on a trip, and before long it’s the only place your files live. When it fails, and eventually it will, there’s nothing underneath it.
The first step in building a real workflow is recognizing this pattern in your own habits. Ask yourself honestly: how many of your current drives are “backups” that you’re also actively editing from? If the answer is more than zero, you’ve already started down the path McKinnon describes.
Step 2: Acknowledge the Weight and Cable Problem
 Multiple rugged drives arranged together showing cable clutter
McKinnon makes a practical point that often gets skipped in workflow conversations: physical weight and cable variety are real friction. Different drives use different connection standards. Some are USB-C, some are Thunderbolt, and when you’re juggling five or six drives across multiple projects, you’re also managing five or six potential points of failure in your cable kit alone.
Multiple rugged drives arranged together showing cable clutter
McKinnon makes a practical point that often gets skipped in workflow conversations: physical weight and cable variety are real friction. Different drives use different connection standards. Some are USB-C, some are Thunderbolt, and when you’re juggling five or six drives across multiple projects, you’re also managing five or six potential points of failure in your cable kit alone.
The takeaway here isn’t to avoid rugged drives entirely. It’s to use them intentionally and sparingly. One drive per active location shoot, clearly labeled, not as your master archive. Keeping your bag lighter also means you’re more likely to carry the gear you actually need for the shoot instead of filling that space with storage that belongs at your desk.
Step 3: Define What “Workflow” Actually Means
 McKinnon gesturing while explaining the workflow concept
McKinnon pauses here to define workflow in plain terms, and it’s worth sitting with his definition. A workflow is the complete process of moving a project from raw capture to finished file: how you ingest footage, how you organize it, how you edit, and what you do with the assets afterward. It’s not just the editing part.
McKinnon gesturing while explaining the workflow concept
McKinnon pauses here to define workflow in plain terms, and it’s worth sitting with his definition. A workflow is the complete process of moving a project from raw capture to finished file: how you ingest footage, how you organize it, how you edit, and what you do with the assets afterward. It’s not just the editing part.
This matters because most workflow breakdowns happen at the edges, not in the middle. Files get lost during transfer. Drives get mislabeled. Someone grabs the wrong version. Tightening your workflow means building consistent habits at every stage, not just getting faster in your editing software.
Step 4: Recognize When Your Drive Count Becomes a Liability
 Row of drives lined up showing accumulation over time
There’s a tipping point where more drives stop solving the problem and start creating new ones. McKinnon describes reaching this himself, where just figuring out which drive held a specific project took longer than it should have. He was also making the painful tradeoff of deleting b-roll footage to free up space, saving only finished files and losing all the raw material beneath them.
Row of drives lined up showing accumulation over time
There’s a tipping point where more drives stop solving the problem and start creating new ones. McKinnon describes reaching this himself, where just figuring out which drive held a specific project took longer than it should have. He was also making the painful tradeoff of deleting b-roll footage to free up space, saving only finished files and losing all the raw material beneath them.
If file sizes are growing because you’re shooting higher resolutions and newer codecs, the answer can’t be “add another rugged drive.” The math doesn’t work long-term. This step is about recognizing when you’ve outgrown your current system and need to think at a different scale.
Step 5: Understand What RAID Actually Does
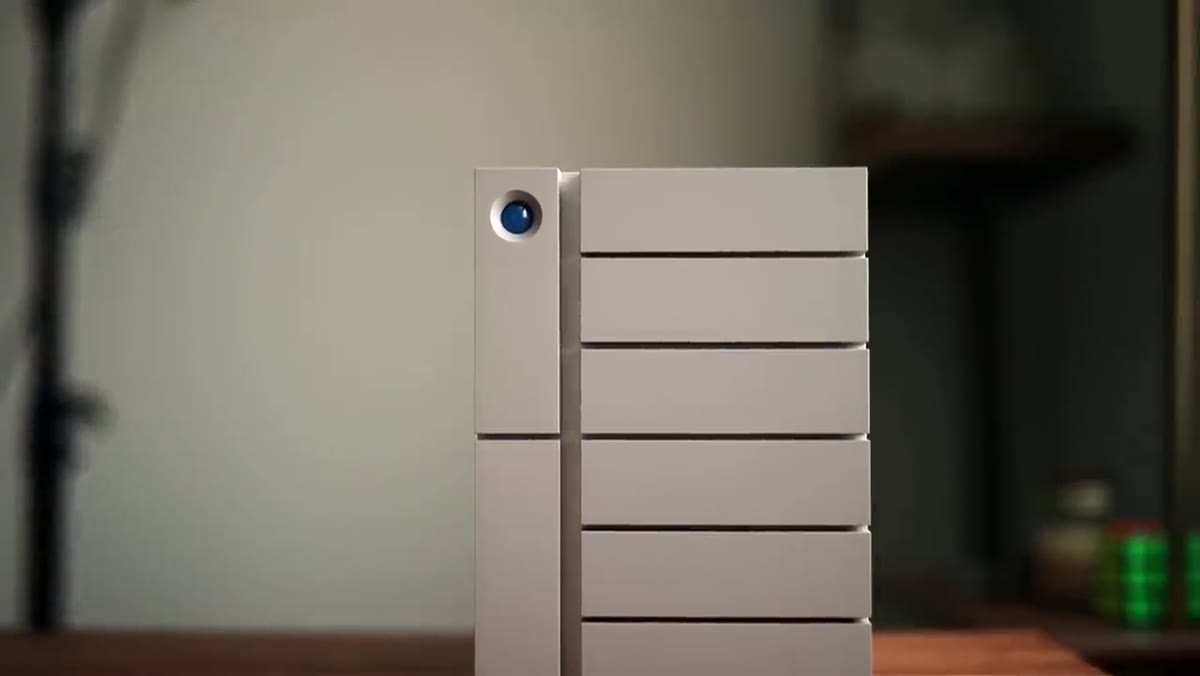 LaCie 6Big RAID unit shown, explaining drive bay configuration
McKinnon introduces RAID storage here, specifically the LaCie 6Big, and explains it in a way that finally made it click for me when I first heard it described this way. RAID stands for Redundant Array of Independent Disks. Instead of one drive doing all the work, multiple drives work together. In a RAID 6 configuration, two of the drives in the array are dedicated entirely to redundancy. That means you can lose two drives simultaneously and not lose a single file.
LaCie 6Big RAID unit shown, explaining drive bay configuration
McKinnon introduces RAID storage here, specifically the LaCie 6Big, and explains it in a way that finally made it click for me when I first heard it described this way. RAID stands for Redundant Array of Independent Disks. Instead of one drive doing all the work, multiple drives work together. In a RAID 6 configuration, two of the drives in the array are dedicated entirely to redundancy. That means you can lose two drives simultaneously and not lose a single file.
The unit McKinnon uses has six bays, each holding an 8-terabyte drive, for a total raw capacity of 48 terabytes. After RAID 6 overhead, the usable storage is lower, but the protection is genuine. This isn’t just more space. It’s a fundamentally different relationship with your data.
Step 6: Configure RAID 6 for Maximum Redundancy
 RAID configuration screen or drive bay setup being explained
RAID 6 is the configuration McKinnon recommends, and for good reason. RAID 0 stripes data across drives for speed but offers zero redundancy. RAID 1 mirrors data but cuts your usable capacity in half. RAID 6 hits a practical middle ground: strong protection without an unacceptable capacity penalty. For a working professional with years of client files and commercial shoots that cannot be recreated, that redundancy is not optional.
RAID configuration screen or drive bay setup being explained
RAID 6 is the configuration McKinnon recommends, and for good reason. RAID 0 stripes data across drives for speed but offers zero redundancy. RAID 1 mirrors data but cuts your usable capacity in half. RAID 6 hits a practical middle ground: strong protection without an unacceptable capacity penalty. For a working professional with years of client files and commercial shoots that cannot be recreated, that redundancy is not optional.
Setup is handled through the drive’s own software interface and doesn’t require deep technical knowledge. The key step is choosing your RAID level before you start writing files to the array, because changing it later means wiping everything and starting over.
What I’d Add From the Studio Side
McKinnon’s system makes complete sense for a video creator managing large files. From the commercial photography side, I’d layer one more thing on top: an offsite component. A RAID array protects against drive failure. It does not protect against theft, fire, or a power surge that takes out multiple bays at once. My own setup uses the RAID as the working archive, synced weekly to cloud storage for anything that represents client deliverables or original raw files. The RAID handles day-to-day access and speed. The cloud handles catastrophic scenarios.
I also maintain a simple spreadsheet logging what’s on each drive and when it was last synced. It sounds tedious, and yes, my team jokes about it regularly. But when a client comes back two years later asking for source files from a campaign, that spreadsheet is the reason I can find them in under five minutes instead of spending an afternoon guessing.
The single most important idea in this tutorial is the distinction between storage and strategy. A drive is just hardware. A strategy is what protects your work when that hardware eventually lets you down, and it always does eventually. Build the system before you need it.
Watch the full tutorial on YouTube to see McKinnon walk through the physical setup and hear the full story behind why he made this change.
Comments
Leave a Comment