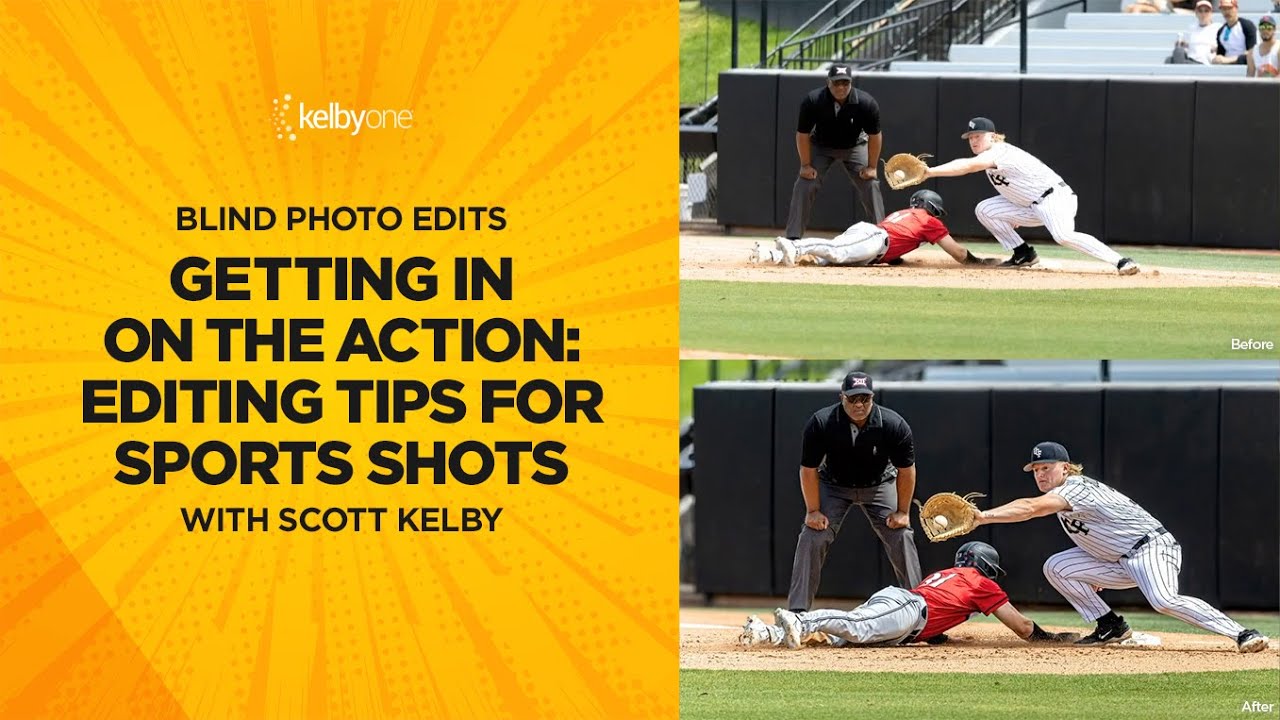
Sports photography hands you a specific kind of editing problem. The photographer wasn’t on a tripod. They weren’t waiting for perfect light. They were chasing a quarter-second window where everything happened at once, and they got it. The shot is good. The raw file is another story: slightly crooked, unevenly exposed across subjects, background fighting for attention it doesn’t deserve. I see this constantly in the post-production work that comes across my desk from ad agencies and editorial clients. The capture is there. The edit just hasn’t caught up to it yet.
In this KelbyOne tutorial, Scott Kelby works through a blind photo edit on a baseball shot - a first baseman catching the ball with a runner diving back to the bag. He doesn’t know the photo before he opens it, which makes the session genuinely useful. You watch him diagnose problems in real time and reach for the right tool immediately. Watch the full tutorial on YouTube - but if you want the technique extracted and ready to apply, here’s the full walkthrough.
Step 1: Auto-Straighten the Horizon First
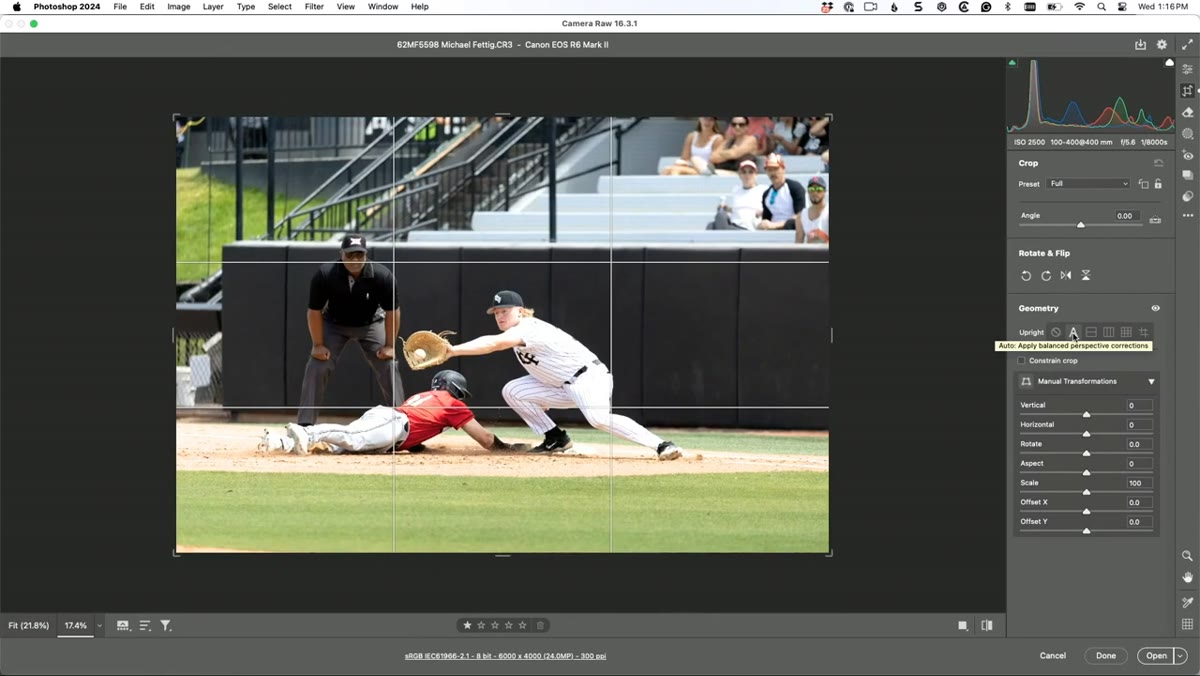 Crop tool selected in Camera Raw with auto-straighten
Before touching exposure, fix the geometry. In Camera Raw (or Lightroom’s Develop module - they share the same engine), grab the Crop tool and press the letter A. That single keystroke triggers automatic horizon detection and straightens the image. On a sports shot, this is almost always necessary. Nobody shooting burst frames at a first base bag is thinking about level lines. Kelby points out that slight crookedness isn’t a failure on the photographer’s part - it’s the nature of tracking fast action.
Crop tool selected in Camera Raw with auto-straighten
Before touching exposure, fix the geometry. In Camera Raw (or Lightroom’s Develop module - they share the same engine), grab the Crop tool and press the letter A. That single keystroke triggers automatic horizon detection and straightens the image. On a sports shot, this is almost always necessary. Nobody shooting burst frames at a first base bag is thinking about level lines. Kelby points out that slight crookedness isn’t a failure on the photographer’s part - it’s the nature of tracking fast action.
Step 2: Crop Aggressively to Kill Empty Seats
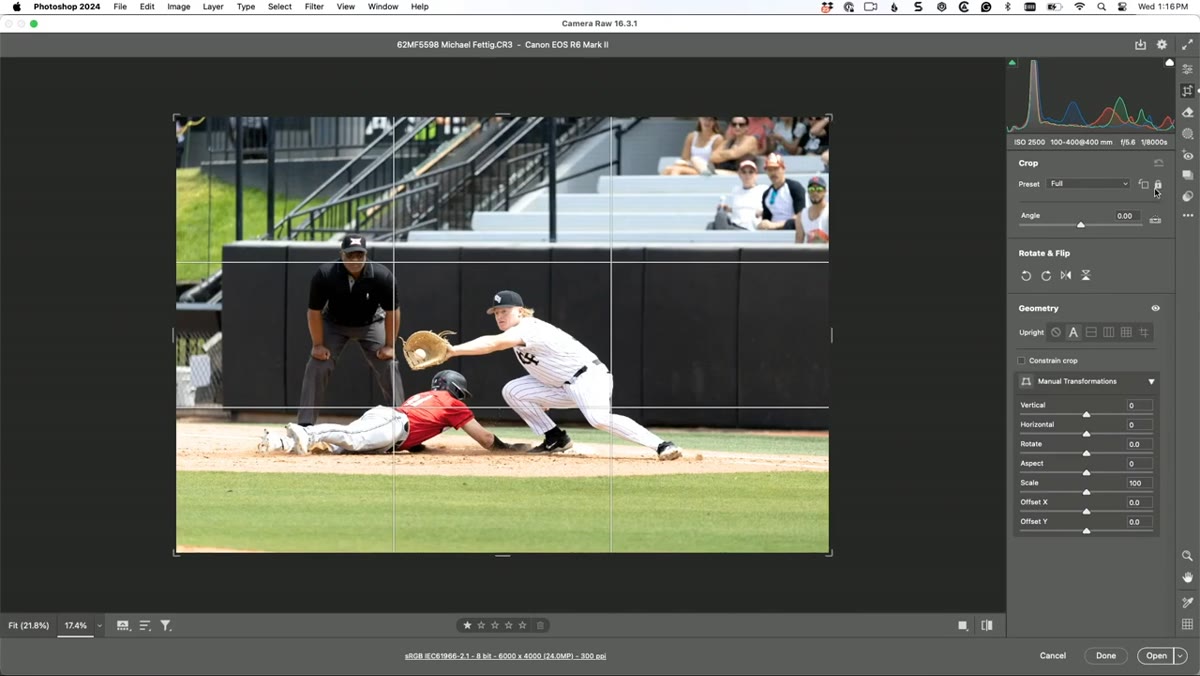 Crop handles being dragged to eliminate stadium seats
Empty stadium seats are the enemy of a compelling sports photo. They pull the eye away from the action and flatten the energy of the frame. After straightening, Kelby re-examines the composition and crops to eliminate as much dead background as possible - prioritizing grass and players over the bleachers creeping into the upper portion of the frame.
Crop handles being dragged to eliminate stadium seats
Empty stadium seats are the enemy of a compelling sports photo. They pull the eye away from the action and flatten the energy of the frame. After straightening, Kelby re-examines the composition and crops to eliminate as much dead background as possible - prioritizing grass and players over the bleachers creeping into the upper portion of the frame.
The practical move here: lock your aspect ratio first so you’re not distorting the image, then pull the crop boundary up until seats become a thin sliver or disappear entirely. If some structural element (a wall, a fence, signage) fills that space instead of empty seats, that’s acceptable. Empty plastic chairs are not. When in doubt, crop tighter.
Step 3: Run Auto Tone as Your Starting Point
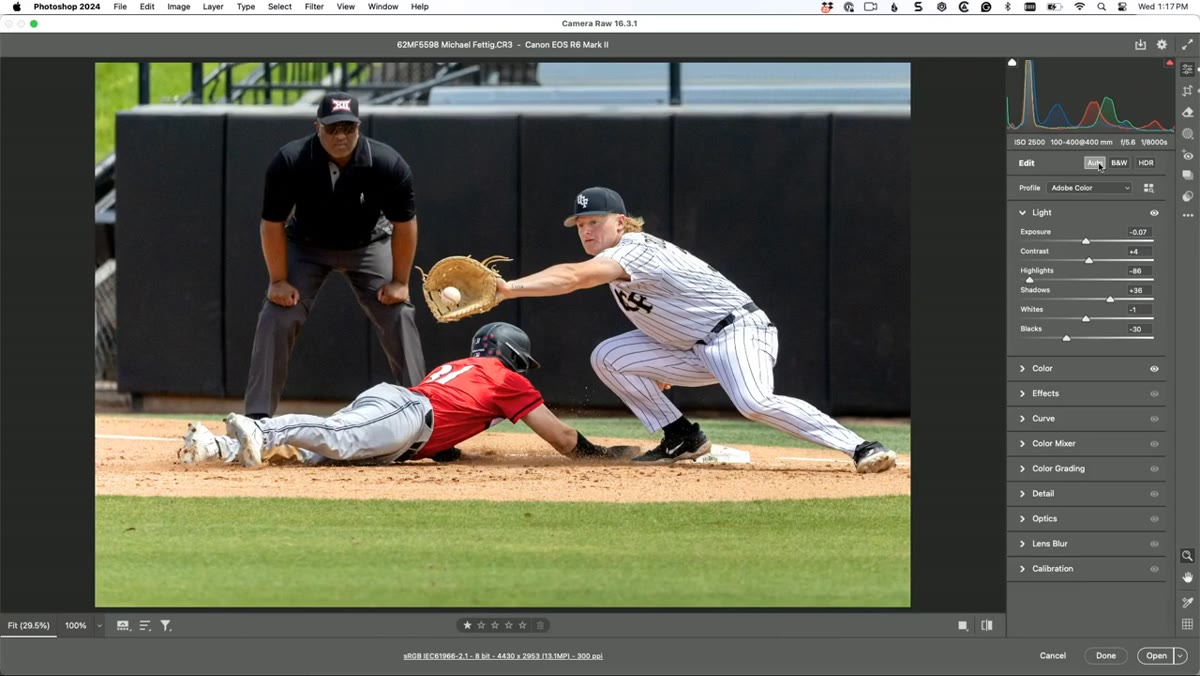 Auto tone applied showing tonal adjustments in Camera Raw
Here’s a thing I’ve had to update my own thinking on: the Auto button in Camera Raw is not the blunt instrument it used to be. Kelby makes this point directly, and he’s right. Modern Auto uses AI to analyze the specific histogram of your image and set exposure, highlights, shadows, whites, and blacks accordingly. It doesn’t just push everything brighter. On this particular shot, it did a solid job establishing a workable baseline in one click.
Auto tone applied showing tonal adjustments in Camera Raw
Here’s a thing I’ve had to update my own thinking on: the Auto button in Camera Raw is not the blunt instrument it used to be. Kelby makes this point directly, and he’s right. Modern Auto uses AI to analyze the specific histogram of your image and set exposure, highlights, shadows, whites, and blacks accordingly. It doesn’t just push everything brighter. On this particular shot, it did a solid job establishing a workable baseline in one click.
Use it as a starting point, not a final answer. If it does something you hate, hit undo and move on. But on most sports frames - where your exposure is already in the right ballpark and just needs tonal refinement - Auto gets you 70% of the way there and saves you two minutes of manual slider work. Across a hundred-shot sports gallery, that math adds up fast.
Step 4: Isolate a Specific Subject with Select Object
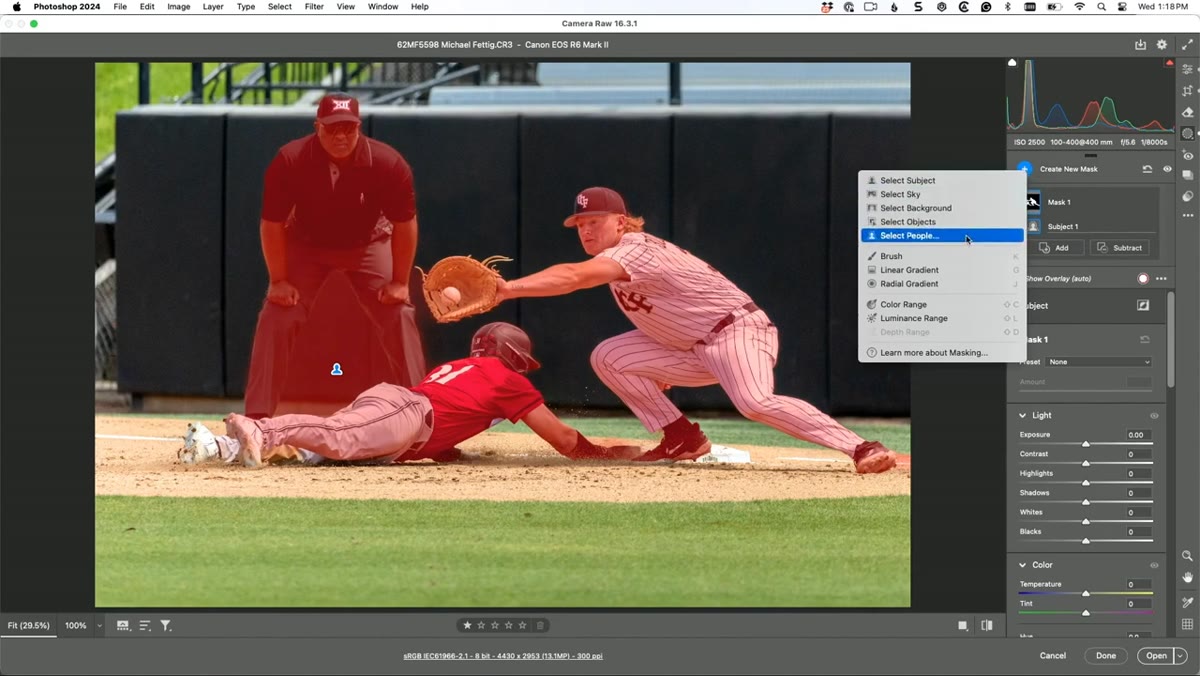 Draw box around umpire using Select Object tool in masking panel
Kelby wants to separately brighten the umpire, who’s wearing dark clothing and getting lost in the shadows. Rather than using Select Subject (which grabbed all three figures in the frame), he goes to the Masking panel, creates a new mask, and chooses Select Object with the rectangle option enabled.
Draw box around umpire using Select Object tool in masking panel
Kelby wants to separately brighten the umpire, who’s wearing dark clothing and getting lost in the shadows. Rather than using Select Subject (which grabbed all three figures in the frame), he goes to the Masking panel, creates a new mask, and chooses Select Object with the rectangle option enabled.
This is the move worth memorizing: draw a bounding box around the specific person or element you want to isolate. Camera Raw’s AI reads the contents of that box and builds a mask around the subject inside it, not everything in the frame. Once the umpire is masked, Kelby nudges up the Exposure and opens the Shadows slightly. It’s a subtle lift - just enough to separate him from the background without blowing out the jersey. With the Select Object rectangle method, the whole process takes under thirty seconds.
Step 5: Use Lens Blur to Separate Subject from Background
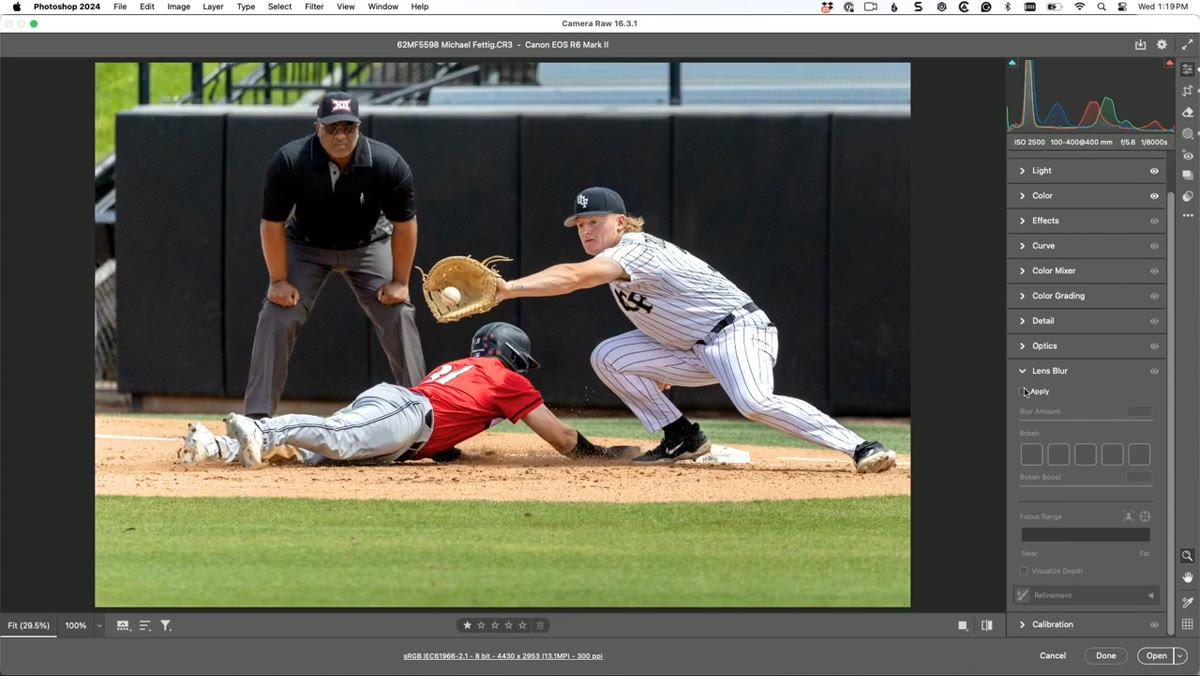 Lens Blur panel open with Apply toggle and focus range slider
This is the step that most post-production workflows skip, and it’s the one that makes the biggest visual difference on sports photography. Kelby opens the Lens Blur section in Camera Raw, toggles Apply on, and lets it analyze the depth information in the file. Out of the box, it doesn’t do much - that’s normal.
Lens Blur panel open with Apply toggle and focus range slider
This is the step that most post-production workflows skip, and it’s the one that makes the biggest visual difference on sports photography. Kelby opens the Lens Blur section in Camera Raw, toggles Apply on, and lets it analyze the depth information in the file. Out of the box, it doesn’t do much - that’s normal.
The key is the Focus Range slider. Click somewhere in the middle of the range and drag until the blur starts rendering on the background. You’re essentially telling Camera Raw where the plane of focus lives, and it applies a graduated blur to everything outside that zone. The stands, the grass in the far field, the fencing - they all soften while the players and ball stay sharp. Kelby also mentions the Visualize Depth option, which color-codes the focus map so you can see exactly which areas are being treated as in-focus vs. out-of-focus before you commit to the effect.
A Note on Applying This to Batch Workflows
I want to add one practical caveat from my own work. The techniques Kelby demonstrates here are excellent for individual edits, but if you’re processing a full sports gallery - say, 200 frames from a single game - the masking and Lens Blur steps don’t batch cleanly because they’re subject-dependent. The Auto tone step and the crop approach absolutely do batch. I’d recommend building a Camera Raw preset that includes your Auto baseline, your sharpening defaults, and any lens corrections, then applying that to the full set first. From there, you can isolate the hero shots for the individual masking and blur work Kelby describes. That separation between “apply to all” and “refine the selects” is how a session that could take four hours gets done in one.
The single most transferable idea from this tutorial is that Camera Raw’s AI tools have genuinely matured. Auto tone, Select Object masking, and depth-based Lens Blur are not shortcuts that produce generic results. Used with intention - the way Kelby demonstrates here - they’re precision instruments that let you work faster without giving up control. The photographer captured the moment. Your job in post is to make sure the edit doesn’t bury it.
Watch the full tutorial on YouTube to see Kelby work through the entire edit in real time.
Comments (5)
Would love to see a follow-up going deeper into this topic.
Just subscribed. If the rest of your content is this good, I'm in.
Applied this to my portfolio shots and the improvement is noticeable.
Shared this with my photography group. Everyone loved it.
Couldn't agree more. I've seen this make a huge difference in gear work specifically.
Leave a Comment