
Client briefs change at the last minute. That’s not a complaint, just the reality of commercial work. An art director decides mid-shoot that the talent’s jacket should match the brand color, or a prop that looked fine on set reads completely wrong in post. For years, my answer to those situations was either a reshoot conversation nobody wanted to have or a painstaking manual composite that added two hours to a job that was already on a tight turnaround. AI generation inside Photoshop has been quietly chipping away at that problem, but earlier versions of Firefly had a ceiling - the results were plausible, not convincing. That ceiling just got raised significantly.
Watch the full tutorial on YouTube
In this PHLEARN tutorial, Aaron Nace walks through the correct way to put Adobe’s Firefly Image Model 5 to work inside Photoshop’s Generative Fill, including a layer mask step that most people skip and that makes the difference between a professional result and something that looks AI-touched. The whole thing runs about two minutes, but there’s enough packed into it that it’s worth slowing down and treating each step deliberately. Here’s how it actually works in practice.
Step 1: Select Your Entire Image First
 Photoshop Select menu open, “All” highlighted
Before you touch Generative Fill, go to Select > All to select the entire canvas. This sounds almost too simple, but the selection defines the region Firefly is working within, and skipping it or using an imprecise selection leads to the model making decisions you didn’t ask for. For full-image changes - like altering a subject’s clothing across a complex background - a clean Select All gives the AI the full context of the photograph to reason about. It needs to see the flag, the background light, and the existing color relationships before it can make intelligent changes to the subject.
Photoshop Select menu open, “All” highlighted
Before you touch Generative Fill, go to Select > All to select the entire canvas. This sounds almost too simple, but the selection defines the region Firefly is working within, and skipping it or using an imprecise selection leads to the model making decisions you didn’t ask for. For full-image changes - like altering a subject’s clothing across a complex background - a clean Select All gives the AI the full context of the photograph to reason about. It needs to see the flag, the background light, and the existing color relationships before it can make intelligent changes to the subject.
Step 2: Open Generative Fill via the Contextual Taskbar
 Contextual taskbar visible below canvas, Generative Fill button highlighted
With your selection active, look for the contextual taskbar - the floating bar that appears below or near your image in recent versions of Photoshop. Click Generative Fill. If you don’t see the taskbar, you can enable it under Window > Contextual Task Bar. This is the gateway to the model selector, which is new with this update and is where the Firefly 5 option lives. Getting comfortable with the contextual taskbar is worth the time investment regardless of this workflow - it surfaces tools based on what you’re doing, which is exactly the kind of efficiency layer I track in my own practice.
Contextual taskbar visible below canvas, Generative Fill button highlighted
With your selection active, look for the contextual taskbar - the floating bar that appears below or near your image in recent versions of Photoshop. Click Generative Fill. If you don’t see the taskbar, you can enable it under Window > Contextual Task Bar. This is the gateway to the model selector, which is new with this update and is where the Firefly 5 option lives. Getting comfortable with the contextual taskbar is worth the time investment regardless of this workflow - it surfaces tools based on what you’re doing, which is exactly the kind of efficiency layer I track in my own practice.
Step 3: Select Firefly Image Model 5 from the Model Selector
 Model selector dropdown showing Adobe and partner model options
Inside the Generative Fill dialog, you’ll now see a model selector dropdown. Adobe has populated this with both their own models and partner models. Choose Firefly Image Model 5. Before you commit to generating, click the generative credits icon in the same dialog - it shows you exactly how many credits each model consumes per generation. Firefly Image Model 5 runs at 10 credits per generation, which is higher than earlier models. If you’re on a plan with a limited monthly credit allowance, that’s a meaningful number to know before you start iterating through six or seven generations on a single image. Plan your credit spend the same way you’d plan render time on a heavy composite file.
Model selector dropdown showing Adobe and partner model options
Inside the Generative Fill dialog, you’ll now see a model selector dropdown. Adobe has populated this with both their own models and partner models. Choose Firefly Image Model 5. Before you commit to generating, click the generative credits icon in the same dialog - it shows you exactly how many credits each model consumes per generation. Firefly Image Model 5 runs at 10 credits per generation, which is higher than earlier models. If you’re on a plan with a limited monthly credit allowance, that’s a meaningful number to know before you start iterating through six or seven generations on a single image. Plan your credit spend the same way you’d plan render time on a heavy composite file.
Step 4: Write a Specific, Conversational Prompt
 Generative Fill text prompt field with descriptive clothing change instruction typed
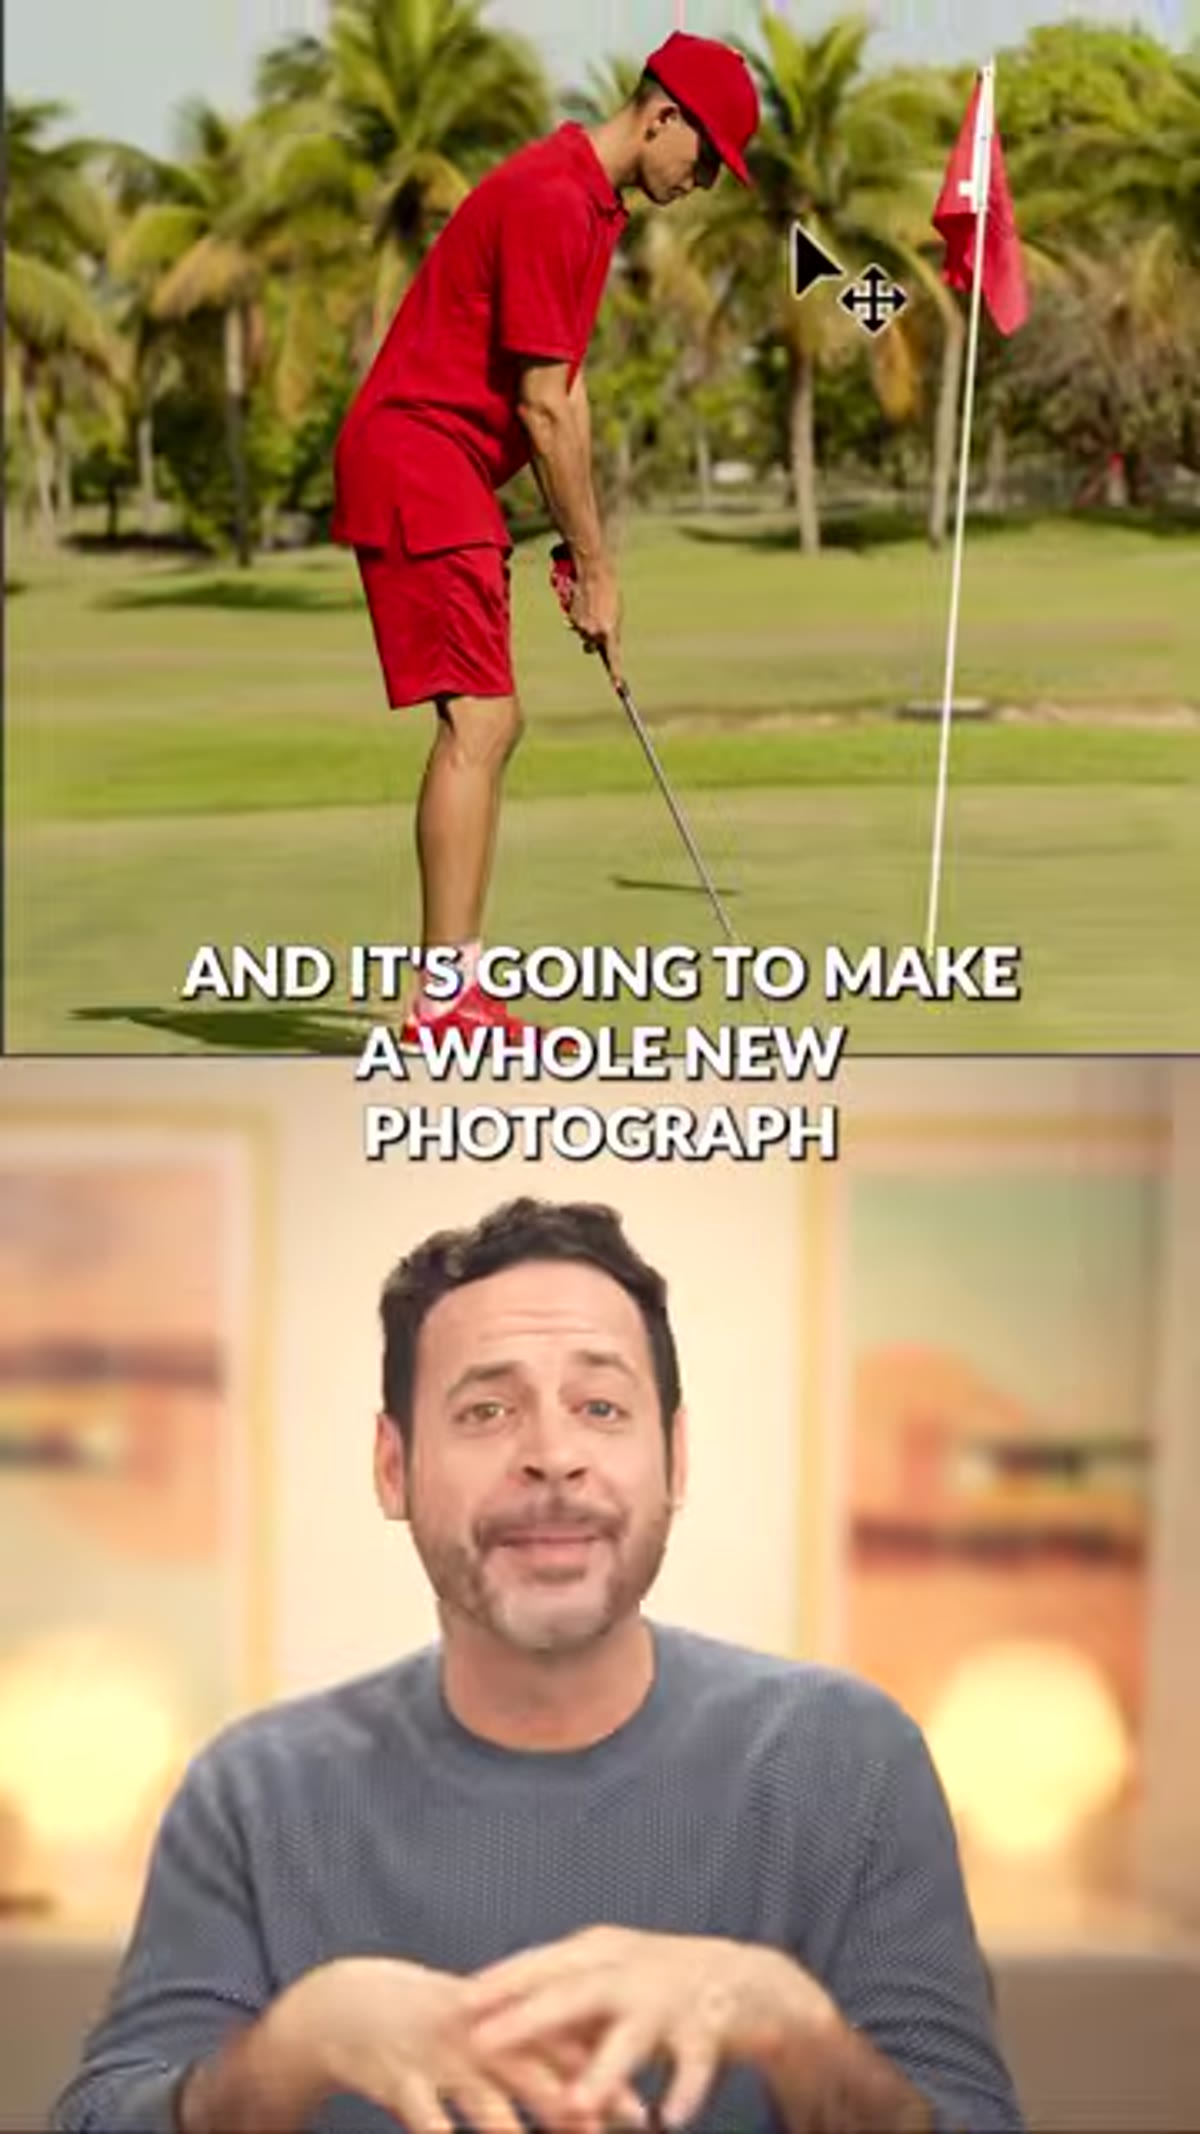
This is where Firefly 5 shows its biggest leap forward. Rather than using shorthand or keyword-style prompts the way earlier models responded better to, you can write a full natural-language instruction - the kind of direction you’d actually give a retoucher or an on-set stylist. In the tutorial, the prompt describes changing the subject’s clothing, hat, and shoes to red to match the flag in the background. That level of relational specificity - “to match the flag” - is something the model can now act on meaningfully. Be precise about what you want changed, reference other elements in the image for color or tone matching when relevant, and don’t abbreviate. The more context you give it, the less correction work you’ll do afterward.
Generative Fill text prompt field with descriptive clothing change instruction typed
This is where Firefly 5 shows its biggest leap forward. Rather than using shorthand or keyword-style prompts the way earlier models responded better to, you can write a full natural-language instruction - the kind of direction you’d actually give a retoucher or an on-set stylist. In the tutorial, the prompt describes changing the subject’s clothing, hat, and shoes to red to match the flag in the background. That level of relational specificity - “to match the flag” - is something the model can now act on meaningfully. Be precise about what you want changed, reference other elements in the image for color or tone matching when relevant, and don’t abbreviate. The more context you give it, the less correction work you’ll do afterward.
Step 5: Generate and Evaluate the Results
 Photoshop canvas showing generated result with updated subject clothing
Click Generate. Photoshop will process the request and return multiple variations you can cycle through in the Properties panel. Evaluate them at 100% zoom, not at fit-to-screen. Look at edges, look at fabric texture, look at how the generated color interacts with the existing lighting on the subject. Firefly 5 handles complex lighting scenarios considerably better than its predecessors - the image quality Aaron shows in the tutorial is not cherry-picked, it reflects what the model is genuinely capable of when prompted well.
Photoshop canvas showing generated result with updated subject clothing
Click Generate. Photoshop will process the request and return multiple variations you can cycle through in the Properties panel. Evaluate them at 100% zoom, not at fit-to-screen. Look at edges, look at fabric texture, look at how the generated color interacts with the existing lighting on the subject. Firefly 5 handles complex lighting scenarios considerably better than its predecessors - the image quality Aaron shows in the tutorial is not cherry-picked, it reflects what the model is genuinely capable of when prompted well.
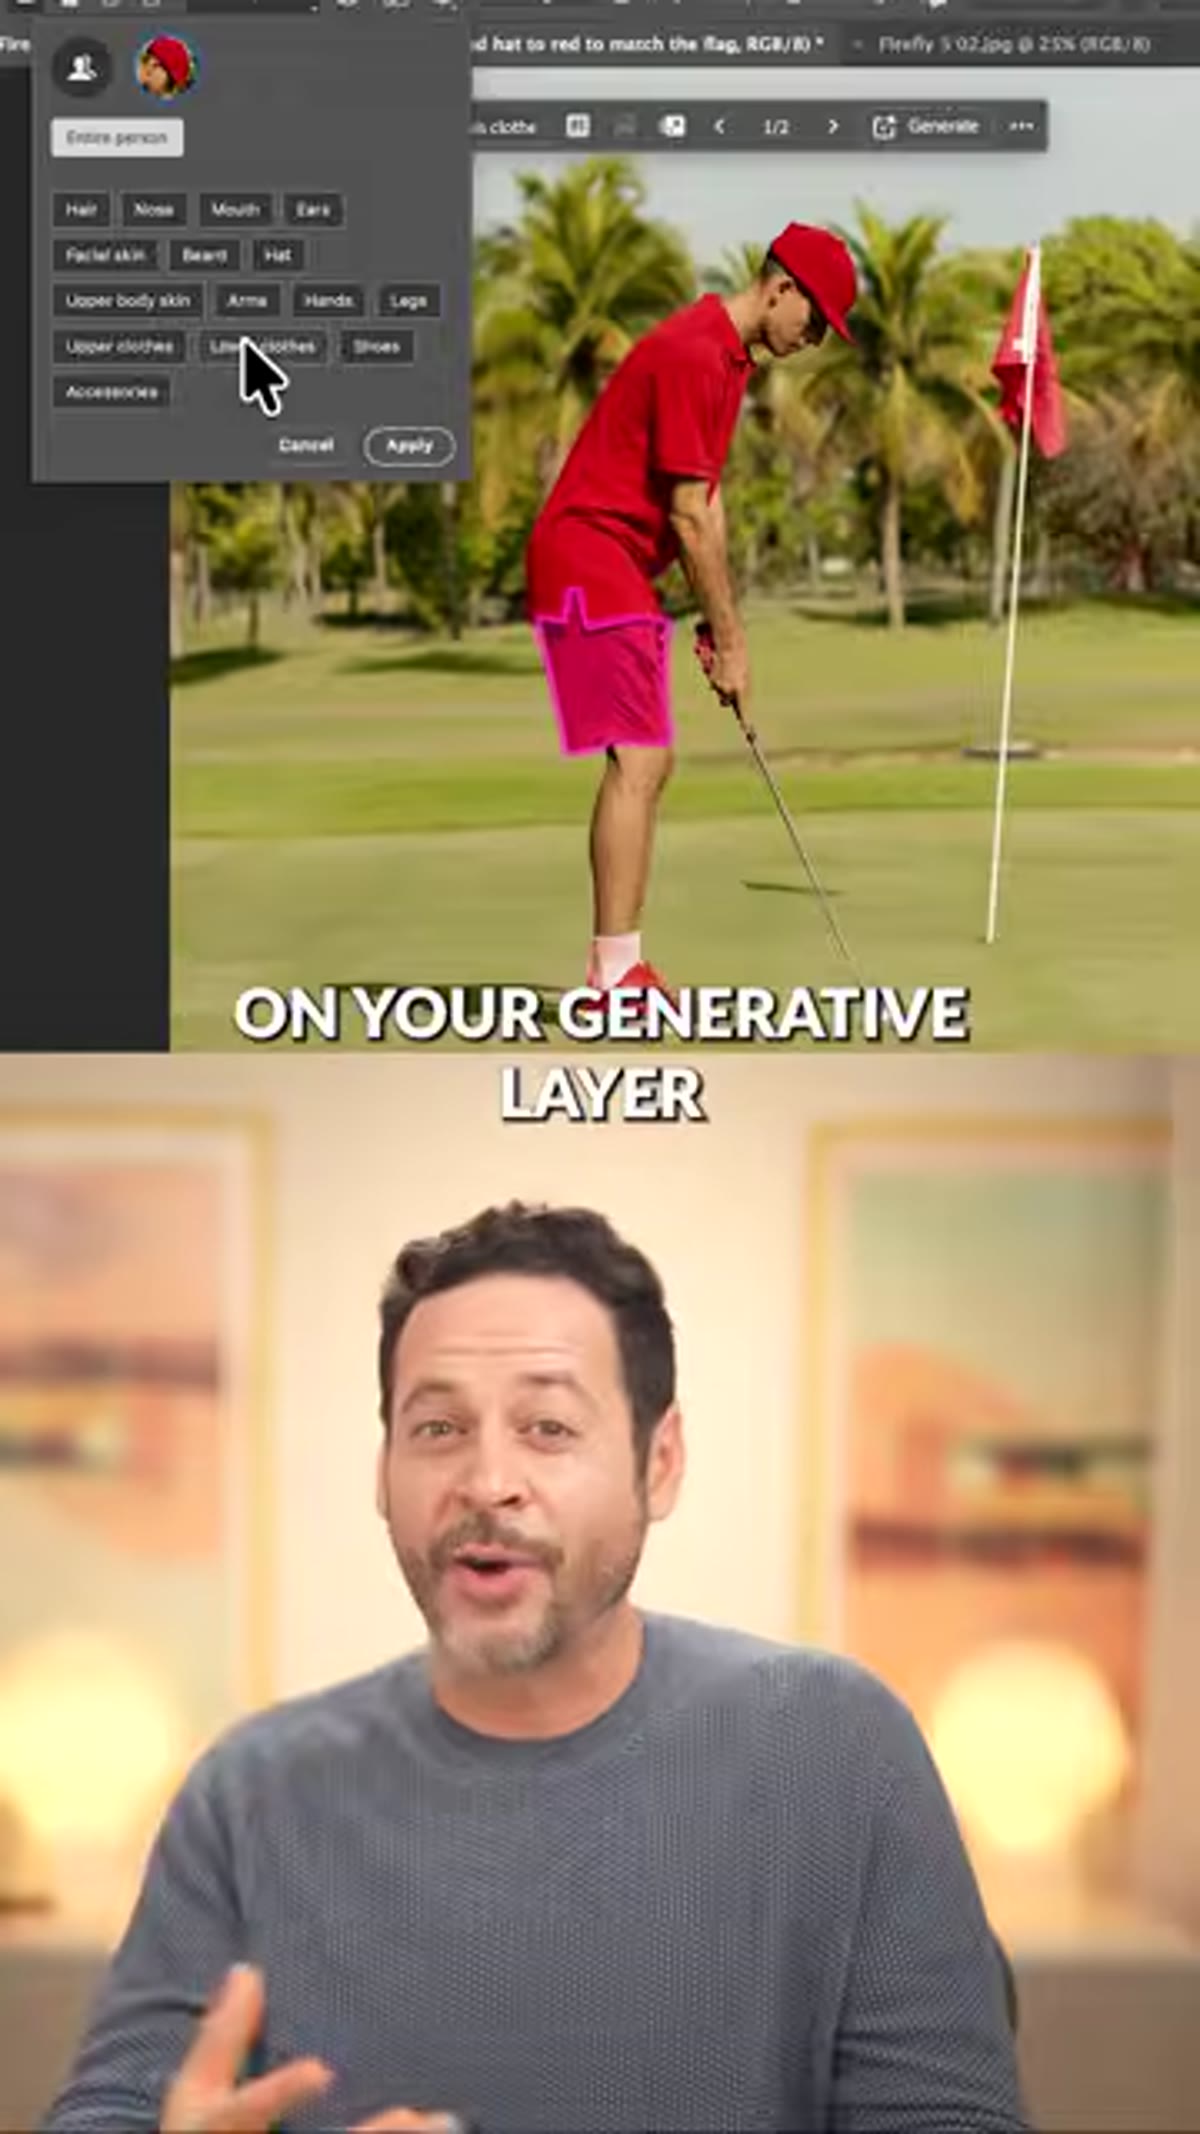
Step 6: Add a Layer Mask to Your Generative Layer
 Layers panel showing generative layer with layer mask applied
This is the step that separates a polished result from a lazy one, and it’s easy to skip when the AI output looks good at first glance. Your Generative Fill output lands on its own layer. Add a layer mask to that layer and paint back any areas where the generation affected parts of the image you didn’t intend to change. The original photograph remains untouched underneath, so you have full non-destructive control. Think of it exactly the way you’d think about masking a hand-painted color grade - the generation is your starting point, the mask is your precision tool. Never merge a generative layer down without going through this step first.
Layers panel showing generative layer with layer mask applied
This is the step that separates a polished result from a lazy one, and it’s easy to skip when the AI output looks good at first glance. Your Generative Fill output lands on its own layer. Add a layer mask to that layer and paint back any areas where the generation affected parts of the image you didn’t intend to change. The original photograph remains untouched underneath, so you have full non-destructive control. Think of it exactly the way you’d think about masking a hand-painted color grade - the generation is your starting point, the mask is your precision tool. Never merge a generative layer down without going through this step first.
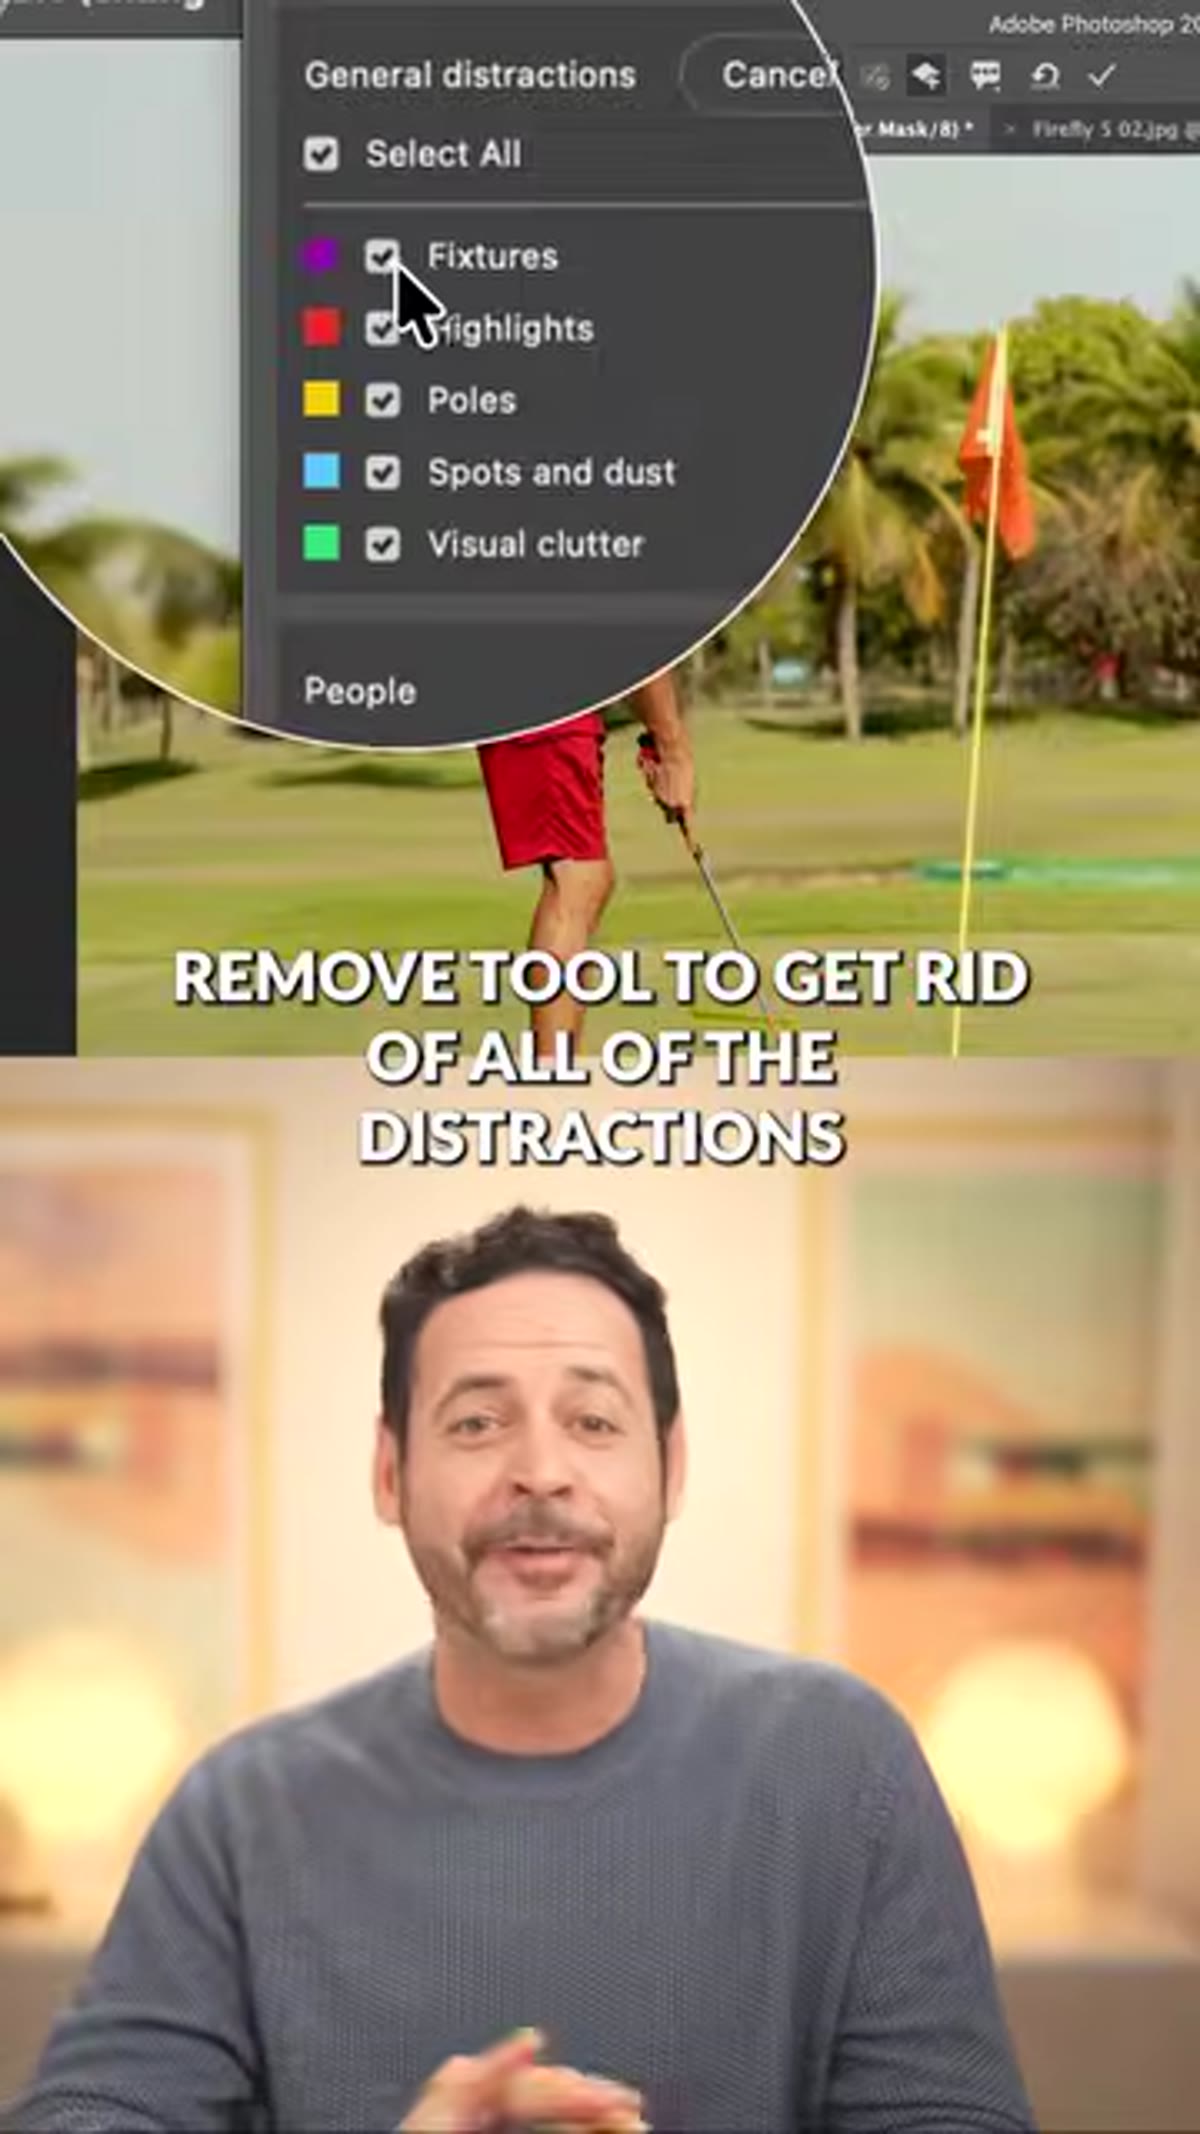
Step 7: Clean Up with the Remove Tool and Camera Raw
 Remove tool active in Photoshop toolbar, distractions being removed from background
Once the primary generation is locked in, use the Remove Tool to address any background distractions in a single pass. Then run a Adobe Camera Raw adjustment - either as a Smart Object filter on a flattened composite layer or through Camera Raw as a filter - to unify the tonal and color response across both the original photograph and the generative layer. This final Camera Raw pass is what makes generated elements look like they belong in the image rather than sitting on top of it.
Remove tool active in Photoshop toolbar, distractions being removed from background
Once the primary generation is locked in, use the Remove Tool to address any background distractions in a single pass. Then run a Adobe Camera Raw adjustment - either as a Smart Object filter on a flattened composite layer or through Camera Raw as a filter - to unify the tonal and color response across both the original photograph and the generative layer. This final Camera Raw pass is what makes generated elements look like they belong in the image rather than sitting on top of it.
One Thing I’d Add from My Own Workflow
The credit cost at 10 per generation means you want your prompt as tight as possible before you start generating, not after. My habit now is to duplicate the document, run one generation on the copy to check prompt accuracy, and then refine the prompt once before generating on the working file. It adds thirty seconds and can save you 30 to 50 credits on a session with multiple change requests. If you’re working on e-commerce shoots with product color variants - something I handle regularly for retail clients - that credit discipline compounds quickly across a batch.
The single most important thing to take away from this workflow is the layer mask step. Generative Fill is not a destructive replacement for your photograph - it’s a flexible, masked layer that you control. Treat it that way from the start and Firefly 5 becomes a genuinely professional tool. Skip the mask and you’re working without a net.
Watch the full tutorial on YouTube - PHLEARN also has a full step-by-step written version with a downloadable sample image if you want to follow along with the exact same file.
Comments (9)
Finally someone explains this in a way that actually makes sense.
Well explained. I think my audience would really benefit from this — mind if I link to it?
I've been looking for exactly this kind of tutorial. Perfect timing.
My workflow just got 10x faster. Not even kidding.
Love this. I referenced a similar technique in one of my recent posts. Always good to see other perspectives.
Just used this on a wedding shoot edit. Client was thrilled.
Great breakdown. The step-by-step approach really helps.
Quality content like this is rare. Keep it up.
The tip about firefly 5 generative fill is a was the missing piece for me. Thank you.
Leave a Comment